Blade Adjustment on Oswego Cutter?
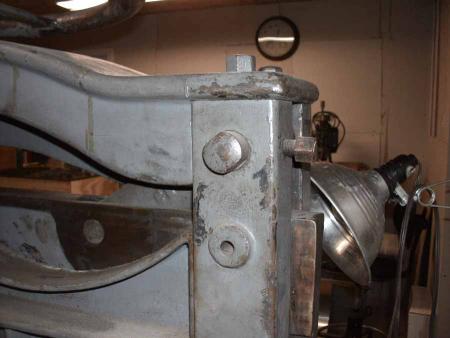
I recently got a 26 1/2” Oswego Machine Works made Brown & Carver Hand-Lever cutter and the blade is out of adjustment. The right side of the blade is cutting into the stick and the left side of the blade barely touches. I’ve talked to some people and was told the blade adjustment screws should be on the top of the blade. Well they’re not. See the last picture taken from the back.
There is, on the other hand, a square headed screw on either side of the cutter near the top. Could these be the adjustment screws? And if so, do I need to do something first before I start messing with them?
Thank you for any help you can provide.
CutterLeftSide.jpg
CutterRightSide.jpg

CutterBack.jpg
i would just loosen the blade bolts a little with the blade down then retighten them, i don’t think those bolts on top of the cutter will adjust the blade. if your blade isn’t coming down evenly you can try a strip of copy paper under the cutting stick where it isn’t hitting hard enough.
The square screws shown in the pic look lke they hold the pins in place .
Dick is probably correct on this unless there are a row of screws or bolts along the top of the knife carriage ,if present they will be designed to push the knife downward when tightened , if you have a hollow in the grinding of the blade then packing the low spot is all you can do as dick suggests .
One useful tip for all is to alwys have the machine set up with a tissue beneath the stick when you are going to fit a new blade . With new knife ready turn your stick to a fresh spot place in bed groove and place new knife in position ,lower carriage to bottom dead ,bolt the knife in place and raise carriage ,remove stick place tissue along the whole length of blade and replace stick, this way you have the lightest touch on the stick by the blade which will help keep the knife sharp, dont go heavier than tissue as you will want to add another tissue as the blade requires lowering and in the absence of proper adjusters this is probably the simplest way of “lowering” a knife.
always try to keep the underpack to the bare minimum or you may create a lip on the guillotine bed and when passing across the stick the bottom sheet may be caught and craesed.!
Is it too simple to suggest that the square screws under debate,are in actual fact all on the main frame and have no bearing on the positioning of the blade, surely any adjustment to the alignment of the blade necessitates contact, by the adjusters immediately adjacent to the top of the blade, and positioned on the blade carriage, and adjusted up and down as required especially when fitting a reground blade that is under size and has to have the bolt holes elongated, and I have seen blade bolts with tiny eccentric collars (killing 2 birds with one stone) i.e. secure the blade and give accurate adjustment, across the 3 ,4 or 5 securing bolts plus all the little suggestions as above.
Who Knows!! I have an Adast Guillotine from Chekoslavakia
1950’s i would say. It has adjusters on the mainframe and they adjust the two driving arms of the blade mechanism. They are marked with a plus and minus scale. hard to say with this but a torch and a good look inside the frame might be interesting. I’m taken by the idea that the squared nut might be a locking nut and the knob at the front in picture 1 might have the ability to take a spanner?
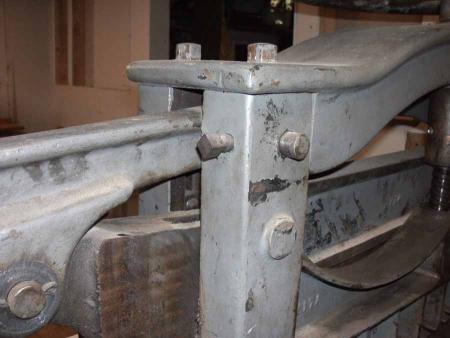
Ok, I have three votes for there not being any adjustment screws and the blade is just held on in the right position with the bolts. I have attached an image of them.
Unfortunately, the blade is way too off to be fixed by adjusting the stick. On the old side of the stick, from before I bought it, the blade had cut in more than 1/8” on the right side, trailing off to nothing on the left side.
Thank you everyone.
CutterStick.jpg
CutterFront.jpg
I would put my money on Lasimp’s answer. Looking at the top picture, perhaps the big pin with the two wrench flats, which is sticking out of the frame toward the viewer, is an eccentric shaft. Try loosening the hex bolt at the right so that the big pin can be rotated. Put a wrench on the big pin’s two wrench flats, and rotate the pin. It may move the connecting link between the frame and the blade holder, up or down. This would move the blade holder and blade up or down on one side, which may enable you to straighten the blade.
My suggestion doesnt suit this machine ,now you have put upthe pic of the front you see no elongation in the knife carriage bolt fixing point ,that said there must be since mentioned some form of tilt and height adjustment . Now looking at the new pic is that an adjuster in the front of the carriage that would lilt the left hand side then you will have to look to Locate an adjuster for dropping the knife downward across the whole length , sometimes this is as simple as a bolt that prevents the handle from reaching below a given point .
As your machine is already out of level there would be little harm in undoing the odd bit and seing what occurs !
I realize that this post is quite old but I thought I’d respond for anyone with a similar question. I just finished reassembling my Oswego 30” cutter. You’ll see a square head screw on both sides - they are both set screws for holding the pins in place. The one on the right is a straight pin so there is no adjustment to be made but the left pin has an eccentric allowing some adjustment (see the flats on the end of the pin to accommodate a wrench) There is a key on the inside end of the pin so I’m not sure how much adjustment you can get.
I haven’t installed the knife yet but will update if I have to adjust it.
Steve
Whistle Pig Press