Platen Back Spring In Need of Replacement?
Hello!
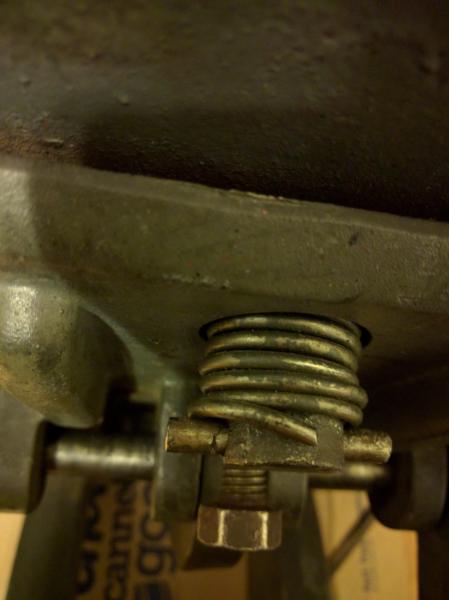
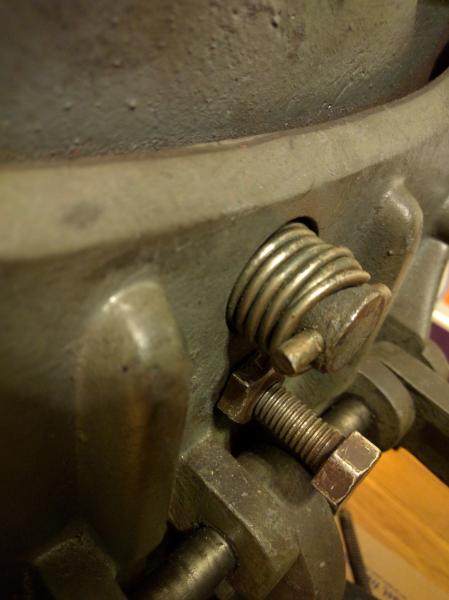
I have a Kelsey tabletop press that I have used a few times and produces reasonable impressions. This is my first press and I noticed that the platen back spring looks a little… warped? (photos attached)
It appears to be overlapping much more than I would ever expect a spring to be. The platen back is somewhat movable by hand against the spring so I am unsure of how much tension it is actually providing.
I have always been nervous about messing with the back spring too much especially since I don’t have the tools to compress a new spring in place.
Thoughts about the current spring and if I should be thinking about a replacement? Thoughts about the best way (or best person to help) replace the spring if needed?
IMG_20160313_190646.jpg
IMG_20160313_190731.jpg
What we have done many many tines in the past, (and still doing) in the absence of genuine replacements, for either One, Spring, Two springs, Three springs, sometimes even Four (many variations over the years)
Merely take the Platen proper to your local friendly Auto Repair shop, smile sweetly or drop a couple of *Greenbacks* on the service bay bench,, and be escorted to the Cylinder head repair section or the Scrap metal bay and acquire a whole handful of valve springs,?? nod to the *greenbacks* on the bench and your aforementioned Friendly Mechanic/Fitter will grind off and down a valve spring to suit your needs, i.e. phisical length, number of turns, (to give the compression strength you require) the bore size to fit the stub on your machine and include at least one substantial STEEL washer, to carry the thrust of the new spring,! your shots seem to show a very *Heath Robinson* previous attempt.
Would expect to see, at the very least, the existing spring abutting a steel washer, taking the thrust, on to the pictured Cotter Pin, Clevis Pin etc and more to the point, the last coil tempered and ground flat, as the inner end SHOULD BE, otherwise the rough end digs in to the base material of the Platen
It, the existing spring looks (as we would describe) coil bound and crude. May have been force of circumstances beforehand.
Good Luck.
*”*”*”* Auto Valve springs come in sizes, lengths and strengths, to suit virtually every requirement on Vintage Letterpress equipment, in many cases without any modification.!! >THE< Bert Munro, pointed that out to us in the Mid 50,s.*”*”*”*
Thanks, Mick!
Any tips on how to figure out what strength of spring I would need? How many turns, physical length?
Is there a best way to remove the existing spring? I am worried that it may fire off with a lot of force if I start unscrewing it.
Tom, follows just generalizations only:- the spring does not normally have to carry a lot of pressure just enough to keep the base in contact with the impression screws, before you dismantle and assuming there is free play on the adjuster bolt pictured, from the front of the press with 2 hands and *care* attempt to pull the whole sub assembly forward against the pressure of the spring, in this case it will only need 2 fingers pressure, even with a good (replaced) spring, you should still be able to overcome the new spring, with just modest pressure, akin to a strength test machine at as little as 15-20% (approx, of course) the spring only has to restrain the assembly up to the point of impression, proper.
From the apparent state of your existing spring, flying off will Not be a problem, pulling of the remains will probably be the difficult part***below, but in any case count the number of existing turns, treat that as a basic yardstick, determine what the full useable length of the stub would be, i.e. from the recess in the base, to the Clevis Pin.
Assume you end up with say 2” or 3” to accomodate any new spring, count or estimate how many turns in unrestrained or free form, would occupy that length, calculate and add at most 3 more turns, before cutting and tempering the last turn(s).
With any luck and a fair wind your Friendly Auto Engineer may be coerced.??
When you remove the old broken spring, examine the recess, looking for wear from the inner end of the lamentable spring, you will probably understand my *WASHERS* at both ends comment, it is a fact of life that compression springs automatically try to rotate end to end on the coils, we have and still do, fit Nylon Washers in addition to the steel, Nylon is a good friction free agent, as is a little blob of grease on the concealed end of the spring.
With any new spring in place, and even with a little experimenting, generally, you should end up with at least one coil thickness GAP between each compressed coil, as my >Coil bound Or broken< comment above.
If and when (hopefully) you are able to contact you Friendly Auto Engineer ask to be shown, An AUTO, Valve Spring compressor, it is in essence, a specialized *G* cramp, long reach/deep throat, will, with a little practice compress and fit your new spring, or talk to your Tool Hire Specialist.
***If you are still concerned re Flying Off tap the Clevis pin out with a long reach punch or drift (preferably length of brass or copper?) but with transparent shield covering the >Flight Path<??, piece of perspex, or transparent acrylic sheet and or Safety goggles.
Good Luck. Mick.
Thanks, Mick!
Will probably give it some time this weekend and let you know how it goes!
Best,
-Tom