Polymer plate issue - Not getting crisp edges
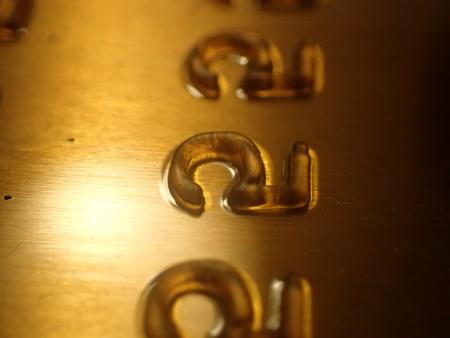
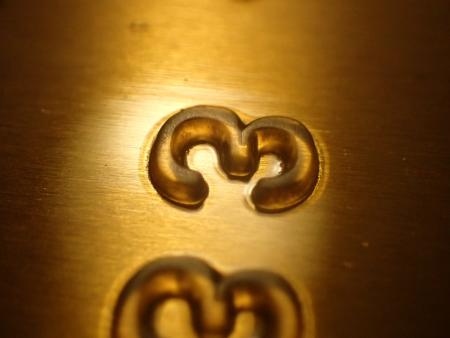
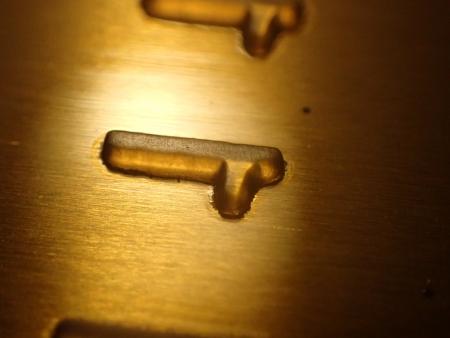
We recently picked up a vacuum exposure unit and some polymer metal backed plates to try out. It works but the numbers on the test piece appear to have rounded edges and not sure exactly what causes this. Does this look familiar to anyone with advice on what we could be doing wrong?
#1 was exposed for 1min40sec
#3 was exposed for 1min
#5 was exposed for 20sec
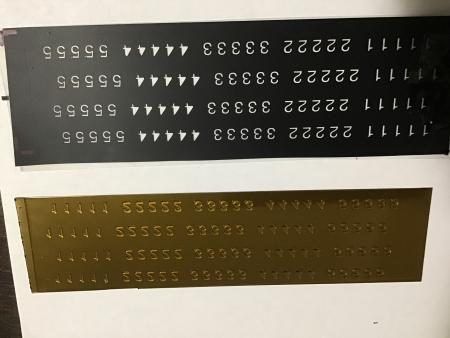
We tried to print some negatives on a Canon Inkjet printer but couldn’t get the negative opaque enough to use. So instead used a vinyl cutter with solid black vinyl, weeded out the numbers and attached the vinyl to a clean sheet of exposure film. The top side of the vinyl without the adhesive was directly touching polymer.
Some things we could be doing wrong but could be a combination.
-not using kreene
-not using the right brush to scrub the unexposed polymer (used a really soft really short bristle brush)
-bulbs could be the wrong spectrum (it’s written in Chinese)
I can go into further detail of the process we did if needed but maybe this stands out to someone as to what the main reason would be
Thanks in advance for any assistance!
0CBFD292-8DDF-4902-ABA7-B9AE6DFC27B3.jpeg
C0C13C8C-FF74-4FD6-9685-CB7D7A3E8E54.jpeg
2A4148AA-9761-4873-87B4-94D5593DB73B.jpeg
154E3E75-8B19-438C-BD66-C1CBE43C3228.jpeg
Blast from the past. But what do the *Good Ole Boys* with heads full of Monotype C**P know about such matters, except, that from a long time ago, it was stated that, for exposure purposes, there was/is a right side Up (or down) for the Emulsion on the Neg. ? ? ? Or something like that.!!
I would try doubling your exposure and maybe doubling it again if that looks any better. If you don’t know the output of the lamp and you don’t have the spec sheet for your polymer it would seem a reasonable experiment. I expose my plates for three and half minutes in our exposure unit. Also you will want to get a 21 step stouffer scale and lay that directly on the polymer when making your exposures. When the plate is finished the washout stage you will see a graphic of how much light has actually hit the plate and if you can get the spec sheet for your polymer that will inform you if you need to increase your exposure time. My polymer askes for a solid step 15 to 16 on the scale so if your seeing something really low like 9 or 10 then you probably need more light.
If you are processing the plate in a tray by hand I would get a horse hair shoe shine brush from the local drug store for washing out and use water from the cold tap only. Too hot water will damage the image starting with the edges.
You might try to obtain a high contrast film negative just to see if there is an issue with the method you are currently using. I don’t know where your located but you should be able to get a neg made from any trade plate maker for $20 and that would allow you to rule that out.
Best of luck.
Bruce
Hey Bryant-
Here is some advice I hope you find to be helpful.
Your plates probably have a Tech Data Sheet that will list optimal exposure times; depending on the wattage output of your exposure unit and the actual power vs lumen (light radiation energy) it can bathe your plates in during exposure, you will need to adjust exposure accordingly.
I have a system intended for PP plates made by an american co., Anderson and Vreeland; with the thinner plates, and close to new bulbs, I was exposing for about 3 minutes.
As the bulbs lost intensity or may materials lost intensity (due to age/shelf sitting), I had to increase this to 4-5 minutes.
It seems likely to me you’re undershooting the exposure times if the edges are rounded down to the floor of the plate, and possible that the polymer isn’t fully cured/is rounding out during washout.
Equally possible is your vacuum contact is not flattening out the plate and the film during exposure, and you could have inadequate contact if the exposed plate area look at all ‘larger’ than the artwork on the film; the light can ‘scatter’, which rounds out detail edges.
I’d recommend a 3 minute exposure first, to see if the exposure is the problem.
If it persists, I’d try increasing vacuum pressure or sealing any leaks in the system. Or replacing pump. Or running air-strings (pieces of literal string) from the draw point (where air escapes the contact frame, to the vacuum) to the edges of the plate, thus making the air pressure equalize more efficiently/increasing draw/decreasing resistance against draw. (sometimes blankets can suck down and then impede airflow/air escape, cause bubbles in the contact area).
Lots of variables here. Think through it logically and keep coming here with observations and I’m sure you can get it sorted and be making plates in time.
I admit to not having read Bruce’s post, Bruce you are on the money too with your advice, IMO- I just echoed some of his sentiments. I have been trying to respond directly of late without reading the thread, and giving comments from my own experience/mind, then correlating with the ‘good ol boys’ like Mick and Bruce (though I’m much younger than you, Mick!)
Haven P. Begin to suspect that You tend to be economical with the facts/truth when commenting about My age in relation to Your good self, OR You have lived life in the Fast (print related) LANE at Time and a Half. Any new devotee that looks in to Your profile and back posts, ought to be able to establish that fact
In the words of my all time Hero - Buddy Holly! RAVE ON.
My record collection includes 12” L.P.s - 7” 45,s even 10” 78,s (shellac rather than Vinyl) on *Coral* records.
My Daughter is christened Maria Elana.
Possibly in the near future, could well post on B.P. (first) a Monotype Matrix case, in 15 x 17 row format, 10 Pt Times, but it will NOT be for cash, just a handful of 12” L.P.s with Pristine Artwork.
Sounds expensive YES, BUT, the Monotype Diecase is probably the only one in the World that has every mat with *Nickle Plated Faces* = Last Ditch experiment before the Demise, that never reached the trade, sadly.
Haven, Thanks. Non intended.? Mick.
just for the record the Code in My driving license incorporates 22/02/1939
But please NO hijacking AIR FORCE ONE for just one Buddy Holly L.P. T****y, may not appreciate it. unless He rides shotgun and drops in on H.M. The Q. for a *Nice Cup of Tea, we believe He got, Cold Shouldered last time.
Of course He could give our Theresa May - P.M - little Moral Support. In Her time of need. ?
Much better! Thanks for all the advice above :)
I was following the best tutorial I could find on “silverclayart” but there was some advice that likely caused some issues such as using warm water and the timing for exposures of the test piece (20sec increments) . We don’t have a Stouffer scale so this number test seems like a workaround.
Anyways, I messed up the timing today on the new test piece. Instead of exposing them from 3min to 4min30sec I did things kinda backwards. The 4min30sec exposure at least appears much sharper than the first attempt
We don’t have the spec sheet or know the brand of plates, they came with the exposure unit wrapped in Chinese newspaper. I guess we could ask the guy that sold it to us.
Good call on the horse hair shoe shine brush! I will try to find one of those tomorrow. Currently I am using a painters edging pad refill. They’re cheap and have a big surface of really soft brushes, only thing is the bristles are so short so need to be extra light with the pressure.
Next challenge is getting one of our printers (Canon or HP) to print solid black enough or someone that could provide a quick turnaround with shipping to Canada. Tried a handful of local print shops but no luck.
Thanks again for being such a helpful community and chat soon
DC17042A-81B3-4903-A08C-399CC420E24E.jpeg
Your picture today looks much improved!
You can order a stouffer scale from any company that sells high contrast film or any photopolymer or photoengraving products. I imagine Briar press, the company that runs this web site would have them. The scale is really very important to have and to use to solve your basic exposure issues with polymer platemaking. One day everything will be great and the next day the image will be terrible and you’ll be scratching your head without the scale to troubleshoot the issue. Also each batch of polymer you order might be a little faster or slower so it’s good to test the first plate you make from each new package.
As far as the instruction sheet goes, if there’s nothing on the packaging and the seller can’t help you may be stuck. But if the seller can supply you manufacturers name and product ID number code there’s a chance you can google and find it. Some manufacturers have the spec sheet on a server you can just download.
At some point you will need to order new polymer so look for a supplier for the type of polymer you need and when you place an order make sure you ask for the instructions. The information should include exposure, washout times and water temperature, post exposure times, hardness, finest line and dot, and proper solvents for cleaning, so very good to have.
A stouffer scale is available from Williamson’s Printing materials in Grimsby ON. They also supply plate materials.
Have not found an inkjet that will give the proper density for a negative. For a quick check have used what rubber stamp people have used, available from Jackson Marking Products a one step negative product called Daylight Safe negative material. Reverse image on vellum and expose then use a developer. dry and then use to expose your plate.
John
Thanks Bruce. Will add a Stouffer scale to the list of needs instead of wants :)
And looking forward to a batch of fresh photopolymer with instructions. Williamson actually has a distributor out West and have been in contact. As of yet we’re not sure what thickness or backing to go with until we can get a feel for what it’s like.
The Canon inkjet as of right now doesn’t appear capable, at least with the ink in it. The HP with eBay refill ink from a bottle with a syringe printed borderline black enough but the cartridge is old and needs to be replaced with a proper one instead of the “one time use” stock cartridge. It was dry for quite a while
Here’s the HP officejet sample with a smeared looking square. It about all the ink I could coax out of it last night. The parts with good density could have provided enough blocking….Maybe a chance it will work with a new cartridge? If not will look further into that daylight safe negative.
Appreciate the tips ;)
Bryant
9068B16B-E3CC-4206-BC60-3D2DEFAB5DB1.jpeg
The plate looked pretty good. I don’t make my own plates so my answer is more guess than fact. Two things I did not see mentioned by the folks who know up above. Cut vinyl has a thicker composite edge than regular neg film. You may be getting some unwanted shadow, light deflection or lack compression along the cut area. You may want to order a piece of film made from the same file you cut the vinyl from. Burn a plate side by side with both and see if there is any difference. I also think no kreen might add to the problem. I think the kreen defuses the light which might solve the edge problem. I am lucky and have a film output source close by. They even have the thicker film which I have been told screen printer like. I will interested to see how this works for you.
I have had success with a product called Pictorico and an inkjet printer. It reacts to the inkjet ink and does a nice solid black. You want a fairly high-res printer though, as it can show the little back and forth lines of the ink being laid down on the film..gives everything just a hint of a jagged edge.