Trying to make my own aluminium dies for hot foil at home
Hi everyone, i’ve been doing a lot of experiments trying to make my own hot foil dies at home but everything i’ve tried so far is failing and was wondering if anyone could help
I’m using:
Aluminium plate
Liquid Photoresist
Copper Sulphate + Sodium Chloride Method
The big problems i’m having with etching metal are:
1 - the resist wont hold up long enough to achieve a deep etch (im looking to get around 1mm-1.5mm)
2 - the resist holds up long enough but there is so much undercutting I lose all detail.
As you can see from the image below, this etch is only about 0.5mm deep and its already had some undercutting and the lines and not crisp at all.
I have also tried photopolymer plates and they need to be heated up to around 160c on my press and soon start to breakdown.
I would really love to be able to do the metal etching myself at home. Does anyone do this type of stuff at home?
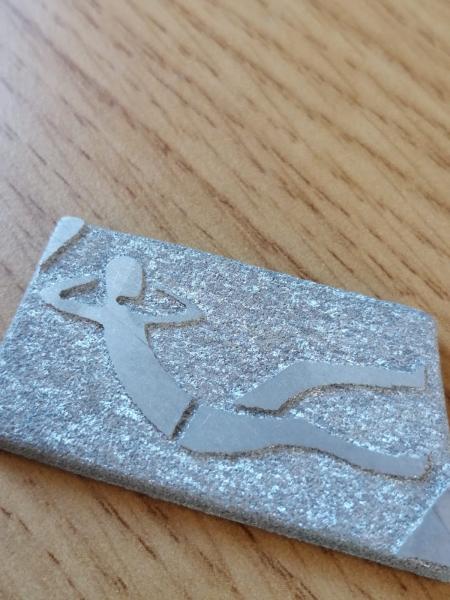
Etch Test
Typically copper or magnesium are the perfered metals.
They are easier to etch and there are tons of books about it.
If you want to keep at it with aluminum your going to be experimenting a lot.
If I remember right copper sulfate and aluminum is a fairly exothermic reaction, the heat might be destroying your resist. You could try putting your plate and etchant in the freezer before and during the reaction to slow it down and cut the heat out.
I wanted to stay away from copper and magnesium because of the chemicals used and that copper and mag are much more expensive.
The photoresist seems to be holding up now, i let it dry overnight and post cured it for much longer. The last test I did the problem was undercutting and jagged lines.
Something that I have been experimenting with a little bit is Electro Etching. I’ll link below an article that goes through the details in more depth but.. by reverse electroplating, and drawing the material from your plate in an electrolyte (table salt for aluminum) you’re able to create some fairly strong etches using nothing more than some electricity and time. As long as you stay below about 8 or 9 volts, you also aren’t producing any off gassing too.
The big benefit is due to the fact that there will be no undercutting as the electricity needs a clear line of sight to pull the material away, creating lovely shoulders.
I was using sign vinyl cut to shape as a resist, and it was holding up beautifully.
http://www.ethicalmaking.org/wp-content/uploads/2017/09/Electrolytic-Etc...
Thanks for the info and PDF i think this definitely could be viable.
Do you have any samples of deep etching achieved with this method?
Have you considered just machining the aluminum with a CNC mill?
Copper sulfate is not super great for plant life or fish if dangerous chemicals are your concern.
Undercutting and jagged lines are all things that people have worked out how to mitigate in copper, brass, and magnesium. I would suggest reading up those techniques there is probably some good tips in some old technical books.
I can tell you that photographic polymer based resists are much more robust when it comes to sticking to the base metal. It might be time to consider buying some sheets of photoresist and using negatives to expose the image on to your plates
Books such as the technician manual by Hunter Penrose describe ye ancient practise of rolling and deepening …4 way brush techniques with dragons blood powder etc…basically surface roll the plate after a while with a press black ink and repeat….I would use progressively softer rollers with more pressure to force the ink over the edges to create shoulders…. H and P also states roll ink on then sprinkle with bitumen powder evenly over to cover …knock off where it is not stuck to the ink then fuse that on each time ……
Tried the electro etching approach. 7 hour etch @ 2v
Still get undercutting which is very frustrating :(
WhatsApp Image 2019-03-04 at 14.57.29.jpeg
Re CNC - Im trying to do this at home so dont have access to a CNC, i think this is what most die makers use these days but really this whole experiment was to try and produce the dies at home with minimal equipment.
Re dragons blood - I cant find much about this process and it seems incredibly time consuming and im not too sure what rollers are needed so i’ll skip this method but thanks for the info
The way that modern magnesium and zinc dies are photoetched is with a solution called “additive” that is added to the nitric acid bath.
It’s something very strange with a special fat that has the property to stick to the shoulders and thus make the etching occur at an angle.
Depending on the proportion of nitric acid and “additive” (different additive for magnesium than for zinc), and the temperature will be the resulting angle.
For etching aluminium, I don’t think there’s an “additive”, since that’s not standard in the die photoetching industry.
Be aware that this stuff is highly toxic and requires special disposal facilities and it’s not cheap. You can only buy it in 5gal pails. This is also best used with at least a home-made bath agitator.
Here’s the best video I’ve seen on the subject (it’s in spanish, though) https://www.youtube.com/watch?v=NW6KCz9-nh4
Also, your best bet would be to work with presensitized magnesium plates, you just expose, develop and that emulsion readily resists the nitric acid.
20130402154729533.jpg
I seem to remember reading shoulderless etching was at 80°F……having spent a life doing etching for printmaking was not at all tempted even with extraction…. angles of the nitric being sprayed at the plate controlled the shoulder angle ……honestly surface rolling a plate with press black is worth a try considering the simple shapes you are working with…..even painting the edges with stop out varnish.
Thanks very much enriquevw for the information and the link to that video, ive seen it before in my initial research and haven’t got a clue what hes doing but the results do look amazing :)
Nitric acid is definitely not something I will be touching, especially as I’m doing this stuff at home so this process he is using is definitely out of the question for me :(
I think realistically its not possible to accurately etch plates to such depths it seems, especially for fine details such as type etc.
I think the only possible alternative I could do at home is to use a CNC machine but its not something I have access to.
Hi thisdesignedthat, The first picture doesn’t look too bad as an experiment. You got some good depth, just a lot of undercutting. That’s going to happen if you have nothing to protect the shoulders so I think you can make this work.
I make engravings in steel for the engraved stationary industry. I work at home with no etching machines. I use very small amounts of a prepared nitric acid solution designed for steel.
If I’m working on a coat of arms and I need to etch the shield down I first cut or etch an outline on the metal. Then I use a special wax and melt it into the cut line. When the metal is cool again I use a fine charcoal and water to clean the surface of the metal. Then I poor a chip out ground and prepare that. Chip out ground is very hard and will protect the metal from most acids very nicely. Chip out is also brittle so I can scratch away areas of ground and expose the metal for etching.
During etching as the acid cuts into the metal the wax that I melted into the lines will protect the shoulder until the etch gets deeper then the line I originally cut. At that point if you want to go deeper you would need to stop etching and paint the sides with more resist, let it dry and then continue etching.
I have two pictures on my phone I can show you, one shows lines cut in metal, you can’t see the wax in the lines, and the chip out ground ready to scratch the areas to be etched. The second picture shows the finished product. When you look at the shoulder inside the shield, that part has been finished with an exact angle by hand so you can no longer see what the etch itself looked like, but it does work. To get the depth you need you may need to alter the original artwork somewhat to end up with the exact shapes you need.
I realize this isn’t a full explaination but I wanted to show a way that it could be done. If you need further information I’d be happy to provide.
Bruce
finished piece.JPG
outlines cut with chip out.JPG
Hi thisdesignedthat,
So I wasn’t sure if you didn’t see my previous post or if you thought maybe it wouldn’t work or maybe I wasn’t very clear but I think this will work for you. I’ve posted a picture to illustrate better what I’m saying. Number 1 shows that the figure must be made as an outline. The outline must be drawn outside the actual figure and the spacing used and the thickness of the line will depend on the amount of spread (red) you get when you etch the line, see pic (etch close). You can control the spread to some extent by adjusting the length of time of the etch, the strength of the etching solution and the temperature of the etching operation. Number 2 shows the outline as it would be, ready to make a film. Number 3 shows how you would expect the etch to appear on the metal with red being the resist. Number 4 shows the resulting etched line filled with wax (orange) and the resist now only covering the figure. Number 5 shows how the wax can protect the shoulder from undercutting during the main etching operation.
I hope this is helpful or gives you some ideas on how to proceed.
Bruce
etch close.JPG
etch 1.JPG
Now in the past, to make a line block by hand, normally in zinc, having printed down the image into a photo-resist, and then taken a straight first acid bite for a few thous down, to prevent undercutting one went in for ”four way powdering”. One had two tools, a hot plate, and a wide very soft brush. One put so called ‘dragons blood’ (powdered bitumen) onto the plate and brushed gently in one direction only , A little powder remained on one side only of the beginning image , one then placed the plate on the heated surface and the powder melted against that side. Process was repeated three more times, with the result being that say a dot had little slopes of acid resistant powder fuzed against all four sides, in practise all round. One then did an acid pass, and as required repeated the process to get the depth wanted. . Slow but it worked and was a commonplace.
Hi harrildplaten,
I think dragons blood is still available and I agree with you that it is a viable route to go. In my career I mostly used the method that I’ve out lined above for additive free etching and it has served me well so I have tried to present it as a fairly easy alternative. It does require the wax and the chipout ground but they are available and it does require at least 2 etches like dragons blood. But hey the further back in time technologically you go the longer things like this took to do. If you wanted to get a certain type of process to work you had to use a certain method and follow all the little steps.
Best
Bruce cpd…..very interesting indeed.
Bruce - thanks for that explanation, i dont entirely understand it if i’m being honest and worry how it would work with text. The shape that I test etched was really just a basic shape I have more more complicated designs I’d like to foil in the future as well as text.
HP - looks very interesting method, i’ve tried to find youtube tutorials and cant find anything on this method either.
Is this the stuff that is needed? https://www.indigo-herbs.co.uk/shop/buy/dragons-blood-incense-product
The chipout method is perhaps less desirable for complicated and small shapes like text if you don’t have the time or motivation for lots of detailed work, but might save you some time on images similar to your test figure. You would need to evaluate each image for it’s appropriate method as you get more experience.
The dragons blood incense may be the same material but may not be a fine powder. I have some dragons blood incense and it is sold and used as small rocks for use with a charcoal burner. You might be able to get the incense and crush it to powder yourself.
I have not used the dragons blood etching method but it was described to me by an insructor during my apprenticeship.
The dragons blood must be the finest powder. It is put into a sealed box. When the plate has been prepared and has had it’s first etch and is ready for the application the box is shaken vigorously for a while to create a fog of dragons blood dust inside the box. The box is left still for a few moments so that the larger particles can fall. Then the plate is carefully inserted through a small side opening with a spatula into the center of the box and is left for an approprate time so that it gets evenly coated with the finest particles of dust. The plate is carefully removed and using a wide brush in one direction the dust particles are pushed up, or banked, against the edges of the etched metal to coat the sidewall or shoulder of the etch. The plate is then heated on a hot plate to melt the dragons blood in place. This process is repeated 3 more times in the same manner except that the plate is brushed in a different direction each time to get all the exposed shoulders coated. The plate is then examined under a lens and any metal still exposed is touched up with resist by hand. If your original resist is not completely reliable you may need to paint out the image itself to protect it. Then the plate can be etched again to a greater depth and the shoulders will be protected.
This method was commonly used before the intoduction of mag and copper chemical etching processes which are called “powderless” etching to this day to promote the ease of their use.
There are books touching on the subject using search terms “Dragons Blood etching instructions” in google books directories, not to be confused with the many fantasy titles out there.
Bruce
Here is some info on Dragons Blood.
best james
img125.jpg
Photo-engraving Primer: Concise Instructions for Apprentice Engravers Or for …
By Stephen Henry Horgan 1920
This title has been scanned and is free to read online.
Thanks for the reference material. Shame there is no video on the process.
I’ve just got my hands on some dragons blood, have no idea what i’m doing but will report back soon with some results :)
Well I’m really surprised by the results so far…..IT ACTUALLY WORKS
Its very difficult brushing the powder and I want to test it with text to see how it hold up but so far I have hardly any undercutting and parts that I didnt coat in resin are undercutting quite a lot now. Will update soon with final results
i cant believe its working!
WhatsApp Image 2019-03-26 at 14.07.43 (1).jpeg
WhatsApp Image 2019-03-26 at 14.07.43.jpeg