C & P Pilot 6.5x10 repair help
Hi everyone, I’ve looked through posts to see if this has been discussed already and couldn’t find much. I am getting an old C & P 6.5x10 back to working order. I have a few questions, and pictures so you see what I’m referring to.
First is about the ink disc:
The ink disc has some rust on it and is fairly rough. This needs to be a precision part. Sanding doesn’t seem like the proper solution. What should be done to get the ink disc in working order?
Second is about the Saddles:
The saddles have a significant amount of wiggle room. I can rotate the saddles slightly left and right. I know it needs to move up and down and pivot on the saddle rod for the rollers to function properly, but the left and right direction doesn’t seem correct. Is the saddle broken? How can I fix it if it’s broken?
Third is about the roller stock:
One roller stock is longer than the other. Is this correct?
Lastly:
where can I get various replacement pins. I’m missing quite a few.
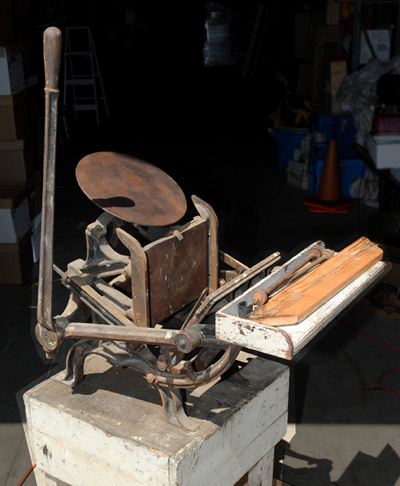
The Press in its rust covered glory
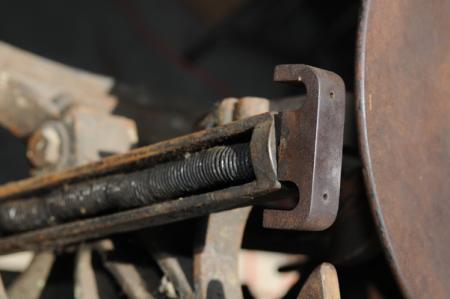
One of the saddles

the ink disc
From what i can see here in these photos, this looks to be in pretty good shape. Just a bit of work and this press will look and probably print great.
Do you have new rollers to try out the saddles? Do you have old roller cores that need re-surfacing? You might have mismatched roller cores. Is this your first press?
i think a fine steel wool on the ink disc is all that is needed, the saddles look ok, the rollers should be the same, for replacement parts i would try Excelsior Press in New Jersey, his contact info is in the yellow pages on this site, he might be able to help you, Good Luck Dick G.
Oh, and sanding the disc is really the way to go. Get yourself a power drill, attach a wire brush cup to it, get some WD-40 to spray on the disc, and go to town! You can then finish it off with steel wool when you finish with the wire brush.
It won’t hurt the ink disc a bit. I have done it to all the presses i have refurbished and i have never had any problems.
Better yet, if you have a bench grinder that has a wire brush wheel on it, that is the best way to go. Just make sure you wear work gloves and eye protection.
my ink disc was in a similar condition. Before using any abrasives, I would get some lemon juice and vinegar and fill a bucket with enough of it to fit the ink disc in. then just let it soak for an hour or so… move it around a bit too… and then you can see how much damage there really is.
Here are a few of my before and after shots from cleaning up my Pilot…
http://mlkandtoast.posterous.com/getting-there-52
Hi Milk and Toast-
Do you mind me asking what you used to clean off your press? You did a great job keeping the integrity of the original pin-striping! Are you using an engine cleaner, or some kind of household product? The presses i have helped restore have for the most part been too far gone, and i have had to repaint them, but if you have any recommendations on what one can use to keep the original paint job but remove the years of ink and grease, i would appreciate it.
Donald-
Thanks!
On the Press I used WD40 and a scotchbrite green scrubby pad. The key is the amount of pressure. I used a little too much in some areas and made the paint come off.
Light Pressure & Patience is key!
I would not use a bench grinder with a wire brush — I’ve had them snatch stuff out of my hands and you definitely don’t want the ink disc shooting across the room! Sanding is also not a good solution — it can remove metal along with the rust and the disc needs to be an even plane to transfer ink evenly. The rotary wire or fiber-bristle brush in a hand drill is a good way to go — and you can put a coarse steel wool pad under it to clean the rust off without removing bare metal, then switch to fine steel wool to finish. The saddles rotating a little is not a problem — the roller cores will keep them straight. Depending on what kind of pins and what size, a good hardware store should have roll pins in various sizes to match your needs. They can be pressed in with a C-clamp or slip-joint pliers.
Bob
Any kind of a wire brush is going to leave scratches in the metal surface which you will then have to remove using finer and finer abrasive surfaces. Using a power tool to do the work gives you little control of depth of cut, and can seriously damage the flat surface of the ink plate. Unless there is pitting in your affected areas, I would try a more conservative approach using a fine crocus cloth, wrapped around a machinist’s surfacing block, and use cutting oil that will lift the particles off of the cutting surface. You really want the ink plate to remain as flat as possible. Steel wool is bad to use around any kind of machinery (it was great when that’s all there was), but there are different grades of Scotch-Brite pads, and you can find really fine ones at auto paint suppliers.
Paul
I agree about not using the wire wheel brush on machined parts. I prefer to use an orbital sander with extra fine wet dry sandpaper lubricated with WD40. This way the rust desolves and the metal shines but with minimal damage to the casting.
I don’t like steel wool either. Scotch-Brite pads with WD40 work just as well or maybe even better.
On non-machine parts, I don’t mind using the wire wheel on my grinder or on a drill. This can greatly expedite the cleaning process. If I am restoring machinery of this vintage, I just plan on repainting. I really like the enamel paint that is sold for tractors. It is super hard when cured.
I can understand your concerns with the disc flying off and hitting someone, but i am doing this in a shop equipped with the proper gear, and i practice safety when using this stuff. I can assure everyone here that the wire brush and the equipment that i have been using doesn’t leave damaging marks on the discs that i have refurbished. The discs that i have brought back to a smooth perfect shine all started out caked in rust. Doing it this way hasn’t affected the printing on the Pilot i just brought back from being a hulk of rust. In fact, i just finished printing a wedding invitation on this press a couple of weeks back and there were no problems with how the rollers made contact with the ink disc, or anything else i restored on this press. I had the usual back and forth with make-ready, but that is to be expected on any tabletop…
sarah_wedding_cards_a.jpg
Everyone. Thank you thank you thank you. reading these comments have really helped me out. I will try the wire brush cup and steel wool if a finer less abrasive approach does not work. First of I will do the vinegar and lemon juice bath with wd-40 and scotchbrite or steel wool pad.
This is my first press. I put the roller cores in the saddles and realized since one is longer than the other, it’s pushing one end of the saddles out. The longer saddle core doesn’t fit well and in tern makes the shorter one too snug. should they be the same size? Also, I don’t have any rollers.
I’ll post updates and I’m sure I’ll have more questions.
—
Garrett
i think na graphics sells rollers, i’d give them a try. Dick G.
Oh, and thank you for the references to places that sell parts etc.
Garretth -
For years, I have endorsed simple WD-40 and Scotch Brite pads. But now I have found better ways to clean a rusty ink table.
I have used the vinegar/lime juice (4:1) mixture to great success in cleaning ink tables - many of them. I let them sit in a bath overnight and voila! like new.
When I’m in a rush - as I was last night working on an 8x12 - or don’t want to bother making up a large bath - I use a thick, coarse Scotch Brite pad and spray some Prep ‘n Etch directly onto the table, then scrub for about 5 minutes until the plate is clean. Then I spray it with some water to dilute the P&E, and follow-up with a final coating of WD-40 to protect the now bare metal.
Prep ‘n Etch is an acidic product available at Home Depot They also have thick, coarse Scotch Brite pads. I pour some P&E into an old spray bottle and spray it right onto the surface. I find that works well. I also wear gloves - rubber gloves are best if you take this route.
Also - for smaller ink tables - tables that I can fit into my lathe, I find a short spell with a fine grit sanding block, followed by some wet-oil polishing with Scotch Brite makes the table look - and work - just like new.
- Alan
Garretth -
I have the same press - an early Series Pilot - and have looked in these roller issues in depth. I think I can help you.
Can you post some close-up photos of your ink rollers?
Are they orginal?
Do you have trucks?
Can you tell us the diameter of the cores you have?
Are the shafts pinched for locking trucks?
I bought a set of rollers once that were advertised as being for the Pilot, but were actually of a smaller diameter.
Kelsey 6x10 rollers will fit the Pilot, but are cast on smaller shafts and the rubber is smaller as well. The Pilot will print better with the original diameter rollers and the roller action will be smoother with the correct diameter cores.
Let us know more about the cores you have. We may be able to help you with rollers.
- Alan
I used to use any oil that was handy (including WD-40) until a machinist gave me some cutting oil. The difference is like night and day in the ease of rust removal.
Paul
I ended up doing the vinegar/ lemon bath. It’s worked great so far, and wd-40 to coat the bare metal. After a close inspection of the roller cores I found they are ok. The small space in the roller truck was not lined up with the notch on the roller core, and therefore a cm or so off. When I repositioned the truck, it was a match. Thanks Alan Runfeldt. Reading your post helped me know sort of what to look for. And thanks again everyone, you’ve all been a great help. Now to give some more parts a good bath.
Garrett
Hi everyone. I’ve removed the rust from the ink disc. There are scratches that I noticed after I removed the rust. Is this going to be a problem? I haven’t sanded it or used a major abrasive on it.
Here is a photo…
Are the small scratches on ink disc ok?
It would be nice to have a perfectly smooth ink disc just as it came from the factory. You could take it to a machine shop and have it turned in a lathe to accomplish that. It would look very pretty. It will cost appropriately for the machining.
Just put some ink on the press and start printing. My guess is that it will be OK. That is the true test.
If it does print OK, you are going to have to be careful and do a very thorough wash up, especially when changing to a lighter color ink. Those scratches want to keep the ink in them.
Thanks inky. I’ll go the machine shop route as a last resort. I will try running it first of course. I am only able to work on this project a few times a week, and as I complete more of it i’ll post updates, (and probably more questions). thanks again everyone.