Help with SP-15 Roller Wheel and Securing Tympan
Hi - I just received my new rollers and set up the press for the very first time. Here are my troubles:
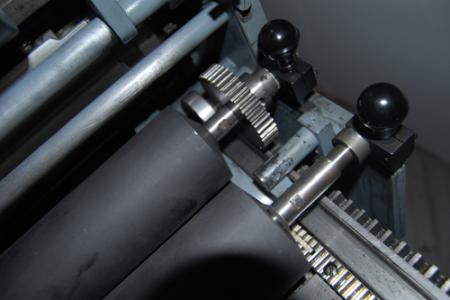
1) No matter how I position the gear/wheel on the back roller, I cannot get it to fit correctly. (First screenshot below.) I know that the gear/wheel should be left of the cylinder piece on the right side of the press, but there is no way to get both sides of the roller in the right position and flat against the base cylinder. I did remove this gear/wheel and was able to print just fine. Do I need it?
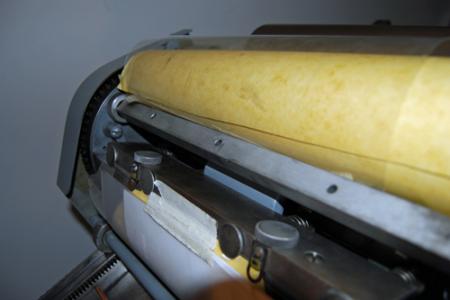
2) I tried to set up the tympan.mylar, but I have two problems. First, I have no idea how to secure the tympan at the end. I see there are three holes (second screenshot below), but I have nothing to put in them. What do I use?
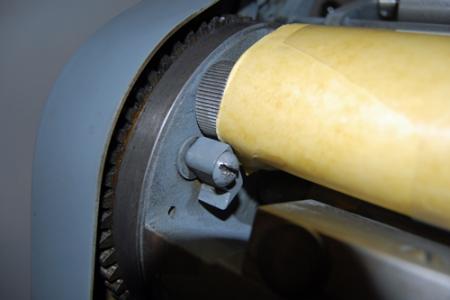
3) Second tympan issue - there is a lever/screw (third screenshot below) that I assume is supposed to keep the tympan tight and in place, but it moves and will not stay no matter what I do. How do I secure the packing once I’ve tightened it?
Thanks!
Kimberly
070310_61872.jpg
070310_6189.jpg
070310_6188.jpg
On no. 3 the sharp end of what you’re calling a lever swings around and fits into the ridges of that gear and if the tympan is wound around in the correct direction, it will lock and hold the tympan tight. Not too sure about #2, but I tape the end of my tympan to the square rod and loop it around the square rod a couple of times. Absolutely no idea on number #1, My Vandercook is one of the low end #1 presses. No inking mechanism…
When the rollers are set to the proper height, this gear ensures that the rear form roller rotates and not slides over the printing form. It also provides enough friction to cause the oscillator to rotate which then contacts the front form roller.
Have you tried flipping the roller ends around? If so, then in photo 1 it appears that there is room to install the gear on the other roller then swap their positions. Barring that, you will need to cut away enough rubber to allow the gear to align with the form roller rack.
Photo 3 shows the reel rod (horizontal bar the end of the mylar winds around), ratchet (geared ring), pawl (the pointed hook). In your configuration the end of the Mylar (drawsheet) winds under or clockwise around the reel rod. Flip the pawl over so the pointed end latches into the ratchet. The ratchet and pawl are tightened by turning the reel rod with a wrench (preferably a 3/4” open wrench) in the same direction in which the drawsheet is wound. To loosen, turn the rod a bit more in the same direction—just enough to release the pawl. Lateral play of the reel rod allows it to be shifted it to correct unevenness in drawsheet.
The holes in the reel rod are for a clamp bar with pins that pass though holes in the end of the drawsheet. When missing a clamp bar many operators use adhesive tape to hold the tail against the reel rod.
FYI:
Drawsheet is the named of the outer most packing material whether made of tympan paper or Mylar.
Ink Drum is the name of the motorized cylinder.
Hi Paul
Just a caution, I think. It is never a good idea to cut into a roller. You (generic you) are doomed from that point on—premature replacement due to swelling/environmental invasion.
If the roller is not correctly positioned when it is received, send it back to the roller folks and have them re-do it until it is correct. If they don’t know the specs, you (generic you) should not be using them.
Gerald
http://BielerPress.blogspot.com
Thanks for all of your comments. I switched the rollers around and wiggled and jiggled and the roller/gear finally became comfortable in its place. I also wasn’t wrapping the tympan around the reel rod the right way and that made all of the difference!
So…here is my next question. After I rotate the cylinder down the bed and release my paper, I rotate back to the starting position. On the way back, the cylinder moves over my plate and prints on my drawsheet/makeready. Isn’t the press supposed to go into trip on the way back? I don’t here a “click” like I’ve heard on other Vandercooks. Below is a photo with the cylinder back in starting position after a complete rotation and what the end of my bed looks like.
070410_6215.jpg
070410_6213.jpg
You must move the cylinder all the way to the end of the bed with every impression or the cylinder will not raise. If you do that and the cylinder is stuck in “print”, you may have broken trip springs
Gerald: yes, sending the rollers back is the better course —- one I just recommended a couple days ago on Vanderblog. Then why not here? Simply an editing gaffe. The suggestion to send them back should have preceded the suggestion to cut. In the time I was (ahem) carefully crafting a my comment, I saw that Arie had posted his. So I turned my attention to the other points I wanted to make. However, I have seen cut rollers, that while not pretty have been serviceable for years.
Kimberly: Reasons the cylinder is not shifting into trip:
- It is, but you have too much packing on the cylinder.
- You are not rolling to the end (completing the print stoke).
- The first photo shows the trip wheel on the operator’s side of the bed, but perhaps the one and the far side is missing.
- One or both of the trip springs inside the carriage side plate are broken.
Your photos also show:
- The Boxcar base is catching ink, indicating that the rollers are set too low, or that there is
- The lockup needs improvement: 1) side furniture should be longer to support the base/form keeping it from twisting. 2) quoin should be longer and placed on the operator’s side.
3) The foot quoin should be closer to the base
Trumped again. Thanks Imp.
Thanks again for all of your comments. So helpful.
I think my issue could be packing. I have 5 sheets tympan, Kimlon and a mylar cover sheet. That wasn’t enough, so I added 5 or so sheets of 80# cover (and I was printing with 110# Lettra!). It seemed crazy that I had to add so much to what I already had, but that was the only way to get the impression I was looking for. Is there a reason why I am having to add so much packing to get the deep impression? I’ve read all of the posts about packing to 0.40 and I feel like I need more than that!
Also, Paul, yes, my rollers were too low on the first pass and I adjusted them. Believe it or not the first photo is after I generously washed my Boxcar with mineral spirits. I seem to have stained the base.
Thanks for the tips on the furniture placement.