Restoring an early 1900’s guillotine paper cutter… ?’s!
This past year I was fortunate enough to become the owner of an old guillotine paper cutter. I believe it’s either a 1906 or 1909 model. Still in relatively good working order, it does require further restoration as far as cleaning it up, getting the blade sharpened and oiling it up. It was used at a High School in it’s earlier life and has been sitting for quite some time.
I’m wondering if anyone can provide any sort of information on how to best go about restoring it, websites, books to check out, anything. I’ve tried to seek out manuals on the darling object, but can’t seem to find anything that will provide me concrete direction on how to properly restore it.
Thank you kindly in advance for anyone who can offer up any information! I greatly appreciate it!
Stephanie
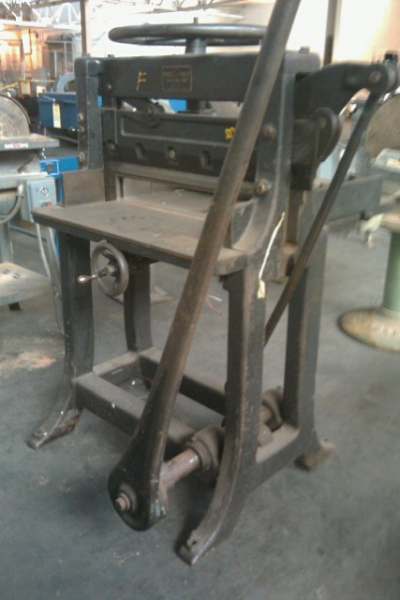
Screen shot 2012-01-08 at 2.38.03 PM.png
What is your objective in ‘restoring’?
Do you want a parlor display piece, or a good cutter for cutting paper?
It is an old cutter and can work forever. It does not have the safety hand grasps on the lever. It is sharp and dangerous and should never be in a place where children, or foolish adults, can mess with it.
General common sense cleaning is fine. Any machine requires oil where two metal parts work one against the other. It doesn’ operate at high speed so it doesn’t require frequent oiling.
Removal and replacement of the blade must be done with great care as there is large potential for injury. Respect the machine. It has no respect for you.
My objective in restoring it is for long-lasting use as a major piece to my screen printing studio.
I’m not sure HOW much restoring will be needed and any information I can find to read up on the machine will help me to evaluate what I will need to do further.
Wasn’t sure if there are particular types of oils that can and can’t be used on it, or any additional types of chemicals or greases that would be better suited for it. Also wasn’t sure if it needs to be stripped completely and refinished… seeking out that sort of information. Which I understand is difficult information to come by given this is all via online. But that’s why I was hoping there might be some sort of written information on how to properly care for such an older piece of machinery.
I thoroughly understand the depths to which the blade can cause massive injury. It does have a pin to lock the lever in it’s upright position which is a step up from the paper cutter I was first introduced to.
How “much” restoration it will need depends on how you want it to look. You can disassemble it down to every nut and bolt, blast clean it and have it fully reprinted. You can just clean up the bed and clamp so it doesn’t mark your stock and leave the rest as is.
A normal heavy machine oil is all that should be needed. Most older machines were designed to be oiled and not greased, though grease on the sliding parts of the blade carrier and frame will not hurt anything. All of the pivoting points should have oil holes in them.
The bed can be cleaned with steel wool and a thin oil like WD40 or press wash.
The most important thing is to make sure there are no parts, especially in the blade operation, that are cracked and could break during use.
I ave a similar cutter that was disassembled in order to move. It is very filthy but the paint under the dirt and dust looks intact so I plan to just wash it with a mild cleaner, instead of stripping it. I’ll then either coat it with a wax or oil to protect it from moisture.
I have the same cutter. I noticed Gold pin striping on the press that had been worn away in most area. I cleaned using the same technique as mentioned above with steel wool, rags, WD40, oil on bed and parts. I sprayed the handle and top clamp with Matte Black Krylon spray paint.
I would advise you to have an engineer look at this carefully with a view to having a safety latch fitted as they are notoriously dangerous ,any one were to bump the handle in passing can cause the blade to drop , i know a guy with something similar he puts a three inch hunk of steel uner the knife every time he puts his hands under the blade thats how bad he thinks they are ! I have a pearl from early 20th cent in my lock up and de commisioned it stays !!
Having a wood or steel block place under the blade when reaching into he cutter is always good practice. Even on a modern cutter because you just never know when something could go wrong. The handle should be set so that when the blade is up the weight of the handle is far enough past the vertical point of balance so that you actually need to lift it some to start the stroke. That way it takes more than a simple bump to make the blade drop.
I know newer cutters had a mechanical “lock” with releases built into he handle. On the one I used the handle was hollow and had two latches, one for each hand. Now sure how something like that could be rigged on a solid handle.
On another note it is a good idea when not using ths type of cutter, ie no safetys, to leave it with the blade down and the hande chained and locked in that position.
Hey everyone, thanks for the really informative advise, this is the exact information I was seeking out and I truly appreciate the feedback!
I really appreciate the safety block suggestions, that’s pretty common sense so I’m embarrassed to say that in the past when using cutters (through school and such) I didn’t practice such precautions but definitely will once this cutter is in working order.
Again, thanks for all the comments, printing these all out!