Registration of impresson on Windmill
Hello everyone!
Today I try first test job on our sweet Heidelberg Windmill and we
have one problem with registration of impression. This problem occurs frequently time to time, not depend on colors. I mean that registration of each color not permanently. Tell me what the problem is? Thanks in advance.
055.jpg
077.jpg
Realy need your suggestion!
Guide? Gripper?
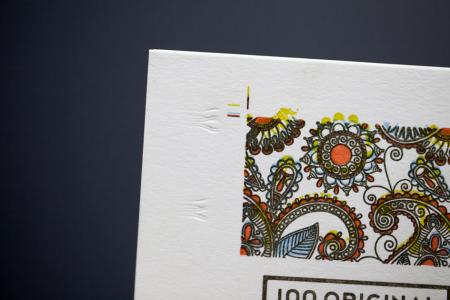
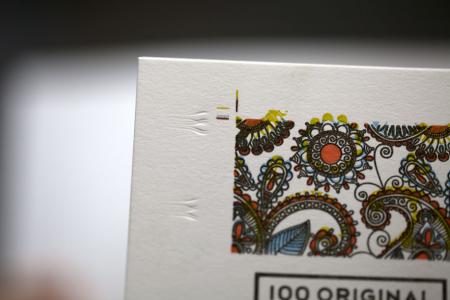
I’ll take a stab at this. It looks like your stock is “springing” off the gripper side guide when released by the gripper. I am guessing this because it looks like the “dents” in your sheet are from the pins on the bottom guides.
You might fix this by spraying spray adhesive on the bottom guides. You also need only one pin in each guide block.
If you have the gripper guide turned all the way to the platen, you may need to run the stock with cheaters, so that there is room between the stock and the guide as the sheet rises up. Beyond that, well, more details would help, such as overall sheet size and which type of guides (brass or nickle) you are running.
It seems like you got three colors to run together…..what did you change for the fourth (yellow)?
I think as above reduce the amount of paper picked up from the pile with the hangersfitted ovver the feedboard or with a couple of 6pt leads stuck to the head ofthe feedbord .
Do remember with colour runs you must have good feeding consistently ,if the press stops you should catch the first sheet out when you re start as it will often be a poor sheet pick up . Try , when you set up the form ,to allow for as little movement from the centre point of the side lays adjustment as you possbly can .
Thanks for reply guys!
I will try to make the discussion more informative. I hope pictures will help to understand. If I right this is nickle guides, isn’t it? Paper size is 110x90 mm, 300 gsm.
to Mike: What is “cheaters”? Not understand((( And there is four colors (yellow, red, blue and black with addictive of yellow).
IMG_6605.jpg
IMG_6604.jpg
IMG_6603.jpg
IMG_6601.jpg
IMG_6600.jpg
IMG_6598.jpg
IMG_6597.jpg
IMG_6596.jpg
IMG_6595.jpg
STOP !!
You clearly need to get a manual for this machine !
You have a cutting plate on the machine you need to remove it and set on a tympan sheet .
You Have BRASS lays on this press , Nip out to the local printers and find someone who can give you two hours basic instruction . You are using two left hand lay blocks which is no real problem but you run twice the risk of a base or type batter.
A cheater is not part of your colour it is a pair of metal strips they are 2 1/2mm thick about 4mm wide and 250mm long ,they hook over the feedboard and reduce your sheet gripped by the gripper arms .
Unscrew part T1434 and T1024move it to the left and re tighten it all ,that is the position for the feed pile when using brass lays .
It will help you if you bend the sheet a little to flatten it ,this will help prevent sidelay jump .
Oh it would be so much easier if i were half my age with no fear of computors!! Could someone forward this guy some of those little arrows with pictures !
Paisley pattern , strange choice of design I could send him a tie that matches his business card!
Peter is right, you should be running a tympan/traditional packing on the press. You CAN run against a die jacket, but you’ll be much more miserable if you run really thick stock. You also stand a very good chance of messing up that nice Boxcar base too. Those pin marks on the sheet are a warning to you.
I would remove the second pin from each of the guides, as they may (and especially with no clearance against the die jacket) cause the sheet to bind enough that it will “jump” and throw off your register.
Read the manual, then read it again. The “Hints to Pressman” book is also a very good read (and I think is downloadable out on the web).
I would use only one left-hand pin. Also, it is important that the pin be at least parallel to the paper surface, and if anything bent so that it sits slightly away from it (more clearance.) Otherwise the sheet will probably drag on it and cause register variance. The pin is mainly to guide the tail of the sheet down to the guide, so that it doesn’t whip over the guide completely.
It looks like the base is hitting your guide pins and causing the movement. Insert a shorter pin. You only need one on the left guide. This pin helps to catch the end of the sheet. You don’t want the pin to push into the paper, because it could cause press bounce/mis-register. Bend it slightly away from the platen. Don’t print on your die cutting jacket. Use tympan paper and packing.
nice catch Kluge Girl, i know now who to call when i’m needing help.
If the pressman tympans up his pins would probably clear but if the safety of the base is an issue get the thick bristle yard broom and begin scalping with some pliers !
Once the correct tympan is in place, you should cut it away where your pins are. That’ll keep it from marking your paper.
Thanks for all!
It was realy usefull for me. I have a question about tympan. What is it? I mean, what his base (rubber, vellum, or anything else)? What can replace it from the standard materials? Could I use some adhesive paper or film for it? Now I’m reading “Hints for Pressman” - great book!
To Peter Luckhurst:
Thanks for the help! Unfortunately there is no localy printers, who using Windmill for printing, only die cut( I followed your advice and here are some pictures of what happened. Am I right?
IMG_6609.jpg
IMG_6608.jpg
IMG_6607.jpg
Correct parts ,undo the screw and move to the LEFT same with pile stanchion move to left .
Tympan is usually a form of oiled or waxed manilla sheet , placed upon the platen to hold all your packing sheets in place and cover all your makeready tissues etc once clamped into place with your packing bars .
You want to use pins that are shorter than those shown ,as short as you can manage ..
A question …
Why are you fiddling with such a small sheet anyway for a multi run job ? By all means use up your offcuts but the word appropriately comes to mind ,
Try using a sheet twice as wide and twice as long and do the job on the machine as you have it, positioned in a corner , just turn the sheet over and around for each run .
Thank you so much!
Now I’m understand (at last). I found a tympan and for it and after will try to print. One more question, could I print without pins?
To Peter Luckhurst: It’s only test job, but thanks for your advice, i think it will be very usefull.
And BIG BIG thanks to you, Peter!
If you look at the delivery stanchion at the right side of your press (part T1009) it has a little notch in it ,that is the packing gauge , you need to put one sheet of your job ,one tympan and any packing should make a good fit in the notch , once you have chosen your packing and clipped it to your platen take the impression off with the knurled collar and take a pull (print) , If the sheet prints at the bottom of the press and not the top you remove a sheet fromm the packing and increase pressure on the impression levers collar .
If it prints at the top of the machine and not the bottom you reduce the pressure on the collar and add packing .
Sometimes you may get through with no pins but it can be wasteful , you can cut a small pin using a paperclip as long as it fits in the holes in the lay , I use the bristles from a yard broom as often as i can !!