Windmill “Mystery Part” help?
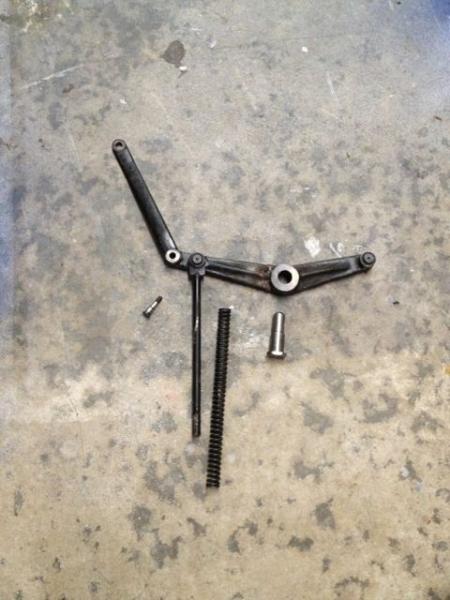
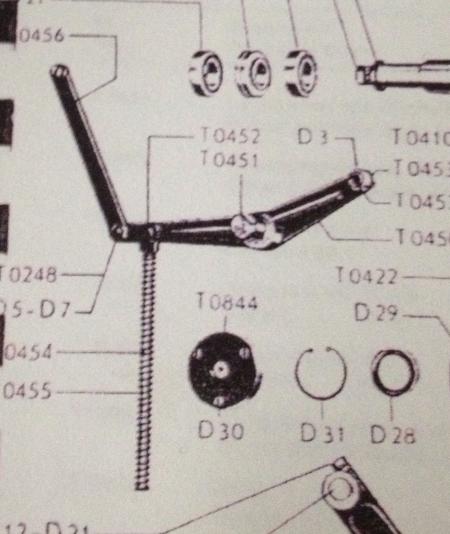
My “new” Windmill arrived with a few parts unattached, and I’m having trouble identifying how and where one particular collection of parts (pictured below) is supposed to install. I believe all the parts together make up the assembly pictured on the parts manual page I’ve pictured below, and I think it’s supposed to attach on the lower left side.
Unfortunately, the otherwise very helpful manual does not show exactly *how* the assembly is supposed to attach to the press, and the part names (“bolt,” “connecting lever”) offer no helpful clues. That there are multiple points of attachment makes it especially confusing. I’ve spent hours trying to figure it out, and watched every single Windmill video on YouTube to try to catch the part in action, but each time the camera gets tantalizingly close to a shot of that particular area, it’s either too dark to see the parts, or the camera cuts away!
Would one of you kind Windmill-operating souls have the time to help a gal out and post a quick picture of this particular assembly attached to your press? A bazillion thank-you’s in advance.
IMG_2835_med.jpg
IMG_2830.jpg
I think this part connects near the flywheel which operates the guides. I’ll try to get a picture soon.
Thank you SO much Dennis!
Hard to get a close up pix. Hope this helps
front view.jpg
Top View.jpg
Dennis, that helps a ton! Thank you very, very much!
There is a reason why it was removed???? you need to ensure the pivot or the pivt point on which it sit is not worn ,there can be no movement in this part other than that for its purpose (to operate the frontlay assembly drive unit ) Correctly identified i think without consulting the manual , be careful to wind press slowly by hand checking at intervals to be sure the whole assembly cant strike against the other parts excepting of course the cams .
Thanks Peter - I believe it was removed because the largest, elbow-shaped piece of the assembly had broken in half. I had it welded; you can kind of see the weld in my first photo.
I am worried, too, about whether it will seat correctly in its proper spot, especially since something clearly happened to break it before. There is a lot going on mechanically in that particular area of the press!
Dennis’ photos helped me find its home; now I need a couple of the proper pins and nuts to get it attached before I can test it. I am a bit concerned that the main bolt (T0451, in the center of the elbow) does not slide in easily, even with a lot of lubrication. Do you think this could be because it’s a new bolt? (It goes through the part OK, but not into the press.) Anyone else have this problem with new bolts? What’s the remedy?
I would also inspect the operation of the lower and side lay gauges, before connecting them to the above parts. If they don’t rotate and slide to the proper positions and return completely without interference, more damage may result.
The rocker may have been broken by a foreign object obstructing the return of the lower lay, but there may be other remaining damage too.
Dropped chase or a chaseful of furniture ? the bolt is fed in from the inner side and the thing must perform its action freely ,without going look in this case, that is then ,once through the two parts held in by the taper pin through the bolt?it looks that way in the photograph , all taper holes need reaming when you have welded it as shrinkage warping etc often occurs at thinner areas of the welded piece ,you should do it anyway although you may get lucky .
as mentioned care to check for excessive play as well as restricted moverment ,these parts need free movement they are really not that robust .
Hey, thanks very much, guys. I’m stuck waiting for my nuts and pins to come in before I can get the assembly installed properly, but I will make sure to check the movement of the lay gauges.
Peter, to clarify - you are saying the bolt should be fed through from the *inside* of the press - so, towards the flywheel, not away from it, correct? Because that’s what the parts manual picture seems to suggest. It’s a bit confusing because the picture is flipped around from how the part actually installs into the press - but they couldn’t show the bolt, cam rider, etc. if they drew it the other way, I guess.
Interesting that a weld might cause shrinkage - I wasn’t aware of that. Good to know.
I have no idea what they dropped in there to cause the damage. The press was used almost exclusively for numbering and die cutting. It’s actually in pretty good shape - nice and quiet when fired up, paper feed working well, etc., but this one area and the sludge tray/washup blade, have been… let’s just say… “a bit of work.”
I appreciate the help and guidance very much!
I will go check the set up on mine to be 100% sure but you usually find these assemble simply its the breaking down that screws you up ! Normally a nut will go on the end furthest from the rocking part (to stop it working tighter or loosening ) , I cant remember if this is a pinned fitting …..
Ok so i cant find a pin , then it must screw in toward the press,it must also be a nice fit through the arm with sufficient ease of movement not to bind when you tighten the pin in (bolt) if there is a lot of play in the other plane (sideways ) i would look to replacing the lot as you know there are a lot of moving bits there and there is not a great deal of clearance . The drawing shows the pin head clearly sits with the swinging component so you assemble it in that fashion . What im scratching my head at is if its just interference fit whats to stop it working loose again !
Hah there is a tiny grub screw you show it iin your photo it goes into the bracket you are passing the pin through and you find it looking at the bracket or mounting point from the rear of the press with the platen closed .Check the bracket mounting point and see if the old grub screw is in the hole ,it may possibly be there and that explain why you cant get the pin/bolt through the hole !