one way to make an impression roller for a small press
OK….. as promised, I’ve finished the testing on my roller-making technique and am ready to reveal to the world how I did it. ;) Actually, it’s not that dramatic…. but it might be of interest to those folks who want to build their own cylinder-style presses.
So far I’ve made three successful rollers by this method: the 10” wide “test-bed” roller that was used in the small press I posted a few weeks ago, and two rollers that are going to be used in my new 13x20” press. I’ve also botched the construction of one additional roller… but hey, that happens sometimes.
The smaller roller was tested under a constant point load of 300lbs over 1squ in for 10 weeks. Then it was made into a press and used for several weeks to print with copper cuts, metal type, endgrain woodcuts and linocuts to see how well it the material works. After all of the testing, there are no measurable deformations, dents, flat spots, or out-of-round spots. I’m convinced that the material is not only very stable, it’s also VERY tough, and should last for many years.
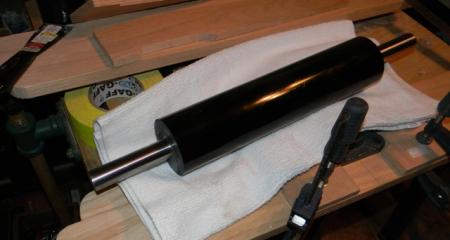
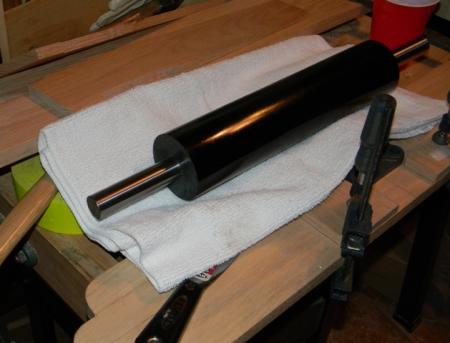
Below are a few pics of one of the finished top roller I made for the larger press I’m building. It is 3” OD with a 1” turned and polished steel core. The roller itself is 13” wide, and the core sticks out an additional 4” at each end for a total length of 21”.
The material used was Black Polyurethane, 95A hardness. It is sold as “very hard”….. which is something of an understatement. The material is as hard as all get out, and VERY resistant to abrasion. It is so resistant in fact that it is difficult to grind, cut with a file, or sand with sand-paper. While it does make a very sturdy roller, it is not easy to work with.
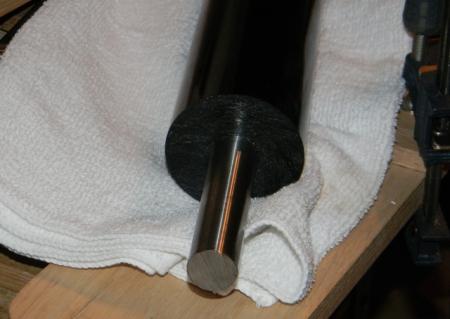
So…. how did I mold it? I didn’t. I bought the material in the form of a hollow tube, already molded from McMaster Carr, cut it to length, and inserted the 1” cores into it. As manufactured, the material has a published dimensional tolerance of .02” in diameter, and the piece I got was better than that: closer to .010 for it’s entire length. When I ordered the material, I was thinking that I’d have to grind it to final dimensions…. but after receiving it, I realized that no grinding would be required.
The ID tolerance was +- .010, which makes for a very tight fit with the cores. To make sure that the rollers didn’t turn on the cores, I bonded them in place with West Epoxy whilst pressing. While it sounds simple in theory, it was actually a big pain-in-the-backside and my first attempt resulted in a ruined roller. After perfecting my technique, it’s not quite as tough…. but it’s still not for the faint-hearted.
So, what problems did I encounter while making the rollers? Only a few:
First, the material is not easy to cut to length. While it can be cut with a handsaw, it will dull the blade very quickly. I ruined a very nice Japanese saw on my first attempt. It also has a tendency to grab the blade and not let it loose. I found that a Chop-saw with a carbide blade is the best option.
Secondly, pressing the cores into place is not easy. When you first start pressing, it’s easy. Then all of a sudden the material seizes the core… and that’s that. It won’t go in or out without a HUGE effort.
Third- while pressing the cores into place, you’ll want to bond the core to the roller at the same time. Since Epoxy will bond to the polyurethane, that’s what I used. However, I would recommend that you NOT use “5 minute” epoxies sold at the hardware store. (see above). Also- be sure to clean the polyurethane with mineral spirits to remove the mold-release agent, or the epoxy won’t stick.
Fourth- the material does come with a few air-bubbles in it. They are not large or significant….. mine only had one small bubble in it… but this could be a problem for some uses.
finally- the material is not inexpensive. While the finished rollers are cheaper than having steel rolls made, they are still a bit pricey.
And there you have it: one way to fabricate an impression roller. If you make one of your own, or think of a better way to make one, let me know. I’m always interested in what others have figured out.
Dave
aka Winking Cat Press
roller 1.jpg
roller2.jpg

roller3.jpg
roller4.jpg
This looks great. This might be the (seemingly) easiest way to make an impression roller. Is this for an etching press?
Thanks for the info! Unfortunately, McMaster-Carr don’t sell any Polyurethane tube large enough for my intended purpose. Ah, well. Back to the original plan of 10” schedule 80 CPVC plus packing. Now, to find a source that won’t break the bank.
—
Michael Hurley
Titivilus Press
Memphis, TN
Why not check with a commercial roller maker to see if they can build the appropriate impression roller? The Vandercook presses that used a similar setup sent the steel core out to a vendor, like Binghams (no longer in business), with the specifications as to durometer, width, diameter. The core needs center holes in each end. Most roller makers that make printing rollers now make far many more other rollers than for printing as printing sales have pretty much collapsed. A machine made impression roller will be accurate and most importantly, concentric to the core.
Dave, what would you estimate the entire project cost? Shipping as well as your time fabricating.
Nicely done! It looks very rugged! I think you could make a jig with a big, long screw that could be used to force these cores into position.
All- thanks for the positive comments! Over the years I’ve experimented with a lot of methods for making rollers and cylinders…. and this seems to be the best I’ve come up with. Hopefully, it will inspire others to build their own presses.
Steve- this roller is for a small cylinder flatbed letterpress. It is very similar to an etching press, except the bed has type-high rails. The roller design would work extremely well for an etching press, though. Especially for one of Doug Forsyth’s tabletop designs.
Micheal- unfortunately, McMaster doesn’t sell tubing that large. That’s why I used the 3” material. If they sold 6”, I’d have probably used it. BUT in my researches I ran across a company that offers larger diameter tubing. Do a Google search…. you might find a large diameter material off-the-shelf.
Fritz- one good thing I discovered about the material is that it is very nicely concentric as shipped. after fabrication, I put the rollers in the lathe just to measure them and found the average run-out to be around .005”. That’s close enough in my mind.
JPK- doing some rough math in my head, I’d say that the rollers cost ~$85 to $90 each, not counting labor. Since there was a lot of design and testing time, I can’t even begin to calculate the labor costs….. BUT for “guestimation” purposes, figure an hour of work per roller.
Billy- thanks! I did build a special “device” for pressing the last two rollers: a hydraulic “roller-core-presser” made out of a log-splitter. Now all I have to do is start the core in the hole, set it into the presser, and GGGGrrrrrr, rrrrrrrrrr, thump…… and viola! Instant roller!
Just be careful not to split it in half!
Fritz, I’m not sure if your comment was directed at me or at Dave, but in my case, having a custom cylinder roller manufactured to spec would blow the budget for this particular project whereas rolling my own (so to speak) will save me hundreds of dollars. Plus, I can space expenses out over time instead of having to shell out hundreds at once. I’m afraid I’ve not got much in the way of ready cash to spend on hobby projects. beyond that, the outer diameters of PVC pipe are manufactured to pretty tight tolerances. Any variance in wall thickness of plain pipe is expected to be biased toward the inner diameter to allow the proper interference fit of joints. Pipe that’s out of round is also generally unacceptable for the same reason. Finally, there’s just the fun of seeing if I can make this work. I’m not a professional letterpress printer, I’m just a hobby printer fooling around. If this doesn’t work all I’ve lost is what I was willing to lose up front and I’ve gained experience.
—
Michael Hurley
Titivilus Press
Memphis, TN