Press Building- another good way to make a roller- and advice
As we’ve discussed many times the heart of a Proof Press or Sign Press is the roller…. and it’s always the most difficult part to build for someone who doesn’t have machine tools. I know that i’ve tried at least a dozen different ways, and only found a few that actually work well. (yes… failure is always an option here at Winking Cat Press)
Well…. I’ve found a VERY easy and cheap way to make a roller for a Sign-Press style machine. Actually it’s so simple that I should have thought of it years ago. What can I say? Maybe I’m just feeble-minded.
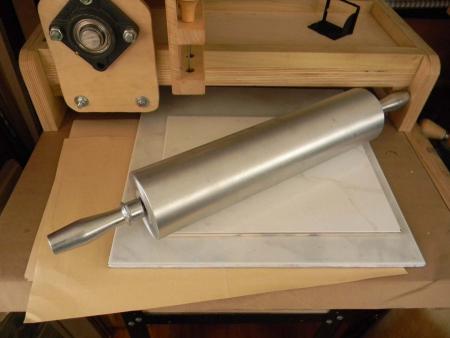
Picture 1 is a standard commercial rolling pin, available at any Restaurant Supply House for a low price. I have five or six of ‘em since they are very handy for teaching printmaking, and making monoprints.
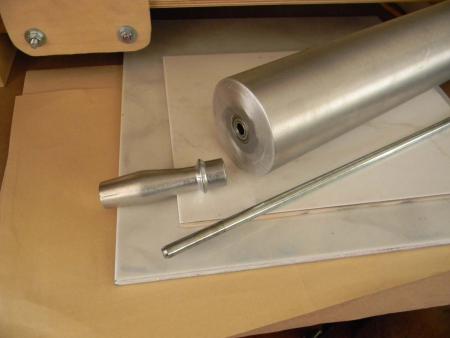
Well, look at what you get when you pull one of the handles off: picture 2. You get a very nice 3 1/2” x 15” roller shell, with ball bearings already installed. The shaft diater is 3/8” which might be too small for use as an etching press, but it’s more than fine for relief printing. If the handle won’t pull off, just cut the shaft with a hacksaw.
Such a roller would be perfect for making a press like my “small experimental press”. In fact it is actually better than the polyurethane roller since it already has the bearings installed. All you need to do is cut a piece of 3/8” thread rod to length for the shaft, OR just use a tap and thread the ends of the shaft that came with it… and Viola! Instant Roller! It even looks good! AND you can use the handles for some other project….. maybe add some rope and make a jump-rope. (wait…. do kids jump rope anymore?)
BUT as with all things, there are some things to be considered:
1- not just any old rolling pin will work. The commercial pin is lathe-turned and has ball bearings. If an alternative pin doesn’t have these features then it won’t work. Also make sure the commercial pin you select has them, too. Not all do. Choose wisely and you will prosper. Choose poorly….. and you are… um…. messed up.
2. if you DO build a press with such a roller, use good plywood, make it the same width as your roller, (in this case your press will be 15” wide, with 13” of usable area) and use 1” rails on the sides.
3- build it right- I can’t count the number of times I get get e-mails from folks who semi-sorta built a press from my design…. but used low-quality wood, or didn’t put idler wheels under their carriage, or skipped this piece or that, or just generally cheaped out…. and so forth and so on. Take the time to get good materials and do it right.
Of course you can use alternative materials, and I encourage you to do so IF you are willing to take the time to figure things out OR are willing to have a failure every now and then. BUT if you aren’t, I recommend you copy an existing design as closely as possible.
Thus endeth the lesson for today.
After looking at the roller on my table, it looks VERY good to me. I think my next project (now that the big / complex press is complete) is going to be a new Sign-Press using this new idea.
Dave
aka Winking Cat Press
rolling pin 1.jpg
rolling pin 3.jpg
Wow ! I want one like this !!!
That rolling pin, with a nice coating of 30-50 durometer rubber covering ground true, would make a fantastic hand press roller. too — I want one! But I suspect they are not available at all here in Costa Rica, though there is one commercial restaurant supply store I will be visiting soon.
Bob
Lise- cool, huh?
Ad Lib…. i’d guess they have one there. If you must use an alternative, please heed note #1 above
Just a quick note: it looks like the pins are very common. I did a quick search online and found many different vendors. Before you order one though, make sure it meets the criteria.
Dave,
Does the rod is going to cross all inside the roller and after I will have just screw just like the rods wich maintain the support each side ?
Thank’a again !
yes…. the rod goes all the way through the roller, just like the cross-ties. Use two nuts on each side…. one inside the side plate, and one outside the side plate to positively lock it in place.
Hi,
I would like to thanks Dave for is good advice and help. It was very appreciated.
My second press is finish and seems to work .
I found difficult to fix all the parts well to set it square. If everything is not perfect it will appears in the use of the press. I am far from being equipped well for this work but I am really proud of me.
I found a 18 inches rolling pin on eBay for $8.99 + shipping to my beautiful Québec city.
I also made 2 pieces to place the paper correctly and an other one to fix the paper as propose by Joe.
Lise
test1a.jpg
test3a.jpg
presse2b.jpg
Hi Lise,
Excellent! You did a great job and I am happy to hear that you are pleased with it.
Please keep us posted with how it is working for you.
All the best,
Joe
Oh, you are well-equipped to produce such fine work, Lise, because you possess the patience, determination, and skills to actually produce what you have pictured in your mind. Rare talent these days. It’s not the tools - it’s the hand wielding them. Well done!
(There are some having great difficulty making a crude, simple box. :o) )
Good Work Lise!
It’s great to see your press. I know you put a lot of thought and effort into building it….. and it appears that your efforts have paid off well. You have every right to feel proud of yourself!
Dave
aka Winking Cat Press