Understanding Registration
Hi All. I’m hoping you can help me again. I’m not trying to be lazy - i have read (i think) every Windmill post on Briar Press and have also gone through the manuals but i still feel dumb when it comes to registration and using “gauges”.
Am i right in the assumption if you are not using the gauge pins (and have your press setup to the normal commercial registration) that the paper will always be aligned to the bottom RHC as per photo 1?
I have set the press up as per the manual to turn on the systems for lay gauge registration. Is photo 2 correct in the way i set it up? I ran a smaller sheet through the press and it still aligned in the bottom RHC. What is the purpose of using lay gauges? Can you ever (or would you want to) have the paper sit smack bang in the middle of the platen or does it always have to align to the edges?
The bar that the lay gauges attach to moves up and down left and right freely.
What is the purpose of the bar that sits directly under the platen and runs around 2/3 of the width?
Sorry for all the questions, and apologies if i have used the wrong terminology. I appreciate your time and help.
Now off to clean my press AGAIN since these photos make it look putrid.
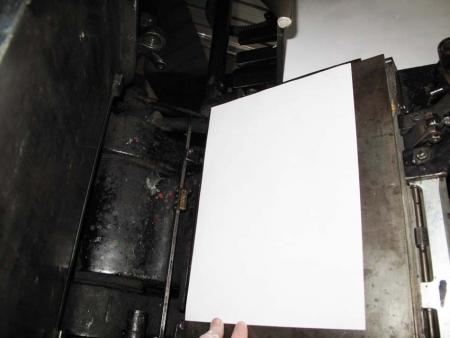
photo1.jpg
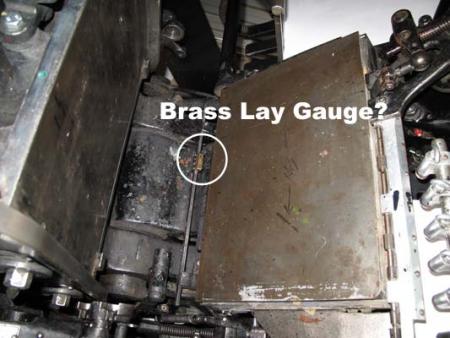
photo2.jpg
Hi Kobes,
With 50+years experience I’ll try and answer your queries.
1. When not using gauges the sheet is held constantly by the gripper and is normally in the centre of the platen, or nearer the top (the nearer to the top : the less variation).
2. The purpose of using gauges is to ensure accurate registration, and if set-up correctly every sheet will be exactly the same relative to the BRHC.
3. The small bar that sits directly under the platen is the mounting for a small holder (part no. T0258F) which is used to prevent the sheet dropping under the lays.
On further examination zooming in on your photo 2, I think the brass lay gauge you have circled is the right hand one and should only be fitted on the extreme right hand edge of the mounting bar.
The two gauges are different: the right hand one, if my memory serves me correctly does not have any holes for lay-pins, and has a U shaped channel for the sheet to drop in.
Re no. 2 in my previous post needs the following words appended “of the platen” to avoid misinterpretation.
i don’t have as much experience as Bern (only 40 years) his advice is always good, hope you have another gauge pin besides the one brass one , or it won’t register. When running off the gauges most people run the stock in the center, but Bern is right about running the stock a little above the center gives you less variation. Good Luck Dick G.
Thanks for the replies gentleman. I only have the four gauge pins as per the photo below. The two on the bottom appear to be different to each other but also different to the top ones. I can’t find a photo/image on the net for either the left or right gauge pin to compare.
The gauge pin used in my original photo above does appear to have a u shaped channel in it BUT also has two small holes.
dickg when you say most people run the stock in the center do you mean the center of the platen BUT with the edge of the paper along the bottom edge of the platen? This is my dilemma - I can’t wrap my head around how to get the paper in the middle of my platen. But I’m not sure if I should even be trying. I have attached a pic of my confusion.
I would dearly love to find someone (in real life) to spend the day with but my hunt has been fruitless thus far. I should also point out I don’t have the supplies (ink, new rollers, base) to actually try an impression yet to work out exact alignment – I’m waiting for a delivery from the USA.
Cheers
platenpic.gif
laygauges.jpg
if you center the stock on the feed table it will run away from the bottom of the press, but will stay in the gripper , so it will never be in the exact center of the platen like your red image. it will be that high on the platen but line up with the blue image on the left but as high up as the red image. Your brass gauges are easier to use than the nickle gauges, your brass gauge with the pin in it should go toward the center of the bar, near the back end of the sheet, the one without the pin should go to the right of the bar as you look into the press. on my press i use two u shaped pins and only use the one with the holes to insert the pin if the stock curls and misses the pin. I’m only a hour’s drive from you if you want i could give you a half days lesson on me , just fly to Boston then rent a car, i’m 1 hours drive south. Dick G.
Ahhh, now I’m getting it I think. Thanks for the clarification dickg. Unfortunately I’m a little further from you then an hour otherwise i would take you up on your kind offer. I’m in Australia. I visited your gorgeous country this time last year and if it wasn’t for the gruelling 16+ hour flight I would seriously think about coming over again.
So, am I right in thinking that if I wanted my paper to be in the centre of the platen (but aligned to the edge) I would not be able to (nor need to) use the lay gauges? I can’t see the lay gauge bar ever going that high up on the press.
So really lay gauges assist with alignment and registration by stopping the paper from falling down off the bottom edge of the platen? One edge of the paper always has to be aligned to the RHS with the gripper arm.
Your Windmill will always require a 1/4” gripper edge (cannot run free in the middle of the platen) as the sheet must always be handled by the gripper. If you are running without guides (commercial) then the gripper will continually hold the sheet through the printing cycle. If there is any difference in relative position of the arms (usually is, though minor), register will bounce between two arm positions.
Generally people running without guides will run the stock to the middle of the feeder and arrange imposition to the middle of the chase (there is a mark provided for this).
When running with guides, the gripper releases momentarily while the guides lift and push the sheet to provide a constant register point. If you run with guides (the brass ones are good) the guides will require a gripper margin as well. This can be minimized with nickel guides, but the sheet will be more likely to fall off the guides. There is an extra piece that fits on the 2/3rd length bar that is recommended for use with the nickel guides. All guides are drilled to take pins of varying sizes to help keep the paper on the guides.
Guide placement is usually to have one about an inch or two from the right side of the platen, with the other within an inch of the tail of the sheet being printed. The Heidelberg manual has more details (downloadable through the Boxcar Press Flywheel and Cylinder site).
It appears as if you have a die-cutting jacket on your press, that will need to be replaced with a tympan and packing (see manual) for printing work.
Thanks mikefrommontana. The posts here have been great and I am amazed by the quickness of replies. All very much appreciated.
Yes, my understanding is the press did come with a die-cutting jacket but I thought I had taken it off. Originally I had a thin sheet of aluminium (or alike) that was taped over the platen. I’ve removed that and what is left (I thought) was the actual platen. But will go back out to the garage and double check.
I’ve placed an order for some Tympan Paper and just waiting for delivery from the USA.
I have the manual and have read it a number of times – I just find it hard to picture exactly what they are talking about and what I need to do. Unfortunately the old style black and white photos aren’t helping me much, but I’ve now discovered the parts manual which has helped enormously when working out what each “bit” is called.
I now realise I’ve perhaps jumped in to this with my eyes closed, not fully appreciating how complex this machine actually is. But I’m determined to give it a red hot go.
Kobes, there are some videos on u tube of heidleburgs running, also Excelsior Press has a video on his site, he is in the yellow pages on this site, maybe if you see one running it will help you. Good Luck Dick G.
Just as a help to you. If you’re using a die cutting plate that is designed for the windmill depending where you position your guides the adjustment may be different. The die cutting plate has two lips or flanges that hold it tight at the bottom of the platen. If a guide moves up and hits the flange, it will be different than if it hits the platen between the flanges.