Pantograph to cut wood type (PICS)
I now have a pantograph (on loan) that Im pretty sure is able to cut out type. The motor spins and I have more bits than I know what to do with. My questions are these:
How should I make the masters?
How to lock in my type high wood?
Who wants the first font?
below is a picture of the model in its catalog. I’ll post the actual machine once its setup
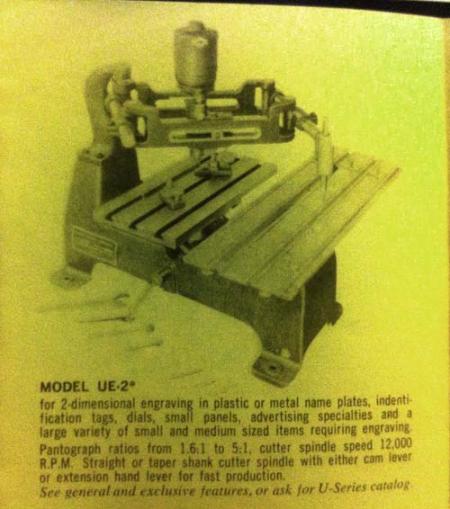
photo.JPG
I don’t have any solid answers to your questions, but I would assume you could cut your masters on a band saw if you wanted to do it by hand, or use laser engraver if you prefer the computer vector route.
Did your pantograph come with any of the hold-downs pictured on the plate below the motor?
Sounds like a fun project. I’m excited to see your progress.
Paul Duensing used one of these to make brass matrices for casting his types. You have to be aware of the reduction ration from the worktable to the cutter spindle. The depth of the cutter spindle is a factor as well. Wood cutter bits are shaped like a half circle or a half-moon with a curve. I have found with my routers that there are some commercial cutters that are adaptable, others tend to burn up quickly. I’ve had good luck with Bosch single flute straight bits for wood, if you don’t allow them to get too hot. The pitch in the wood can build up on the cutter as well, so keep them clean.
Heres some pictures of the panto itsself
photo 3.JPG
photo 2.JPG
photo 1.JPG
That’s awesome! Can I have it?
Wow, that’s a fantastic machine, thanks for posting the pictures.
I have one of those UE-2’s with the same woodtype intentions. I hope you keep us updated on your progress. Do you have a selection of those tapered collets with it?
Calvert
KCMO
I duplicated my hand cut ampersand today on a piece of scrap wood. From a 5 inch symbol down to about 50pt (0.7”)
photo 1.JPG
photo 2.JPG
looks pretty cool!
Awesome!
Can you also scale up?
1.6:1 down to 5:1 appears to be the capability of this particular pantograph. It is a sign engraver’s tool originally. They were always reducing from patterns. We have a similar setup in the letterpress shop at Cooper Union made by New Hermes right here on Cooper Square in NYC.
Daniel Morris
The Arm Letterpress
Brooklyn, NY
The original model that I posted is actually a different one. The machine I have actually can do up to 7:1.
@ Daniel Morris:
Could you post a picture of your setup? I’ve yet to cut any type high wood and would love to see your hold down method for the master & the blank.
@ everyone:
What is the finishing process for end grain wood before its ink ready? I cut some end grain maple tonight and it seems a little porous in the “early wood” part of the ring. I’ll scan it and post tomorrow.
I don’t know if this part of the equation has been talked about here yet, but one of the key factors is to start with CURED wood. I believe that they left their parent slices (a little over 1” thick) of log sections on drying racks for AT LEAST a year at Hamilton Wood Type before they ever began processing it. This allows the wood to thoroughly dry out and stabilize.
If the wood is still “green” it will tend to warp and even crack as it continues its long/slow curing process.
So this is not a matter of simply going out and grabbing some wood to start cutting on.
I believe that they shellaced the wood after if had been planed and surface sanded prior to cutting the pattern into it. If you can find some wood type that has never been inked you will notice that the printing surface is much glossier than the cut away areas.
Rick
Agreeing with Rick:
The face of the wood will likely need to be shellaced or varnished.
A few years ago I thought I’d “clean up” a piece of damaged wood type, so I sanded out the imperfections, added paper tape to the bottom to get it back to type height then found that the bare wood would not transfer ink as well as the shiny surface of a companion letter.
I believe I used wipe-on Polyurethane varnish to bring back the luster - and improve the ink-handling of the surface.
In any case, you will probably also want to oil the wood to seal it and prevent warping as well.
Best of luck.
- Alan
This maple is definitely cured. Its as hard as a rock and I know sat on the shelves of the hardwood shop I used to work at for least 10 years. I scanned the wood before I cut it and after I cut an “F”
The relief is very shallow because I’m still working on the hold down method.
IMG_0007.jpg
IMG_0006.jpg