Challenge Advance Blade Alignment
Hi, I was wondering if anyone knew how to align a Challenge Advance 19” Paper Cutter?
It only has alignment screws on the front side of the cutter, and not on the back side of the cutter. How do you push the blade towards the front since there are no back alignment screws?
The far side alignment screw is pushed as far as you can screw without locking up the blade holder. I still need to bring the blade further back on the far side, or bring the blade further forward, which I can’t do without the backside alignment screws. Thanks!
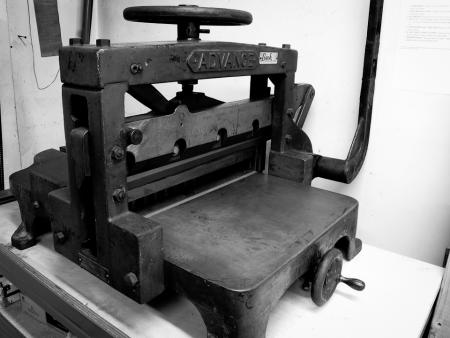
SimplyLetterpressedEquipment-321.jpg
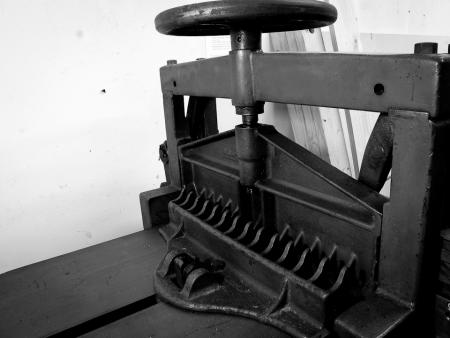
SimplyLetterpressedEquipment-324.jpg
I bought an older advance from bindery tools, call them, they specialize in cutters particularly
There is no “blade alignment” front to back with these. You set the knife against the gibs and the gibs align the blade to cut squarely. They’re visible in your first photo, the nuts and allen-key set screws which go through the left and right vertical columns which hold the clamp frame up.
Loosen the nuts, tighten the set screws until the knife has a bit of “drag”, and then tighten the nuts which hold the set screws in place over time. This will tension the blade against the knife gibs and square it up, but it doesn’t fix alignment unless that was your problem before.
I hope that helps.
Thanks for the info, I’ll give it a shot!
You most likely need to align the back guide to the knife to insure a cut parallel to the guide.
I concur. You must adjust the back guide to be parallel to the blade, or as near as you can. On my cutter, I have cranked the back guide as far as possible and am still about .008 long on that side of the cut on a medium wide piece of papwer. The only thing left to do is to shim the back corner with .008 of paper stock to bring the cut square. Improvise
A lot of those old dears move a different amount every time you lock the back fence down ,then you have the wear to live with too . .
1/32nd out across the width of the bed is not too bad for this technology and construction but can be overcome by making sure the side plates are square to the knife so that becomes your important face of the machine instead of the back fence wich in reality becomes a touch guide that you are measuring from as opposed to bashing the stock against as people do ,its a technique thing !!
Hopping from left to right is never the best idea either as the back fence often rocks a little so tumbling the stack when cutting to maintain paralell faces is a good move .
Thanks everyone, got everything squared! It was the back fence out of square. Here’s how I fixed it:
To test to see if the back gauge is square, put a small stack of paper against the left side of the back gauge, but not touching the side guide and make a cut. Leave the back gauge in the same position and FLIP the paper over and push it against the right side of the back gauge but not against the side gauge and cut. See if any paper will trip off. Do the same from right side to left side. If the paper is trimmed, the back gauge is out of square.
Before testing the cuts, the back gauge has a little play like Peter says above. So make sure to pick a side of the play, and set it before clamping and cutting. Meaning the back gauge wobbles on a pivot point, make sure to set the back gauge to one side of the wobble to keep all the cuts consistent. Let’s say you put a sheet of paper on the right side, grab the left side of the fence and pull it back every time before clamping the paper. The wobble is enough to make it seem like the cut is out of square.
To square the back gauge, first make sure the gibs are snug by adjusting the front gib screws in pic 1 above (2 on each post). Then behind the back gauge, there are two nuts between the two parabolic bumps that you can see in pic 2 towards the back of the gauge. Loosen the adjustment screw just a bit on the side that the trim occurred, then tighten the other screw. A little adjustment goes a long way.
With the squaring screws tight, make another test. Continue to adjust and test until no trim occurs when testing the cuts.
Hope this will help others with their Challenge Advance cutters!
Another thing to consider when cutting is to always bring the back gage up from the back when setting a size. This keeps the back gage from moving when you jog the stock back against it. There is always some slop in the lead screw which drives the back gage. If you bring it forward from a back position, the nut that rides on the screw will be at its most backward position, so the back gage will not move when the paper is jogged. Since you are locking the position of the lead screw and not the back gage when you lock the position, the back gage can move back if you don’t account for the lead screw slop.
John Henry