Advice getting the inker unit off a my windmill
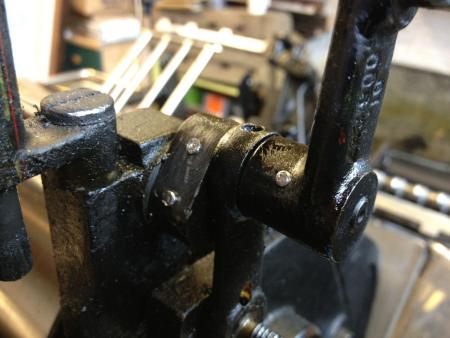
I’ve recently taken delivery of a 10x15 platen. I’m not sure of the age but reckon it’s likely late 50s, early 60s. I’m checking my way through the press and after reading this post www.briarpress.org/23592 I was planning to remove the inker unit so I can clean all the dried ink and gunk out and check over the lubrication system. It seems like a fairly simple job but I fell at the first hurdle - I can’t get the taper pins out from the assembly which lifts the inker rollers off the cylinder.
I’m looking at part T0691 or T0690. I think I’m right that if I don’t remove a taper pin (F25) from either of these parts or the corresponding parts on the other side I won’t be able to lift the inker unit off. The pins are stuck hard and I don’t want to hit anything too hard and risk breaking or bending parts.
Can anyone give me some advice on best way to remove stuck pins? I’m not sure which way the taper runs on some of them - I guess it’s the thicker end up for a part in it’s normal operating position. But this is just a guess.
I have removed another couple of pins on a similar part and they came out using a small punch and hammer.
Any advice ismuch appreciated. I’ll attach a couple of photos.
Edit: I changed the name of this post - it’s more relevant.
IMG_0153.jpg
IMG_0155.jpg
Hi there,
I have a 1953 model. I removed the inking unit a year and a half ago. I did not have to remove any taper pins to do so, and certainly didn’t touch the parts of the press you’ve photographed.
I can get a better description when I get home and have the press/parts book in front of me. That said, it wasn’t much more than removing the cowling (with the ruling, mounted in front of the main inking drum), remove four large bolts, and disconnect the fountain advance arm. Again, if memory serves me well. The whole unit comes off…you shouldn’t have to disconnect little bits and pieces.
…and don’t lose the thin shims that go between the assembly and main press block! :)
Matthew
Hi Matthew
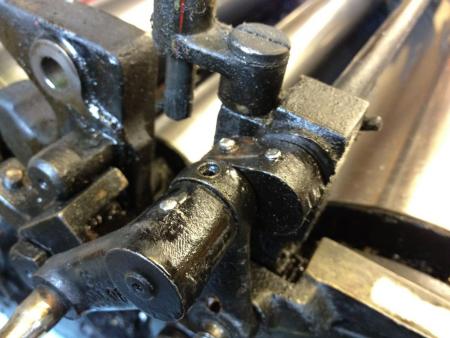
Thanks for your reply. I’ve looked at the press again and still can’t work out a way to get the inker unit off without removing the links mentioned. Here’s what I see: the mechanism which lifts the inking rollers off the inking cylinder is connected to the roller track (T0605) so, I guess, if I don’t remove the taper pins I mentioned in my original comment I won’t be able to lift the inker unit away from the base.
The instructions I’ve seen for removing the inker unit sound simple so I’m probably making it unnecessarily complicated. It’d be great if I don’t need to remove these parts.
To clarify I’m using the right terminology: I’m assuming that the four bolts to remove the inker are shown as F1 & F8 and that the inker unit is the big lump shown at top of P48 in the parts book?
I’ve added a couple more pics which I hope show the top mechanism and how it’s connected to the roller track.
I appreciate any advice.
IMG_0157.jpg
IMG_0156.jpg
if it ain’t broke then don’t fix it, these are hard to remove and you could easily break something else.
I’m in the process of blowing out my oil lines and cleaning the tank (which was incredibly dirty) 4 bolts and a few lines, just like the old volkswagan bug, takes the whole inker top off.
P1040318.jpg
Dennis - thanks for the photo - looks like a good job.
Could I ask you for another photo of the front of the inker unit? I want to see what’s left at the front where it was connected to the roller track. I’m having trouble disconnecting mine.
dickg - I totally agree. I’m not trying to fix it - just clean and maintain it! That’s why I’m asking for help.
Thanks for any advice,
Kevin.
Carefully flip the rails up out of the way.
P1040350.jpg
P1040351.jpg
P1040349.jpg
One more thing. There is a shaft with a spring on it that goes up through the inker unit on the pump side. It’s not connected at the top so just lift the unit up and it will slide out.
Dennis - Thanks for those photos, that explains it perfectly. I hadn’t understood that the roller rails remain attached. Now I get it! You obviously removed the four eccentric screws holding the rails in place - I didn’t pick that up from other descriptions. That’s great to see and solves my dilemma.
I like your rig up hoisting the unit out of the way - I’m going to copy you on that too.
I had noticed the shaft underneath the unit. Thanks for the reminder.
Thanks to all for your help. Much appreciated.
Kevin.
Thanks for posting the pictures. I always wondered what a naked windmill looked like.
Just don’t use Coppertone or Hawaiian Tropic oil.
i liked the first post better, and you didn’t tell me what kind of quion key you need????
Okay I changed it back. I was going to say decapitated naked windmill but that it almost as perverse as scrapyard. Any key will work better than the screwdriver/high heel that I’m using right now. It’s amazing what you can use in letterpress when you are in a pinch. Just like the time I used a cookie sheet for a die cutting jacket. :)
Okay I changed it back too. We have to keep it flowing. oil that is, black gold, Texas tea…
Please, sorry if I ask something that was already answered, but, how do I remove the roller rails from the top? Glad if someone could help me or point a link.
Thank you in advance!
rails.jpg