Windmill head dissassembly problem
Hello letterpress people :-)
I`m new here but I hope someone can help solve my problem.
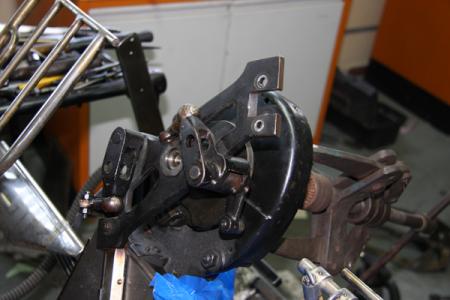
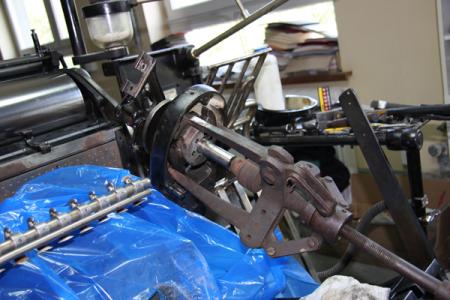
I need dissassembly Heidelberg Windmill 10x15 head (this where griper are mounted) I need dissassembly head to all separate parts. I have head open and I`m not sure where to go - from gripper side or form back side?
As you can see I tried from back side - but this doesn`t move and I don`t want to broke something..
Any advice?
PS. Sorry for my English …

windmill head 003.jpg
windmill head 002.jpg
windmill head 001.jpg
i don’t want to sound rude but please call an engineer/mechanic who has experience on Heidelberg letterpress machinery to fix what ever problem you have. I dont know why you are trying to remove these parts but to do it is a speacialists job with the right equipment, you could do more harm than good. Please take your pullers off, it does not come apart that way.
Thank you for your opinion. Of corse this should be easiest solution - but in my area there is absolutely no heidelberg mechanic. I have to fix this myself. I have experience in different types printing machines - but this windmill is my first - that why I`m asking. Please notify that when I have problem I stop work, found this forum and ask question…
So I hope I can get some advice here?
TOMODA you should talk to Peter Luckhurst , he is the heidelberg guru on here and he should be able to help you. Good luck. Why are you taking this apart?
Click on whittenburginc then click on their website. I think their bona fides are unimpeachable.
I need to have gripper arms higher becouse I need more space for the counterforce from embossing set (braass dies and plastic counterdies).
I want separate head and place additional shim. I know that is possible becouse I spoke with man who did this, but than I didn`t ask about details - he work this way many years, but now I have no contact with him. I was thinking that separate heads will be easy as in Grafopress (copy of Heidelberg) but isn`t.
Heidelberg has parts with very tight tolerance so sometimes even if you know how dissassembly something, this is not a easy job. With this head I`m not sure which way to go - that why I`m asking…
Girl with a kluge - thanks for advice. I sended message to Peter
Village Press Inc - I don`t doubt to whittenburginc knowledge and I`m understanding his point of view, but unfortunately I have to do it myself.
when you emboss on a windmill you have to tell the die maker you are using a windmill, they will make a thinner counter which will work just fine.
if you put shims under the gripper carrier you will cause problems at the transfer point from the feeder to the grippers, please listen to the advice about making the die to a different tolerance, this would be the best way to go and give you less problems, if you put shims under the gripper carrier you are taking the machine away from its original setting and you will probably cause more issues with the press
Problem is, that I have lot of ready dies set which I have to use now on windmill becouse higher orders. Second reason is that I`m using deep embossing effect and than counterdie is higher than regular even if is made on thinner base..
I`m making 3D embossing when design is really high and also counter is high - than problem is that paper doesn`t go right way to registers becouse stops on counter - when grippers will be higher - than paper will have some more space between counter and should work proper with register.
Of corse - maybe I will have to try different shims becouse I want start from thinner as is possible…
You need a kluge to do this job properly. I wish you luck with your shimming. Please let us know how it works. I would like to be able to the same thing on my windmill…..on a kluge you simply raise or lower the feeding arm as needed.
Try covering your embossing counter with a larger piece of paper, plastic, etc. Tape it firmly to the platen. It will help to make a “ramp” for the gripper arms to go up and over your counter.
kluge is the only way to go, if you want a higher embossing. Girl with Kluge, when did you get a windmill??? i just can’t keep up with you. i too do the ramp thing on my windmill to keep the gripper away from the counter.
Kluge is on my wish list :-) But I`m living in Europe and kluge are main in States…
About ramp thing - this is good idea and I also tried this before.. But when I have emboss about 1,8mm deep (is hard to make good embossing this size with paper but is possible) than counter is really high and design stops correct paper way. Paper doesn`t go correct to register always - sometimes better sometimes worse… Sorry for English - I hope you know what I mean..
Of corse I can let you know about final results.
most of my spare windmill parts came from a man who thought he could strip it down and put it back together, he stripped it but could not get it back together again.
dick I don’t have my own windmill, they pay me to run that, a miller major, and simplex, and kluges at my part-time/on-call job. I’ve been doing that since the early 80’s. I did pick up a nice kelsey about an hour drive from here. Now each of the boys have their own press.
TOMOTO contact me off list and I can send you some pictures to help you now with your counters, sorry I can’t help you with the other part of your problem.
I have this to add i think .
Whittenberg chap is correct in his comment , LEAVE THE HEAD ALONE .
You wont get any extra clearance that will help you. If you want to go that deep get a victoria paralell approach machine or a hand fed machine that has adjustable bed.
If you raise the head you can only add wear take up and that will be about two thou on a fifty year plus aged machine that has been run full time . It will do nothing to help you and if you raise further you will have worse trouble with the sheet sliding over the side lay and maybe if you go higher still dropping over the top of your headlay . I have over thirty years on and around the platens and never have i encountered such drastic attempts to get around a simple problem !!
Set up with no steel platen plate , stick a hole in a 9oz board to allow the die to poke through and affix to platen this will reduce the snagging ,it will also mean your sheet is in the correct plane in relation to your side lay finger and the right height for the sheet to drop onto the front lays correctly . If your Problem is the occasional bad lay left to right plane then stick a bit of double sided sticky tape to the surface of the right most headlay and the sticky surface of the tape will give the headlay the grip it needs to bring the sheet across to the side lay , you have to put the board on the platen face or the side action cant take place properly .
Raising the gripper carriage is not really an option as the area recessed in the chase does not leave much room if you have any packing behind the chase .you may also damage the gripper if it catches the chase before it closes itself ,i cant say off hand what will happen but i strongly advise against it .
On the subject of head removal ,i have whole assemblys of heads , they are whole still as i have never seen a need to strip one ,only change the pawls spring or the bolt it is all fixed on , i have had to do no more to one of these and cant think other than a carriage smash ever seeing the need to pull it apart , having said that ,i have a very old head here and no amount of effort will part it !