replacing saddle spring on a Craftsmen 9x12 Monarch platen
This is somewhat a continuation of this discussion (http://www.briarpress.org/41075), but I thought is would warrant it’s own entry for ease of future searches by others.
I’m about to replace saddle springs on my Craftsmen 9x12, but I’m stumped. How do I get the original spring off to even replace it when there is a notch in the shaft? See picture.
The notch almost looks like a pin and it goes through to the other side, but I’m not able to budge it (on either side). I’m able to pull the the whole shaft up to compress the spring (like I would if I were to attach the rollers), but I can’t seem to figure out how to remove the spring itself since I can’t get it past this notch.
When I do compress the whole thing, I’m able to pull the shaft out of the guiding hole, so once can get the old spring past the notch, I would easily be able to remove it from the whole press and thus easily replace it with the new one.
Any guidance/suggestions?
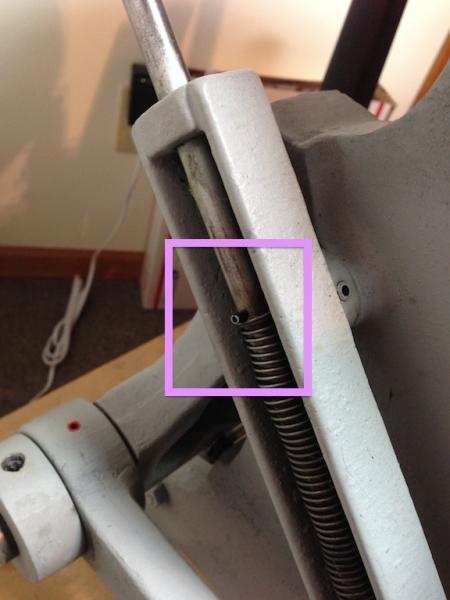
SaddleShaftNotch.jpg
By notch do you mean the roll pin in the shaft? If that’s the case, pull the pin out. If you can get to the back of the shaft, use a pin punch to push it out. If you can’t, some careful and somewhat forceful pliering is in order. Sometimes if they’re made out of cheap steel you can collapse them a bit with pliers, making them just fall out. Don’t worry about buggering the pin up, replacements are cheap and easy to find, most modern big-box hardware stores even carry them, which is almost surprising.
Keelan…. that particular press has a shoulder machined in the shaft. It’s just barely visible in the pic below the roll pin.
Tony- To remove the spring, you have to use the right size punch to knock out the roll pin, AND the roll pin that holds the roller saddle in place…. and then pull the shaft out from the bottom. (By that I mean the bottom when the saddle is UP). When you do, the spring just comes right out.
When you replace the spring, insert the shaft from the bottom, through the new spring. When it’s about half way through, knock in the roll pin shown in your picture. Then put the shaft the rest of the way in, partially compressing the spring, and re-pin the saddle in place.
At least that’s how I did my last Craftsmen roller spring. There may be a better way, or your machine might be a little different than mine, so look at it carefully before working on it.
ONE NOTE: Be VERY careful driving out the saddle pin. The saddle is not very sturdy, and if you go banging away, you could break it. When reinserting it, be careful to line it up first, then just tap it in place.
You might want to consider pressing the roll pin out and back in rather than driving it, as being a bit safer for the integrity of the parts. I have successfully used a C-clamp, and also a pair of large slip-joint pliers, for this purpose, with some sort of driver such as a cut-off nail slightly smaller in diameter than the pin, to remove the pin. The pressing process maintains better control.
Bob
having read the three comments so far it brings to mind the old adage. There’s more than one way to skin a cat. Cheers
yikes!
With a lot of sweat, (and some tears and quite a few swear words), I was able to get the roll pins out on each side to get the new springs on.
Thanks for you help! They were so stuck and not moving that I would not have even thought that they were pins that could be even removed. Good thing we have this site!