Photopolymer KF152M - Letter shoulders not evident
Hi everybody,
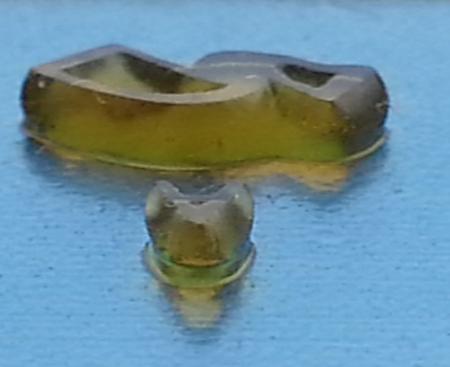
I’m dealing with some problems regarding the shoulders of the arts on photopolymer. You can find an exemple attached, with the letter A.
- I’m using a home made exposure unit (7 tube UV lamps).
- The photopolymer is around 2 inch of the lamps.
- 3:45 min exposure
Can anyone help me to find out the problem?
Thanks in advance,
Tiago
Screenshot.jpg
Since no one else has said anything, I’ll say a few words.
When you expose photopolymer, the light exposes the top first. As the exposure goes on, the light exposes the polymer farther and farther down until the polymer is exposed all the way to the plastic base.
Looking at your image, it looks like the polymer is exposed OK, and the shoulders angle outwards as they should, from the top to about halfway down. Then the shoulders start to angle inward. So, I would say that your exposure is long enough to expose the top half of the polymer but not the bottom half. Try increasing your exposure time.
Do you have a Stauffer 21 step transparent sensitivity guide, as shown here:
http://www.stouffer.net/TransPage.htm
You should put this on the edge of every plate you make, or at least put it on occasionally, to see if your exposure is correct and consistent. If you change your exposure time, you will harden different steps on the plate where you have placed this scale, and other steps will wash away.
When you put the scale on the plate, don’t put it over your negative….put it to one side of the negative, directly on the plate, emulsion down (which is shiny side up).
For info on how to use the scale, Google: “Bieler press on scales and lamps” and an excellent information sheet should come up.
I think I have read about partially exposing from the back of the plate in order to avoid this problem.
eg EPIC photopolymer plates from MacDermid
http://printing.macdermid.com/documents/resources/EPIC.pdf
Can be too long a washout too, too high a temp.
Join Gerald Bielers photopolymer group is a good idea, plus buy his book. Lamps at the correct spectrum-gotta be careful with home made units.
It’s likely too short an exposure. I would start there first.
Adjust length of exposure to 20% additional, and duplicate same washout time as first exposure.
Examine results.
Check back.
I think jonathaneclipse has got a critical part of the puzzle here. Personally I only use steel-back plates and in my situation more exposure would be needed to correct the body formation above. But that character “A” would fill in completely with any additional exposure.
Some plastic-backed plates do require an additional back exposure, some don’t; this is where referring to manufacturer’s specifications is absolutely necessary, both for exposure method and to know the normal step on the 21-step grey-scale.
I was in flexo for a lot of years, and back exposure was a normal part of the platemaking process with the “soft” polyester backed photopolymer plates which flexo uses. When we did that, it cured the polymer next to the base, thus creating a new “floor,” which was slightly above the polyester base layer. The relief was then the measurement between the floor and the printing surface.
I hesitated to recommend a back exposure in my previous post because it looked like all the letterpress plates I could find pictures of, were washed down to the base. If the plate were back exposed, there should be a thin layer of polymer on the base, even after the plate is processed. This in itself is not a bad thing, as long as the amount of relief needed, is still achieved.
If, in flexo, we were to wash down to the floor, a lot of the fine free-standing detail in the image areas would be lost, either during printing or when washing the plate with a bristle brush. However, we were doing runs of 50,000 to 1,000,000 plus on web fed presses, so that might not occur in our “short” letterpress runs.
Another thing to take into consideration is the wavelength of UV light produced by your bulbs. Different makes of photopolymer expect different wavelengths of light to cure in the time listed by the spec sheet. If your bulbs are producing a different wavelength of UV light than expected by the plate manufacturer, the cure may be off. Generally, the specs sheet for the particular plate will tell you what that wavelength is. It depends on the bulb maker as to whether you can find out the bulb’s wavelength, but if the bulbs were intended for this kind of use you should be able to find that info as well.
—
Michael Hurley
Titivilus Press
Memphis, TN
I agree with Michael above. Here’s the spec sheet on the plate material, including the spectral sensitivity:
http://www.toyobo-global.com/seihin/xk/print/#box01
As an aside, I bet not many people know there are 5 layers in the sheets of raw polymer, as described in the spec sheet. Following are a couple more things which the spec sheet doesn’t explain. Regarding the slip coat layer, when processing the plate, this layer is the first thing to dissolve and wash away. Regarding the adhesive and anti-halation layer: when a plate is exposed, we want the light to go through the polymer and expose it. After that, we don’t want the light any more. So, the anti-halation layer is a special layer which absorbs the light and basically gets rid of it. If we didn’t have that layer, the light would go through the polymer, bounce off the polyester base layer, and then go back up through the polymer and expose it where we didn’t want it to be exposed! That’s what halation means in this context: when non-image (stray) light exposes the plate (in unintended ways).
Which is known as “Light scatter”, in some circles?
Another aspect not being discussed is: The film.
Is this exposed through imagesetter/silver film? Or inkjet film?
Silver film would be totally opaque, so- adding a bit more exposure would not necessarily be a bad thing, even for that A.
But if inkjet film is in use, it actually does allow some light through the ‘obscured’ areas of the film and can create a contrast problem, in that it partially hardens or hazes the areas which are intended to wash out- and that means that adding more exposure clouds the image at the top. There’s a part of the exposure curve that will work but it’s much more narrow than imagesetter film.
Geoffrey
Hate to ask the obvious but does not the anti-halation layer in contemporary sheet photopolymer plates actually act to prevent back exposure from being effective?
Gerald
Yes, HavenPress, light scatter.
Thinking about the negatives, we expose the plate to a solid step on the gray scale, which might be, to pick a number, step 14. So, with steps 1 to 14, enough light gets through the gray scale so that we get image areas on the plate. From steps 15 to 21, not enough light gets through, so we get non-image area (I know the actual change may be a few steps wide, but lets not worry about that for now).
The steps on the gray scale are .15 density units each, so 14 steps X .15 density units each equals a density of 2.10. So, up to a density of 2.10, enough light gets through the negative to expose the plate. After step 14, we have steps 15-21, which is 7 steps, and not enough light gets through those steps to expose the plate. Thinking of those 7 steps, 7 steps X .15 density per step = a density of an additional 1.05. (By the way, density is a logarithmic scale which means that for every change of 1.0 density units, 10 times more or less light [depending on which way you are going] gets through the negative).
What I’m leading up to, after all that background, is that when we make a plate, we don’t create image area from step 21, with a density of 3.15, down to step 15, with a density of 2.25. If you subtract those two, 3.15 - 2.25 = 0.9 density units. When you vary the light by 0.9 density units, that means that actually, 8 times more light gets through step 15 than what gets through step 21. Looking at it another way, with the upper steps of the scale, we can vary the amount of light which gets through the negative by 0.9 density units, or by 8 times, before we start creating image area. So, we don’t have to have perfectly opaque areas on the negative to get non-image area. We just have to have the non-image areas at a degree of opacity which step 15 has (or maybe 16 or 17 to be safe). This is why the people who make ink jet negatives, which are not perfectly opaque, can still make plates with them.
Hello Gerald,
I partly base my answer to your question from my experience with the types of silver film which have (or had) an anti-halation layer. As I recall, the anti-halation layer is designed to block scattered light, but does not block all light. It is not totally opaque. So, you can expose through the anti-halation layer, but it just increases the exposure time. This used to be necessary in some darkroom functions.
Also, we can hold a plastic backed photopolymer plate up to the light and look right through it, so the anti-halation layer which Toyobo says is in that plate, must not be very opaque either. If you had a piece of scrap lying around, I would be interested to hear of your results in making and processing a plate with a back exposure. I would be surprised if it didn’t work, but it might not serve any purpose in what people are doing in letterpress these days (except maybe for tiagogracio who started this thread). From experience, the back exposure is much shorter than the main exposure. This should give you a floor which is polymer, and keep the plate from being washed down to the polyester.
We used to do a back exposure test by putting something opaque over most of a strip of plate material, expose it for 15 seconds, pull the opaque piece back a little, expose for another 15 seconds, pull the opaque piece back again, expose it again, etc. After processing, this would give us a series of steps with different floor heights, and then we could pick the one we needed, with its associated exposure time.
I was wondering if you ever recommend to people, to make a back exposure on letterpress plates. We always did in flexo to set the floor height (by varying the back exposure time), and also to help support the fine image areas. However, I certainly understand that this is not flexo, and what we did might not have any use in letterpress.
Geoffrey
Thanks for your response.
I have never done back exposure. First time I heard about it was when Boxcar was having problems with the KF152 plates and a Toyobo rep suggested back exposure as a solution to problems that were surfacing with the use of the plate for letterpress. The plate does not quite meet letterpress specifications. Because of that I have never used it nor will process for other folks who do use it. Just didn’t need the possible trouble it might cause.
But. An acquaintance suggests she has had some success with the KF95 plate (which does meet letterpress specs) though using this technique with high end laser jet (Epson) output that will otherwise not render smaller type sizes.
All I really know about it. Your comments about using it for Flexo early on are interesting. Thanks.
Gerald
Hey Geoffrey-
I understand what you’re saying; I don’t mean to suggest there never could be an inkjet film output available which can work for the process.
I also don’t think you mean to assume a lot about a lot of other people’s inkjet positives if you say that most can work- with regard to their realized opacity and quality of output. But I would like to point out that a lot of people outputting with inkjet are actually not getting above 9-10 density and they’re using sort of cheap printers in the process.
For instance- I use a RIP and a program that controls droplet count, and allows me to make the film as opaque as possible (for the ink system and inkjet printer I’m using, an epson 9900).
Works great for silkscreen, and even works pretty well for 94-fl and kf-95, km-95 photopolymer but hasn’t ever worked with these thicker plates. I can process the same plate with an imagesetter film no problem, though. Same processing situation, a bit more time of exposure, and it works.
HavenPress, that is interesting about what you say above regarding how people get by with film imaged by inkjet. I guess if they can come up with a procedure which works, they have met their objective, they can make a plate and print, and more power to them. However, I personally would not feel comfortable about operating this way because I don’t really know what the transmission density of the negatives is, and I wouldn’t know how much leeway I had before I made a bad plate.
There’s a saying in industry that “if you can’t measure it (meaning a process), you can’t control it.” Most people can’t measure their transmission density, so they don’t know how close they are to failure until they make a bad plate. If they could measure that density, they could measure every negative, and if their inkjet printer started trending toward making lower density negatives for some reason, they could catch the problem before they started making bad negatives. They could also evaluate the effects of making different printer settings, using different films, using different ink jet inks, etc., etc. on the resultant density.
I just looked on eBay for used transmission densitometers and a decent one would probably run around $400. That’s not pocket change, but from my point of view, it would sure make life easier.
It was also interesting, HavenPress, to hear of your RIP and program which controls droplet count.
Here’s a diagram from DuPont explaining exposure of relief photopolymer when it was still an experimental process in 1959. Note that light was understood to diffuse through the material and is only partially absorbed by the anti-halation layer. This spread gives the supporting base below the printing surface. An undercut or barrel-shaped body can be unstable, shifting or breaking during processing or printing.
It doesn’t show the same body formation that I’ve seen on any modern relief photopolymer. It may be that a point-light source was used for exposure back then rather than the close bank coverage that became standard; that does have an effect on body formation. And no doubt the chemistry of photopolymer has evolved.
I’d like to add that a 95-thickness plate is very thin: base and all, it’s no more than the relief of a Linotype slug. A 152-thickness plate needs more exposure to build up the same sloping body, and if you compared a good 95 to the 152 above, the 95 base would fall to about at the waist of that barrel-shaped body.
dupont.jpg
great tech info thanks Geoffrey -I think in a spare moment-!- I’ll try just a back exposure and see what happens on its own……just remembered …I was shown it also by people who supplied the plates…..which are B94F from Miraclon. I do output from a Canon inkjet via an expensive RIP Photoprint DX6(later versions are more uptodate of course), but also through Illustrator with max black and contrast, and this has worked for a Tyobo 152 down to the floor for a student too couple of years ago.
Hey everybody,
Thank you all for the valuable information. Let me explain how I have been exposing and developing the plate:
I use a Epson 7900 to print the negative, 2880ppi with an increase of 50% of ink usage with matte black.
The negative seems to be very opaque, but I don’t know witch density I’m achieving.
I’ve exposed the KF152 metal base on an exposure unit with 7 tube UV lamps (around 350nm wavelength), 2 inches above the plate. I’m not using vacuum, just a thin glass with pegs to keep them tight but I will add the vacuum to the exposure unit on my next trial because I wonder if the glass could be blocking or interfering on the rays not allowing it to get to the bottom of the polymer.
Like HavenPress said if I increase the exposure time I notice a decrease of definition, like the hole on letter “A”.
The washout is done with water on 25C (77F) and very soft brush.
Summing up, I believe my problem could be on the negative, where I’m not sure if it is totally opaque (I’m using Photocentric transparency - Would someone suggest any other particular brand?) or the lack of the vacuum unit.
you would be correct that different kinds of glass let differing kinds of uv through-check., some block/reduce.I hold our negs up to a window and can’t see through, that works for me.
Due you use that film -eg Grafolac2003 in Uk- that has that coating on it to adsorb extra ink, eg digital transfer film also is an example. even though it is loaded into Canon as CAD film, I send the neg to print as “commercial proofing paper”, ie to get max inkjet onto the coated “dry film” as this called. Note, some Epsons can be converted with kits so all cartridges are black printing for max density.
So, a lot of people have this notion that when printing inkjet films, loading the film with ink to it’s ‘maximum potential’ will actually make it more opaque.
This is not the case. There are lots of articles on this and you can look it up for yourself/I don’t have time to link or explain it- but every film on the market has an ‘optimal droplet count’, or amount of ink sprayed from the print head that will produce the most opaque layer of black ink possible. 50% over the standard amount output is not going to ever be the optimal thickness for film. Maybe for paper of some type, greedy absorbent paper, but most plastic/clear/coated films actually need a smaller amount of ink to avoid ‘bloom’, which makes the coating more transparent at the centers of small shapes or across any flat areas. Like, in a negative, for example…..
Anyhow, you should look into the film. I truly believe that to be the issue. Get an imagesetter film or opaque film negative and your results will likely improve.
Good luck!