Ink Issues?
Hi there -
I’ve been struggling with a few weird issues on press and since I’ve exhausted most everything I can think of - I thought I’d ask the experts to see if anyone has other suggestions of what to try next.
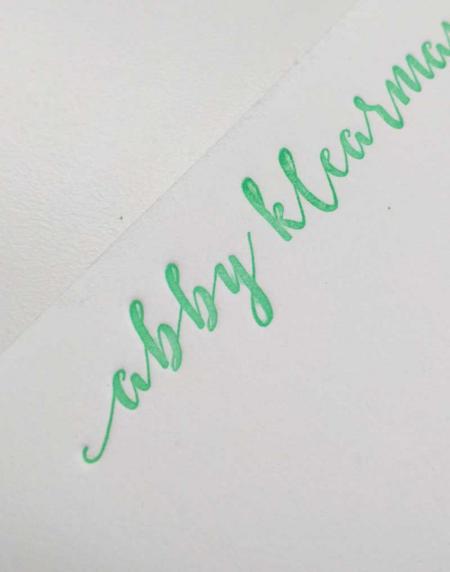
I’m printing on a small Craftsman 4x6 running a set of notecards. I have run this kind of job before several times without major issue. Last night, when printing a couple things I noticed the ink / impression was not as “crisp” as I’d like and was smudging in some places. I’ve attached pictures for two examples - the green one I *think* is due to the way the rollers are hitting the ascenders on the b, k and l. Unfortunately, due to the very small size of my press I don’t have the option of turning the form to mitigate that. Is there anything else I can try?
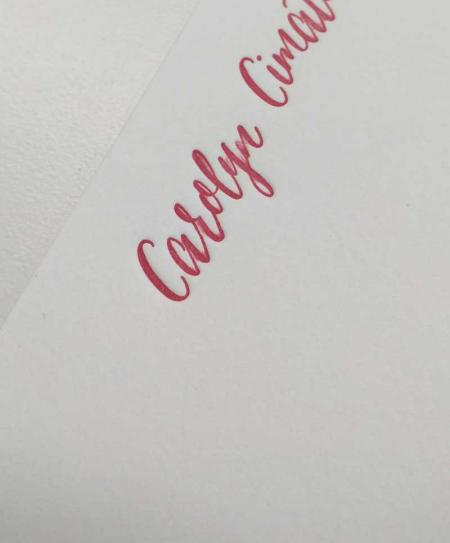
For the red job - I am totally stumped as I don’t think I’m facing the same roller issue, yet I’m still seeing quite a bit smudging in the word “Carolyn”.
Things I’ve tried so far:
- Used different types of ink (green was oil, red is a rubber)
- Repositioned form in a few different ways
- Taped the guides
- Increased / decreased packing
- Thoroughly cleaned plate and wiped to ensure no lingering solvent
Any other suggestions or ideas (other than getting myself a larger press to allow for greater flexibility in form placement? I’d love that, but probably not happening this week)?
Thanks so much for any tips!
green_issue.jpg
red_issue.jpg
For ink to transfer during printing, the inked area of the plate must physically contact the paper. In your case, you must be inking the areas of the plate where the open areas of the ascenders are supposed to be. Otherwise, the ink wouldn’t transfer in those areas. This is probably due to one or both of two things: 1) the rollers are hitting the plate too hard, forcing the ink into some of the non-image areas, which are then printing because the paper is physically contacting some of the non-image areas of the plate due to your (presumably) deep impression, and 2) the relief on the plate in some of those small open areas is typically not as deep as in the larger areas, allowing ink to cover those areas of the plate more easily, and then transfer the ink to the paper.
What I would try is raising the rollers slightly by taping the rails, so the rollers are less likely to squeeze ink into the non-image areas of the plate and then print that ink on the paper.
Are you using the grippers to hold the sheet to the platen? I don’t think it is a roller or ink issue but one of the paper hitting the plate before the actual impression is made.
Now you have two opinions, Fritz’s and mine. I hope Fritz is right, because if that is the case, your problem will be easier to solve.
Thanks Geoffrey and Fritz!
I did try taping the rails in my tests, but perhaps I didn’t adjust the packing enough at the same time. I’ll give it a go to see if I can get more of a kiss impression to see if that helps.
I was not using the grippers as they are a little wonky sometimes on my press. I didn’t even think of that as the potential problem - thanks for the suggestion. I’ll give it another try tonight with the grippers or something to keep the paper from hitting the plate first and hopefully that will make a difference.
Thanks to you both so much for the input!
If you have both grippers, you can stretch rubber bands between them across the paper in areas that don’t get printed for that run, even at an angle if need be, to more firmly hold the paper against the platen. Also, what kind of rollers do you have? If composition, and it has been more humid recently, they may have swelled a bit, thus hitting the plate harder than when dryer. Taping the rails to raise the rollers to just a kiss of the plate should solve a lot of your problem.
Bob
I say that the printer needs to be a bit smarter than the press. Not a lot, but some.
The printer must understand how the press was designed to print, and then be able to help the press do its job.
It starts with proper inking. No amount of cursing, arm waving or messing with the packing will help.
Like medical diagnosis, it helps to touch the patient. We here on the forum cannot do that and must rely on verbal info and photos. Bob and Fritz have offered helpful advice. I will chime in.
The closed space in a type piece is called the counter. Think of the o and e and p. The space adjacent to a letter, but below the level of the face is not truly a counter, but it is a place where ink should not be. Your examples show ink has been deposited in some of these spaces and has
received enough pressure to transfer to the paper. It does not look from the examples that you have too much ink on the press, but rather ink on the form where it should not be.
Remove the chase and clean the form thoroughly. Insure that it is dry. Alcohol is a good solvent for quick drying.
Replace the chase in the press and ink the form. Remove the chase to the stone, or other work surface and examine the form. A magnifying glass might be helpful. Is there ink
down on the shoulder of the plate where it should not be?
If so, you have made a discovery and are now ready to help the press. You have good reason to believe your roller pressure is too great. To help to verify this, cut a couple of strips of copy paper 1” wide. Roll rollers to bottom of the rails and place paper strip over the form and roll rollers up. When roller is over the form, tug the strip. Is the strip gripped or free. Now you have more information.
You will need to do the test left, right and center. There should be just the slightest resistance to the tug. The resistance you would expect from one kiss inking thickness of ink. If it grips too tightly, your roller pressure is too great and needs to be reduced by taping the rails. Add layers of tape until the face of the type does not take ink well and then remove a layer of tape.
Please report back when you have solved the problem so others may share the knowledge.
Get some ink on your shirt.
Thanks again to all for your helpful suggestions. After another evening of playing around with the press, I (surprisingly) think it might actually be an issue with the plates. I know that it is very rarely the fault of the plates and usually an error in set up of some sort - however, when I inspect the form with a loupe I definitely see the plate picking up ink in spots it should not. I’ve tried several different options when taping the guides and can’t resolve that issue (except when it’s taped so much that no ink is picked up anywhere at all). Reducing the packing to back off the impression did help minimize it a bit - but I can still see traces where the ink is blurring/smudging. I tested it with basically no packing at all and still had the same issues. I also took the suggestions of including the grippers, cleaning and inspecting the form, etc - but none seem to have done the trick.
The kicker for me was that I put on a different plate (same type) and was able to get it to ink and print as expected. Yet, I’ve tried a few different forms that were all part of the same larger plate and all of them seem to have these issues. I have examples using the same exact font on the plates (in a smaller size even) and the old plates seem to print fine, but new ones have the blur.
I think I’m going to try to get some new plates made as a next step to see if that resolves it.
Any other suggestions (especially if it seems I’m way off track) are appreciated. I’ll update later with more pictures of tonight’s tests. Thanks again for all of the input so far!
I would add to Inky’s most excellent post, do a pull down /draw down test on each of the inks to check the viscosities match……………..presumably they are not different manufacturers, or for different purposes..eg there are more “normal’ offset inks cf say “special “ones for different kinds of papers etc that are used in letterpress printing……
its just that I had a very similar problem year ago with an emerald green, but I was hand inking on a hand press
I’d be surprised if it was the inks as I’ve used three different ones in my testing so far:
- Rubber mixture of 3 van son colors
- Oil mixture of 2 colors from Ink in Tubes
- Oil from different color Ink in Tubes (no mixing)
I’ve always had really good results with the ink from Ink in Tubes and haven’t really had issues with the rubber inks from Van Son in the past. Given I got the same results with a few different ink trials / colors, it seems likely that it might be something else (but you never know!).
I did some tests with plates from a different order and for the same font style (in a smaller size), I was getting really clear results. You can see in the image how the two different plates printed on the same pass - one is fairly crisp on the lettering and the other is having the issues. Obviously, I didn’t correct this to get a perfect print and the birds are light, etc - but it seemed to indicate that the “Sherry” plate was a little funky given the other one printed so much clearer and was in a better position for me to start tweaking the other elements to get the best print. No matter what I do with the “Sherry” plate, I can’t seem to get rid of the area where the ink is showing up when it shouldn’t be.
I did the same test with other old plates and other plates from the new “batch” with similar results. I ordered some new plates, so we’ll see tomorrow if that does the trick.
blurryplate5.jpg
As a follow-on to illustrate the need for proper roller height and pressure to insure kiss inking.
If you can view an old copper or magnesium halftone printing cut (plate), rub your finger over the halftone dots. You cannot feel them. The relief is no more than .001”. The dot needs to be inked and the area adjacent to the dot needs to be free of ink. All of the old newspapers that printed with the letterpress process had halftone cuts for the photos. Kiss inking required.
In school, one of our final exercises was to print correctly from a copper halftone. Kiss inking and good makeready required.
View the flesh side of your finger tip to see what makes a fingerprint. The relief is about the same as a halftone. If too much pressure is applied while inking the finger (or too much ink), the print will be blurred.
kmdc You are working through the troubleshooting process in a logical way. You will get there and you will have learned something.
One more
In some cases you can clean up a poly plate that is taking ink where it should not. It is like cleaning up a wood or linoleum cut that has the same problem. You cut or abrade away the unwanted material that is too high. Very difficult to do in tight places like counters of letters. A flex shaft drill with a small dentist burr can do the work with a very steady hand in more open areas. Also a pencil eraser stroked over a metal eraser shield will remove some of the poly material.
Sometimes the only real solution is to get a new plate. If you go back to the same plate maker, include the old plate and print. Explain what your problem is and that you believe the plate to be faulty.
Turns out that the issue was indeed the plates! The new plates arrived and solved all of the issues.
Thanks again for all of the insight and tips. It definitely helped with the troubleshooting process. Appreciate it!