Ink coverage/roller height
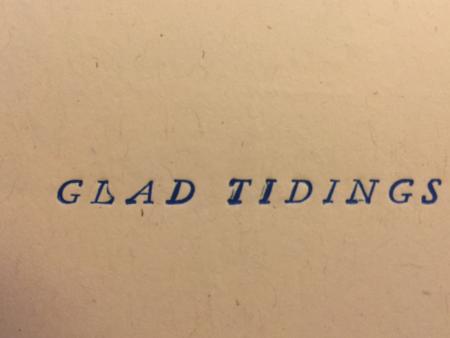
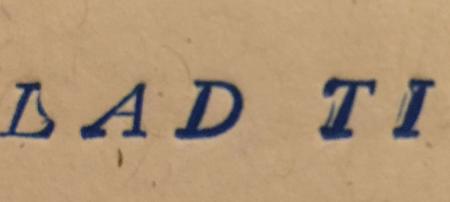
I can’t for the life of me figure out why my type is printing like the attached photo. The ‘L’ and ‘T’ and ‘I’ plus the ‘D’, ‘T’ and ‘I’ look heavier than the rest of the letters.
Press: C&P 12x18 New Style
Ink: Van Son rubber base plus
Rubbers: roller (age-no idea)
I have added tape to the rails and either I have too much or not enough. I can’t seem to find the sweet spot. I have done this twice, adding layers upon layers of tape and then removing and starting over.
Could this be an issue with rollers or trucks? I was told the rollers were new when I purchased the press from the prior owner. I have no idea what he meant by new (new, out of the box or newish). They are rubber and I have not used them until now but I have had them for two years.
Any help appreciated. I have read a slew of posts about building up rails. 11 pieces of tape later I still have unacceptable printing.
IMG_7150.JPG
IMG_7150-e.jpg
Is this the first time you have printed with this press?
You may have more than one problem. You set about checking and correcting one thing at a time.
Lock the form up at the stone and press on opposite diagonal corners. The chase should lie true and flat and not be wonky.
Remove the rollers from the press and roll them on the stone, or some other very flat surface. Put a flashlight behind them and look to see if any light shines through under the rollers or trucks. Check to see that the rollers and trucks are the same diameter. Do this with a paper feeler under the trucks or rollers.
Place chase in the press and put a good straightedge across the type form and the rails. This works best with four hands as you will attempt to rough measure if there is any gap between the straightedge and rails. Place straightedge vertically on each rail. Again with flashlight examine to see if rails meet straightedge evenly, or if there are waves or scallops of wear. Place chase in press and install rollers. No ink. Cut one inch paper feeler strips. Place over type vertically and roll rollers onto type. Tug feeler. There should be just a slight amount of contact and resistance. After all these tests you have information. All you have to do is apply it and assist the press to do the job intended.
It appears you have a bit too much ink and the rollers are making too heavy contact with the form as there is ink down on the shoulder of several letters. You may also be trying to get too much impression with too much packing.
The trucks are steel and the rails are iron. Iron wears on the old presses. In extremes, perhaps up to .030”. Tape is your answer. When you measured across the type with the straightedge and saw a gap over the rails, that gave you an estimate of how much wear you have to correct. The old printer did not have micrometer or feeler gauges. He did it this way.
Place chase and rollers on press. No ink. Add a layer of tape to each rail and roll the rollers over the type. Check the tug feel with the strip of paper. Do this one layer at a time until there is no resistance and the paper strip fits freely. Ink up and do the strip feeler test again. The ink film will be about .001” there should be just a slight resistance and the type should be kiss inked. You should be very close. You may have to take off one layer of tape.
You have to be a little smarter than the press to help it do its job. Not a lot, but a little.
No amount of cursing or arm waving will do any good until you get the inking correct. Only then do you go to the packing and makeready.
Get some ink on your shirt.
Leave the rollers and reduce the packing first. As already stated the impression is too heavy. Lighten the packing to get a kiss impression first. After a print turn the paper over and look along the surface to check the type is not making a deep dent.
Loyal Type,
Both responses are very good. But when setting the type if you over tighten the quions not only can you cause the wonky-ness of the Chase/form on the stone. The quoins should be tight enough that when you lift the corner of the Chase nothing moves but not so tight as to create any warp. You should also be “planning” the type in the form. That is - using a block of wood, there are planning blocks made for this purpose, which you would tap with a hammer or your quion key to make sure all of the letters are seated in the form. Although I think excessive pressure may be the answer here, as Inky says everything should be reviewed one step at a time. Inky’s post should be required reading.
Steve
Everyone above has told you how to correct your problem.
Now, tell us is this metal type?
Is the packing a good hard press board or soft chip board.
Packing alone with good lock up and small amount will correct your problem.
Soft packing will never work correctly.
It looks like metal type, and it is being inked down to the counters, indicating a roller problem.
Here, a counter is the flat shelf between the face of the type body and its shoulder. Those lines on the characters L T I and N are exactly where I would expect the edges of the counters to be.
Before I had a roller gauge, I set rollers the way my father did: raise them until they aren’t touching and then gradually lower them to light contact by reading the image on the surface of the roller. It was easier to do in the days of composition rollers and expansion trucks.
Thanks for the responses. I don’t know what I would do without the kind folks on Briarpress.
Answers to questions:
Inky: yes, this is the first time I have printed on this press. Your step-by-step directions seem to be the way to go since by following them I will get a good understanding and knowledge of the condition of chase, rollers, trucks, rails. I am going to try to do all of your suggestions this evening.
Steve Varvaro: One thing I did do and check and recheck was if the type was planed down and seated, and it is. I was hoping this was the problem since it would be an easy fix. I also made sure not to lock the quoins too tight.
Old Letterpress Man: brand new metal type, red pressboard, a sheet of kraft card stock). Also did it with only the red pressboard because I suspected perhaps that I needed to adjust the platen bolts.
Followup questions:
Does it matter what kind of tape I use? I am using nylon tape currently. I see that NA Graphics sells UMHW tape in two thicknesses (.005 and .10). That may be the same tape i am already using.
Lastly, I go from photopolymer plates to metal type, sometimes in the same job, does this mean I will need to constantly be taping the rails, untaping, taping, etc? I see a lot of posts about expansion trucks but I have no idea if that is what I should be using or not.
Expansion trucks were made primarily for use with the old composition rollers. These shrunk and swelled with the changes in temperature and humidity. They will also allow you to change the truck diameter in an attempt to raise the rollers. This allows you to fiddle with six trucks and have the opportunity to not have them all even. Stay away from messing with expansion rollers.
Get 1/2” vinyl tape from the office supply store. Works fine.
Get the rails to the correct height and the trucks and rollers the same diameter. You are restoring the press to the way it was built, as best you can.
There are three types of people who mess with the impression screws.
1. The well intentioned, but misguided.
2. The absolute idiots who turn things.
3. Those who really know what they are doing..
The impression screws were set at the factory. Unless someone has messed with them, you should not have to fiddle with them again unless you are printing some very heavy stock. Make compensations in your packing and makeready.
Once you get the rollers and inking right you should not need to mess with them whether the form is type or petrified peanut butter.
Understand how the press was designed to work. Help it to do its job.
Get some ink on your shirt.
Well put. You just prevented me from becoming #2 on your list.
My rollers are 2” and my trucks are 1 15/16”. Do I need to go find 2” diameter trucks? I thought I read somewhere that the trucks need to be slightly smaller on this press. ??
Also, my roller gauge stripe readings with no tape on the rails were 3/8”. That seems like a lot of tape to correct. I guess it just takes what it takes. But is that considered normal for a 100 year old press?
Since you seem to be going for some impression, I’d check that you didn’t end up smashing your type on the first run. The bloated serifs on a few of the letters suggest that to me. Been there, done that. Learned a lesson!
Jonsel - I am actually not wanting any impression and simply trying to learn how to print well and use the press as it was designed. This was my very first attempt and I obviously had too much packing on the original attached images. However, this was the result of under packing on the previous attempt which was red pressboard only (see attached). Common sense tells me I should be been somewhere in between(??) but I need to check the other things Inky suggested as well.
The type seems to be fine. I had even replaced a few of the letters just to make sure.
IMG_7151.JPG
I look at the photos again. Have you removed the rollers and rolled them on a flat surface to see if the rollers fat in spots.
Another thing it could be, and I had to do this on my 8x12 when I got a few years ago. Give the platen surface with a cleaning. I found that over the years someone had let old ink and dirt dry on the surface of the platen. At first I couldn’t see the problem with the platen. After cleaning the platen I noticed the type was printing better.
Oh, common sense would also tell me on that last image that there needs to be an even amount of contact from the first G to the last S. Does that hint to the rails being more worn on the left than the right? Why would the D have more hit than the A? These were planed down to level on the stone.
OLM - no, but I will today. I never thought of cleaning the platen but I will do that too.
Loyaltype – Thanks for the additional image. I don’t have a C&P style press anymore, but I had a Samson 8x12 for a number of years. I smashed my type but good the first time I used it!
It’s interesting that some of the letters ink better than others. The D shouldn’t be nearly as heavy if the A isn’t. You probably do need to balance the rails a little, but I’d do it at small increments at a time to see if the ink starts to transfer better.
What typeface is this? I’m trying to understand how the serifs on the T and A can be so blobby with what looks like similar impression. In your original image, the D in TIDINGS looks ok, but the I and S are both heavy. Is it possible you didn’t run the ink out long enough so it became smooth? I’m just grasping. Take it step by step and you’ll get there. I think others have said this as well, but work on impression and inking separately. That will help you sort out where the issue is.
Where are you located? Maybe there is someone around you that can help you tune up the press and your technique.
Jonsel: You asked, “Is it possible you didn’t run the ink out long enough so it became smooth?”
It’s possible. I probably did 20 passes of the rollers. To my beginner’s eye, the ink disc looked completely covered evenly and smooth and looked to what I remember seeing other presses do. However, my motor is in repair so I was doing everything by hand rotation and may have needed another 20 passes.
The reason I am ruling it out is because on a second attempt, after cleaning off the ink disc, rollers and form, I got the exact same results on the same letters.
Normally you want your form at or near the center of your chase and platen. Some find that a slightly different location provides the sweet spot. Often just turning the chase upside down may provide information. Do the poorly printing letters print the same each way? Or not. Changing the location of the form in the chase may make a difference. You are looking for information to analyze. You must learn to think like the press. Well, almost. There is a reason the machine behaves as it does. All you have to do is analyze and discover what that is. Then correct it.
One thing at a time. Ruling something out is as important to solving as is finding the solution on the first try. Of course the latter is quite satisfying.
Learning and practicing this ancient craft is a journey. Of course you can always do the composition on your computer and have the work done at the copy shop.
Inky I will try this. FYI - I am in this to learn and discover as well as enjoy the process. I am in no hurry to be a good printer. I will get good by learning to think like the press, as you say, and practicing. I don’t have a mentor or teacher. So it’s you guys and George Mills for now. And I truly appreciate the help.
Can’t beat George Mills—believe what he says in his book, though later in life, his comment to me about makeready in letterpress was “They don’t pay enough to mess with that,” which about floored me. I spent a week with him in his shop in Ft. Smith running a huge job on the Miehle Vertical which I now own. And after the first of the year, we will be reprinting Platen Press Operations.
Fritz - That’s a great story and you own his Miehle now? Amazing. I read old posts on here that you had copies of his book but I guess you sold out as they were not on your site. Nice gentleman on Briarpress sold me his old copy. Very handy since I cannot find a manual for this press.