Need advice: disassembing 1909 Golding Jobber #6
Hello Briarpress,
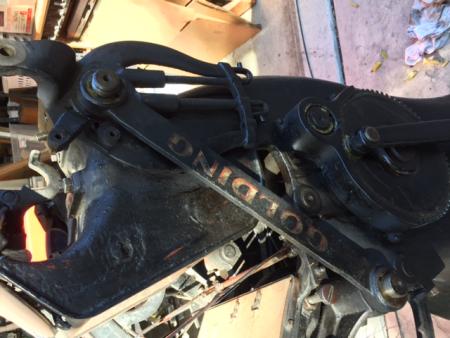
I was able to buy a replacement ink frame-left for the broken one on my 8x12 Jobber. I am carefully disassembling but now I’m stuck. I cannot remove the draw bar (part with “Golding” painted on it) see photos:
https://photos.app.goo.gl/zjuuOqnURnCBzK0t1
Should it just slide out, now that both nuts are removed? I have tried hammering and prying at it at different points of the press cycle, but no luck. Any advice is appreciated.
Thanks,
Ken.
IMG_2227.JPG
IMG_2228.JPG
Hi Ken,
I’ve taken a couple of these apart, and although I’m not looking at a press to refresh my memory, I believe that arm is holding up the feed side. If I recall correctly, you need to take the pressure off by lifting that up, being careful because I think it falls back down once released and weighs a considerable amount obviously. Once the pressure is off the arm it should slide off providing there is nothing obstructing it. You way want to prop the whole bottom assembly up so it doesn’t drop if that arm is going back on in the near future.
Good luck
I’m trying to remember from a smaller Golding I had that had to be taken apart that way — I believe that also there is a hefty spring down under that helps position the platen for impression, and that spring will probably also need to be disabled or made to not push on the platen to relieve that pressure on those arms too. And be careful about the support for the platen if you’re only removing one arm, so the platen doesn’t twist. (a bit of foggy recollection)
Bob
Thank you so much for insightful feedback AdLib and mireink.
It is true that I thought the weight of the platen could have been borne by the “right” side draw bar (actually left as you view the press from front) while I quickly remove the “left” bar. I was thinking along the same lines as you and did a quick try with a long crowbar bearing the load from the side I was removing…but with no luck. I will try again tomorrow once the WD40 has a chance to loosen anything it can.
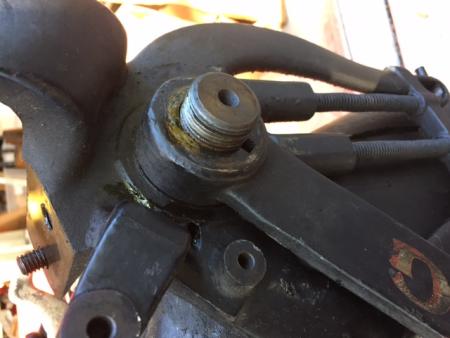
For some further info, here is a close up photo of the threaded shaft. Note the keyway thing. Does that provide a clue?
The two large nuts on this side of the drawbar were removed quite easily. I tried removing the two nuts on the other side and found both super tight — I could not loosen either one. Could they be reverse thread? Does it make sense to remove that side?
Final observation: the shafts at both ends of the drawbar move exactly with with the drawbar. i.e. the drawbar is not a loose rotational bearing with respect to the shaft.
—Ken.
IMG2238.JPG
One way to support it would be to use ratcheting straps. The two-inch wide straps can take a load and aren’t expensive.
Great idea Parallel! Hadn’t thought of that, and I do have some. Will try shortly.
Just to finish the story…success! Lots of WD40, ratchet strap, hammer blows with block of wood, alternating ends finally got it off. Roller frame replaced and my press now sports 3 rollers for the first time in probably 50+ years. Thanks for everyone’s help.
IMG_2292.JPG
IMG_2295.JPG