Golding Official No. 6 - sprung a bolt
Hello,
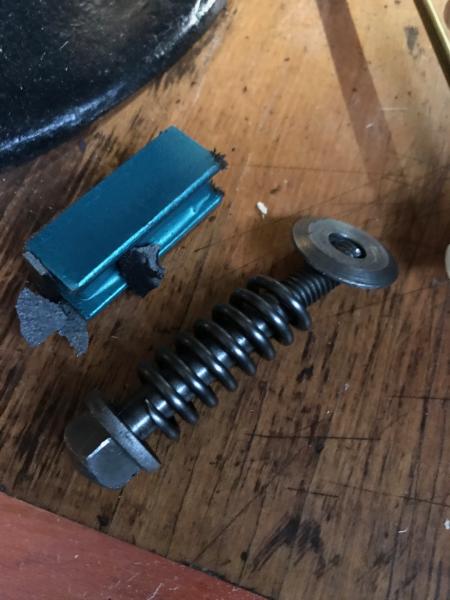
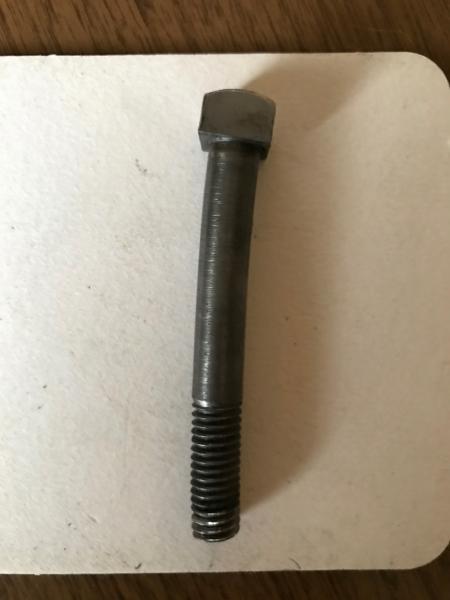
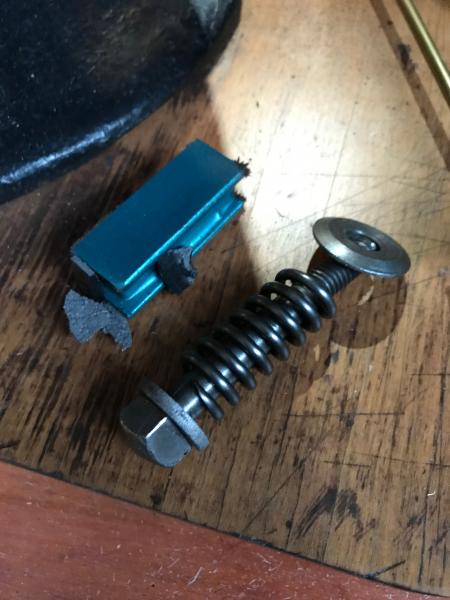
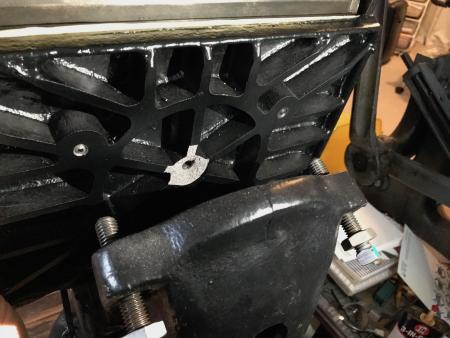
I am a novice/hobby printer. I was recently practicing using my Golding Official no. 6 by printing coasters. It was the first time I had used it in about a year and prior to that only used it a couple of times for a few book marks and stationery. I was still using my C&P Pilot for any print work I was practicing with. During this recent print session, I switched paper qualities and was not thrilled with the impression…the impression was heavier on the bottom. I wanted to get to know my press better so adjusted the impression screws a little at a time (following guidelines I’ve read over the years). That didn’t work even with a platen adjusting gauge. I probably did the wrong thing by unscrewing them completely and then turning them a little at a time to again try to get an even impression. After a about 1/2 hour of this tweaking and blind printing, the center bolt sprung out from the bottom of the platen and unfortunately some cast iron with it. The bolt was slightly bent and only looks like it was threaded in about 1/4”. Naturally, I’m devastated because it prints so nicely aside from the impression needing to be slightly adjusted. I printed about 1,800 coasters in a couple of days right before this happened. Maybe I over taxed my press (they came out nice though).
What might be the best repair solution? It seems that there is still enough thread for the bolt/screw but, it’s hard to get it back in place. And, I’m assuming that it’s not usable without that center screw/bolt?
Thanks,
Anne
IMG3375.jpg
IMG3380.jpg
IMG3374.jpg
IMG3372.jpg
You could take the platen and have it brazed up and rethreaded, or there might be enough thread left to just put another bolt in- have to replace the bent bolt. Yes, you messed it up by not having all the bolts adjusted. A lot of us have done something similarly misguided at some point- but you can get it going again :)
Thanks scottbaldwin…all of the bolts were adjusted when I was printing but, not when I was trying to adjust the platen…and at that time I was turning each impression screw a little bit, making a blind impression, trying again…that’s when the center bolt sprung. But, it does help to know that I am not alone in unintentionally messing a press up.
Does your press say “Golding” on the side of the main casting? Your photo of it looks identical to my Sigwalt, which was an imitator of Golding with a few changes, the platen mounting system being one. But my Golding 7x11 Pearl Improved has a similar mounting system without the curved back of the platen fitting into the curved “cup” on the platen support. My Golding was bounced around in shipping to me and that part of the platen attachment broke, revealing that it had been broken before and a repair arc-welded in place, with poor quality welding. I reinstalled the threaded portion with the best epoxy I could get, generously applied, and it has been OK since, though I don’t use that press much.
See if there is room between the back of the platen and the “cup” on the support for a piece to be added. You could drill and tap, carefully so to not break through the platen surface, and get a piece of 1/4 to 3/8 inch thick steel to fit that space and screw it in place, with a hole threaded for the long bolt, and reassemble. You will be limited in how much tilt is possible, but there should be no need for tilt - the platen should always be parallel to the bed when the press is closed all the way for printing.
Bob
Just a Question: Black Paint, the Metal looks to be a white metal, usually this are cast iron, grey to mid black color, if it is a knock off, it’s cast alu, looks silver. White metal is a real low Quality. I would be careful trying to tap it.
Looks like it’s cast iron, see the bits stuck to the galley magnet-
Hi Scott - yes! I was going to point that out. It’s for sure cast iron and, Bob, “Golding” is on the side of it and, I purchased it from a very reputable person so I have a little bit of it’s history. I’m sorry about what happened to your press….your repair suggestion prompted me to ask my boyfriend to take a look at my press again now that I calmed down about it. He’s mechanically inclined and has a lot of patience (with me) so we were able to figure some things out just now - forgive the length:
•I blind printed what I had been previously working on - this time obviously without the center bolt and learned that I was asking too much of my press - I wanted a deeper impression over a broader area….hence, all of the tweaking…but, my press is much happier with a smaller surface area to print so, I got a lesson on area/pressure. I’m sure you are all aware of how that works but, it was a lesson for me…I was pushing it too far… my press is capable of printing a broad area BUT, that will only give me a light impression. When I replaced that larger design area with a smaller polymer plate, I got more of the impression I’m looking for (not a heavy bite, just a nice, clean, visible impression) . I have to limit the size of design I print to achieve the desired impression. My boyfriend likened it to standing on a bed of nails. You won’t get punctured because of the broad, even area that the nails cover. But, if there’s a smaller area of nails, “ouch!”. I needed that visual and now have a better understanding.
•Correct us if we are wrong but, the center bolt doesn’t seem to have a lot to do with the impression but, it’s main function seems to be to keep the bottom of the platen in place so that it moves with the rocker and does not get stuck upright so rollers potentially hit into it…? If there is a chance to break anything further by using the press without the center bolt, I will look into getting it repaired sooner rather than later….
•He looked at the center bolt more closely and said the threads were a bit damaged to begin with just from age and how it was potentially used in the past. Would maybe be able to get a new one fashioned…
So, I learned a lot about my press the hard way. And, I appreciate the replies. I can’t print the types of designs I was hoping with the impression I was hoping for BUT, now I know how to better design into the capabilities of my press.
Thank you!
Anne
Anne, that bolt and spring pull the platen back against the adjusting bolts. If there is room in the back of the platen, another solution if you can find it is forge-brazing a modern machine nut in there, matched by a new machine bolt. (You might use a “plate nut, a disc with a threaded tube attached, made in one piece.) Then carefully pack the platen with a tympan sheet, a couple of sheets of bond paper, and a piece or two of file folder cut to fit. Lock up four type high objects in the four corners of the chase, and adjust the platen way back out. Close the press to the limit stop, and holding it there, with your boyfriend’s help, and using a strip of bond paper as a gauge, gradually turn the adjusting bolts in a half turn each at a time until the strip of paper held between one of the type-high blocks and the platen just drags a little when pulled out. Check all four blocks and keep tweaking until the drag is the same on all four. At that point the platen is parallel to the bed. To increase the impression, ONLY add packing, don’t touch the adjusters. When you are printing, ALWAYS close the press to the limit stop, to get uniform results. But do remember that the deep impression is not good for any antique printing press - it’s not what they were designed for. You risk damage again by overstressing your wonderful press — The Golding is just about the strongest of the tabletops and its virtue is it can print a sheet several times larger than the platen, a bit at a time.
Good luck! My Sigwalt is the imitator of your press and I have been using it for about 50 years and hundreds of thousands of impressions. It CAN do it!
Bob
For deep impression, try a plant mister on the sheet, dampening it slightly, then print. The moisture softens the paper, and also makes the ink transfer better, using less ink. Could answer your desire.
Bob
Thank you, Bob!
I am printing out your suggestions and will take another look at what we can do later this week to get it to work properly again! I appreciate your help. I am going to look up your Sigwalt to see what those are like.
I do understand that the old presses were not designed for deep impressions….and I certainly don’t want to tax mine. I try to explain that to friends, who appreciate letterpress, (but have never touched a press) that it was never meant to be so tactile. But, that’s what seems to be expected for certain applications (greeting cards and stationery…the size of paper my press can handle)…I’m striving for something tactile but, not “pillowing”.
I have a C&P Pilot that I love too and can go back to working with in the meantime…she’s having her own set of issues but, I think I may have found an old thread in this forum that will be helpful (ink issue….looks more like a water color/ombre’ effect even though the ink disc is evenly covered + newer rollers - tried taping the rails, but read another suggestion to tape the trucks instead).
Aren’t we lucky to have these beautiful and functional pieces of history? Even though I’ve been printing on the side for about 8 years, I’m still obviously learning…
Thanks again!
Anne