Rollers not following the same path…
Hello, friends. I have yet another troubleshooting question— since you all seem to be so quick and informative with everything I’ve had problems with thus far. Today’s issue: my rollers do not follow the same path on the way up as they do on the way down. They actually make a sort of diagonal path when traveling from the ink disc down the rails; the problem lies in the fact that the path down the rails is not the exact same as the path back up them.
When I watch my roller cores’ ends while my press operates, I notice that they begin in an even position (the same amount of core protruding from the right as from the left side); as they roll down the rails, however, they shift towards the right until the end of the core is almost flush with the hook part of the roller grip arm. Then, on the way back up, they come back out to an even position. When I look at the ink on my rollers after a few run, there is a tale-tell triangle shape where the roller does not ink on the left side of each roller. It is maybe 1” wide by 1/2” deep. I never really thought anything of it until I tried to print a large design… and it inked unevenly.
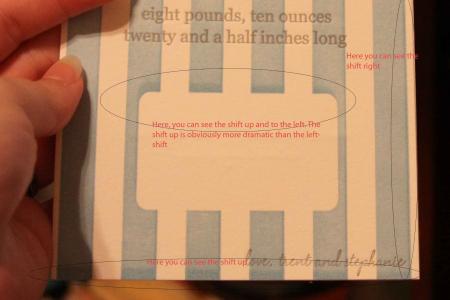
When the rollers go over the plate the first time (on the way down), everything inks perfectly. However, when they come back up, the roller is shifted slightly to the right and down and therefore does not hit the plate in the exact same spot. This causes the roller to ink the plate more on the far 1/4” left and top sides than the rest, leaving what I can only describe as a shadow of the design. The ink is always darker on that top and left 1/4”, and always in the exact shape of the design. It’s very strange.
I am using brand new rollers, brand new plastic trucks, and have evenly-taped rails. I can’t for the life of me figure out why this shift is occurring. Any ideas? I’ll be printing a few runs this evening and will take a photo of the ink-less area of the rollers when I do. Below is a photo showing the darker inking on the far left and top of the blue design, but I will take a better photo from something more intricate in the next day or two. Once the ink has dried for a few weeks, the difference in color isn’t as noticeable… so none of the projects that I had previously completed are AS dramatically uneven (thank goodness), and would therefore not really show up in photos.
Sorry for the novel of a question. Any advice or thoughts on this situation would be appreciated! Hopefully all of you geniuses can help me once more :) Thanks in advance!
press1.jpg
The darker area is called a (mechanical) ghost. The rollers do not strike in exactly the same spot on the down and up strokes, and the ink that was left on the roller in the non-image area on the down stroke is then deposited at the edge of the image on the up stroke.
It is a hard thing to avoid on a platen with solids/reverses, unless you have a distributor roller. Especially if the ink has a lot of white in it, as those inks do.
Is the form in the press turned 90% from the way it is shown in the photo? If so, I would suggest a few washers on the core ends between the rubber and the roller hooks to keep them from shifting side to side.
Daniel Morris
The Arm Letterpress
Brooklyn, NY
I have used the arrangement Daniel M. describes. Put the washers in between the roller trucks and the saddles or hooks. You still need enough space to turn freely, but this could keep your shifting left and right to a minimum.
The shifting could be caused by a slight mis-alignment of the side arms of the press, or worn saddles.
The coverage depends on what press you are using. If a tabletop press with two ink form rollers, you may be pushing the limits of solid area with this design.
As Parallel indicated, mechanical vibrators on top of the rollers do make a big difference, but are difficult to locate for some presses.
John Henry
Cedar Creek Press
I don’t know what press you’ve got Steph, but if it’s a small table top you can “add” a distribution roller by holding a hand brayer against two rollers as the press inks.
Thanks for the comments, gentlemen! I was out of town for a few days unexpectedly, so I am just getting back to this issue.
I have a C&P OS 10x15, so it’s definitely not a small press/large solid issue.
Parallel, so I’m pretty much stuck with it, and should just try to minimize the amount of area affected?
Daniel, the form is indeed turned 90degrees from the direction shown. I’ll try the washer trick and see if it helps, and I’ll let you know.
Thanks, everyone. I’ll let you guys know if the washers help at all.
With the rollers in the press, push them to one side until the truck is in contact with the roller hook, and measure the gap on the other side between the truck and hook. Get enough washers for each roller, with the inside hole as close to the core diameter as possible, to fill that gap, leaving a very little bit of space (maybe 1/32 of an inch), then put half of each stack of washers on each side of the roller to center the rollers between the hooks. This should eliminate the shifting problem.
Bob