C&P Pilot inking and roller arm
Hi all. I had my press printing fine just a day or two ago and now I have run into some problems. I had two pretty successful runs with two different items, one of them needing a moderate amount of ink coverage and it seemed to do fine. Platen was adjusted about 2 weeks ago and I needed to retape my trucks, but I seemed to have fixed those issues and was getting some nice prints. However, when I cleaned up the press to re-ink in a different color and with a new plate (photopolymer) I started getting the dreaded uneven inking problem. It started out as more ink being laid where the rollers first made contact with the plate and then the rest of the print was fine. I tried re taping my trucks, taping the rails, adding and removing tape, changing my packing, reversing and switching the rollers, flipping my custom machined base, moving my form, adding and removing ink, inking with both or only one roller…and now I am just getting very inconsistent results. And even if I get one *okay* print, they consistently get worse with each print thereafter. Impression is fine, and I studied the trucks pretty closely to make sure they are really rolling down the whole way rather than sliding, which would cause slurring. They also seem to be rolling fine. Sometimes all the switching up takes back to my first problem with the right side inking too much with the left and center looking fine, then other times there is fine inking on both the left and right sides with just the middle being too light. Then sometimes I get inconsistent inking in random spots of the plate. I’m about to give up! Right now I am looking for a quick fix since I need to get these invitations done in about a week and a half, so I am running out of time. I would try roller bearers but the base in my press is custom machined to take the place of a chase + base. I would need some kind of roller bearer that has adhesive that can stick on either side of my base while clearing my grippers and I have no idea where to find this. I highly doubt it is my base because I had it printing fine for at least three projects. I have spent hours on this and am ready to give up.
Now, what I am thinking may be part of my problem is that I realized now just how “off” my rollers are once they roll down the slope of my rails. One side is leaning down to the left and the left arm is also loose. How do I tighten this back up so that my roller inks and rolls down my form straight rather than crooked? I thought it was a loose pin on the left side and tapped it back down but it did nothing and the left side is still movable. The right side is supported by an extra “arm” so it is keeping it in place, but the left side is just slumped down. I’m thinking this is one of my main problems of why I can’t get it to ink correctly and want to fix this so I can rule it out as a problem just incase it’s not the answer. I have attached two photos so you all can see what I am talking about with left “arm” of my press. How do I tighten this back into place?
Also, since I need to get these invites out very soon and my “wording plate” is holding me up, anyone have any suggestions for quick fixes? I was even considering hand braying but I’d need roller bearers and once again have no idea where to find something to attach to my custom base since I am not using a chase. Can anyone help? Thanks so much.
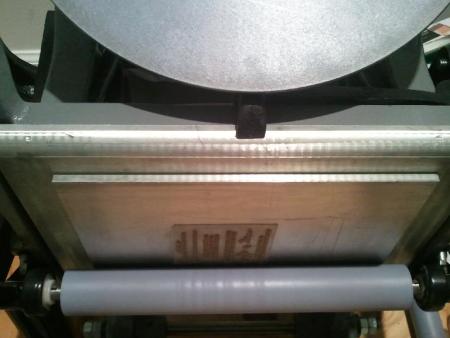
you can see here the roller is not straight.
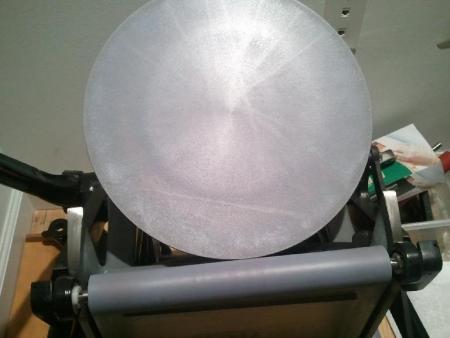
and DEFINITELY not straight here. it was not doing this for my first couple projects. how do i tighten up that left arm so that the roller is straight?
There may be excessive wear in the roller arm shaft where that pin (I’m assuming the one you tapped back in) has rocked back and forth over time. That taper pin should definitely be holding the arm of the press snug in place, so if you’ve got any play in that area it is most likely a bad shaft or loose pin.
In your photos you’ve only got a single roller installed—is this how you’ve been running the job?
I have also seen this happen when the roller arm shafts (inside the springs) are rusty or dirty. It might help to give them a good oiling and maybe even a very light sanding to knock off any grime that may be inhibiting their movement.
Hope this helps,
Brad.
ohsotoxic:
You might drive the pin all the way out and make certain that it isn’t sheared (broken). This is not likely, but it is possible. The pin should hold the roller arms securely, and they should be firmly held with no mis-alignment as you are experiencing. It is a tapered pin, and as Brad has indicated, if it is not firmly seated, there will be some give and take which could produce the problem you have.
With the arms mis-aligned, the rollers may be binding as they rise over the form, and although turning, they may not be turning at the proper rate.
J Henry
What is the best way to drive the pin out? And, where can I get a new one and how to re-install? I had my press going well and now this scares me. I don’t want to break anything.
dicharry, yes, I only have one roller on the press at the moment because I felt the other roller was just producing more inconsistent results. It seemed I was having better luck with just one roller.
Help! Does anyone advise against hand braying?
For bearers just use a die of a 18 or 24 point rule. Another thing is what you wash your press with, that can cause inking problems, although that roller arm is most likely your problem. Dick G.
You should find a straight pin punch just slightly smaller than the pin’s small end. A piece of steel rod could also serve. If the pin were loose recently, it should just pop out. If it has been sheared, the hole in the shaft must align with the outer hole before it can be removed.
You may be able to build up some combination of leading and tape at the sides of your chase/base to serve as a bearer for hand inking if it comes to that.
John Henry
Thanks for the help everyone. It seems I have been given some bad information, so today I will set out to find a better cleaner. I was originally told to use lacquar thinner to clean my press but according to the forum it’s too harsh. I only used it once so I hope I didn’t damage my rollers. Can I get mineral spirits at a home improvement store? What else can I get in the meantime to clean my press with? I want to get some California Wash from NA Graphics but right now since I am on a deadline, I don’t really have time for that.
DickG, can you clarify on what you mean by “a die and 24 point rule”? Sorry but I am a total newbie and don’t understand all the lingo yet. Again, I need something to attach to my custom machined base as roller bearers. I am not locking anything up in a chase, so what would work best? Something + tape? I don’t have any lead type either because I am working strictly with photopolymer for now.
I am starting to understand about the pin. Everyone thinks that is the problem? I will try and find something tonight to drive it out with, but if I do need a new one, where can I find these? It saddens me that my press is out of commission again when I had it working beautifully for a few short days :( and I’m on a deadline so it stresses me out!
A well stocked hardware store should have the taper pin. If the hole is as drilled (reamed) by the manufacturer it will be a # 2 taper pin.
Thank you. Hopefully I don’t run into any problems. Anything I should know before trying to replace this pin? I hope that is what is making my arm move around. I don’t know what else it could be. It is the little silver dot showing in the second photo on the left hand side, right? That is what I was playing with last night. I attached a pic pointing to what I think I need to drive out and replace? Hopefully this will fix my problem.
pin.JPG
Lacquer thinner—ouch. That’s a very harsh cleaner. I’d take a close look at the rollers and make sure they aren’t damaged. Also get some kerosene or odorless mineral spirits, clean the rollers and let them dry thoroughly before printing.
Yes, that looks like the pin you’ll want to drive out. Look on both sides of the arm’s collar (where the pin runs through) and identify the smaller side of the pin. You’ll want to use a punch on the small side to knock the pin out of the collar. If the pin was recently loose then it shouldn’t be hard to knock free.
Keep us posted.
Brad.
I don’t mean to alarm you with too much information, but there is another pin (called a Dutch pin) located at the end of this same shaft. It is hiding behind the roller arm shaft & spring. It is typically 3/32” in diameter and about a 1/4” in length. It is parallel to the shaft center line on the shaft’s edge. The hole is drilled 50/50 into the shaft and the roller frame shaft boss. Its purpose is to provide another means to secure the roller frame to the roller frame shaft. I believe C&P used the Dutch pins to locate the roller frames before drilling & reaming the tapers.
You are using polymer plate only, you can get plates that are a solid bar say 3/8” wide then use these for bearers on each side of your base. Dick G.
Thanks for your help everyone. Ink Spot, I am hoping it is the other pin that is giving me problems but when I get home I can upload and link a video, maybe that will help everyone identify my problem. Also, DickG, thank you for pointing out I can do this with photopolymer, should I just build it up from there with tape?
Okay, so I got the pin out. I posted a photo. There doesn’t appear to be anything wrong with it (unless that dent showing in the photo is a problem) but the arm is moving as much as it was before when the pin was in. The right side pin would actually be easier to get out, I could move that with my hands. This one needed to be tapped out. Anyway, since I am not sure that is my problem, I took a video and uploaded here so you can see how much my arm is moving. How do I fix thissss?
http://www.youtube.com/watch?v=OW7rTc6OEpo
Thanks.
pin.jpg
That pin definitely has problems — that notch is probably what’s causing your trouble. It looks a little like a roll pin — hollow tube with a lengthwise notch. I’d take it to a good hardware store and get a match for it, maybe a couple of thousandths oversize, and press that into the hole carefully, making sure the arm is positioned so the holes line up.
Bob
If the holes are still tapered (not drilled correctly to accept the straight roll pin) the roll pin will not work to make nor keep the roller frame tight. So it seems you have two choices … should you chose to tackle this problem. First are you certain that the only loose part is the L/H roller frame? If so then your focus will be there. Don’t overlook the possibility that what was done to the left was also done to the right. Anyway. 1) If the holes (roller frame and shaft) are still tapered get a new taper pin. If they are of the same diameter do what Bob says, a new pin … slightly larger. Drive either in while supporting the shaft from below and you ought to be good to go. Where are you located?
Tom
T&T Press Restoration
Bob, just to clarify, I can’t even see where any other hole would need to match up with it. The place where this pin goes just looks like a straight shaft and like it’s not really pinning or holding anything into place…it just looks like it was driven down into a single piece of cast iron with no other hole to match it up with. I am sure the pin is not there for no reason, but taking the pin out made no difference in the movement in the arm. It moves the same as it did when the pin was in, which leads me to believe this may not be my problem. I tried to post a photo of the hole, but it just doesn’t look like there’s any other hole to match it up to. I’m honestly not sure what this pin’s purpose is.
pinhole.jpg
Tom, I am in Virginia. And I am pretty sure the left side roller frame is my main problem. The right side seemed a little loose today after I played with it a bit but I tightened up a couple bolts and now it’s as tight as it was before. Should I think about replacing the pin on that side too? That one moves easily.
If you hold one roller arm and move the other while watching in that pin hole I think you’ll see movement of the shaft inside the arm casting. It’s that movement that the pin is supposed to prevent. The two arms should both be pinned to the shaft that connects them through the press frame so they move together. If the pin becomes loose and one arm starts moving on the shaft it will eat the kind of notch in the pin that you photographed. It is also possible that the movement has worn the pin hole either in the steel shaft or the cast iron arm. In that case you need to take it to a machinist and have the holes bored out to a standard size pin and new pins installed.
Bob
That is my only option? I have seriously hauled this press up north more times than I care to count! It’s heavy and we don’t have the means or correct vehicles to keep moving it :( And I need these invitations done by next week. Ugh, I am so sad right now.
Listen to Tom at InkSpot and Bob at AdLibPress. They are probably the ones with the best and focused advice on the problem. Tom has analyzed this exact problem on another press. Like yours, he did not have the patient in his hospital, but the guy has had many of them apart and knows how they are intended to work. You are looking for a quick fix to get the job done. Maybe you can quick fix stuff another pin in and maybe get the job done. Maybe you should get the job out to another printer and get it done on deadline. Ultimately you will want to repair, not fix the press.
That will require removing the arm from the shaft and carefuly inspecting the holes in the arm and shaft. Nickle bet one or both are worn out of round. Previous owner stuffed a roll pin in and it was a make-do fix. Repair will probably require machine shop work to ream the holes and insert a new and slightly larger diameter pin.
You note that many came to respond and attempt to help.
Isn’t it fine to be part of a community that does that?
Yes, inky, I agree, it is very nice to have the help of others who know how to repair the press. My mom’s co worker’s husband has a machine shop but it is in New Jersey and I am in Virginia, so we will have to haul the press up north again when we have time. But as of right now I am looking for a quick fix to get this job done but if nothing works I will have to see if there is someone in Alexandria who can help me or allow me to use their press while mine is out of commission…again.
Thanks for all the help everyone.
alright, so i think i am going to buy a brayer to cover my butt just incase the makeshift stuff i got this week to pin up my press doesn’t work and i need to hand ink. would anyone suggest this brayer? http://www.americanprintingequipment.com/index.asp?PageAction=VIEWPROD&P...
i don’t want to spend too much on one since i am planning on getting the press repaired, but i am on a deadline and need to get these invites printed by this weekend. i am not sure how much hand inking i will do once i get my press repaired, so it wouldn’t be very economical for me to be buying a real expensive one now. does anyone else have any other suggestions for good results?