Engraving-Can someone please enlighten me?
I’ve seen some stuff in my life printed as engravings. I think it’s pretty cool, but I still have no idea how it is made.
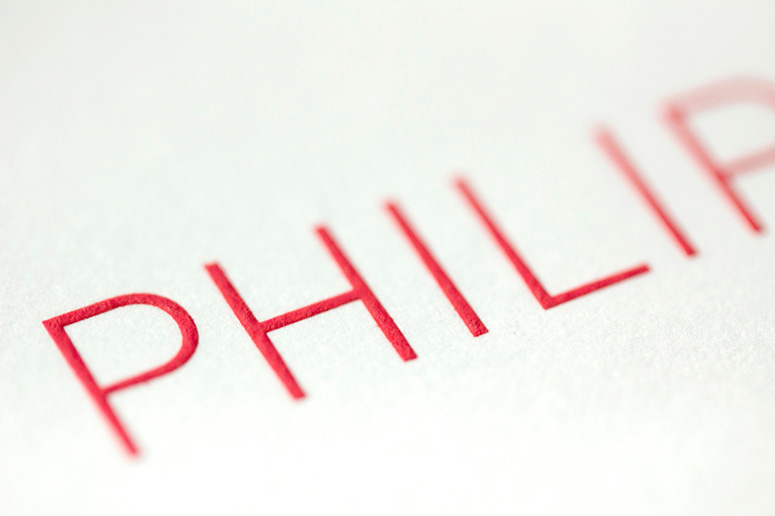
I’m talking about this: http://www.underconsideration.com/fpo/project_images/philipattar_04.jpg
Can someone please explain to me how this is done, and if it can be done on a regular press like a C&P ?
Thanks a lot!
Best,
Enrique
The type of printing you’re talking about is more properly called intaglio. Engraving is strictly speaking a correct term, but as you can engrave plates for use in letterpress, the word is a little vague in this usage.
Intaglio is a completely different type of printing and must be done with a different kind of press. In letterpress, what you want to print is raised above what you want open and thick ink is spread across the raised surface before being pressed into the paper to transfer the print to the sheet.
With intaglio, the opposite is true. You cut away what you want to print and leave the unprinted parts high. Once done, you coat the plate with a thinner ink that settles into the engraved depressions, wipe away excess ink from the raised portions and press the plate to the paper to transfer. The wet ink causes the paper to swell into the depressions in the plate, creating that raised texture to the print. To my knowledge, there’s no way to print intaglio on a letterpress.
Hmm..I’ve seen intaglios printed on a Vandercook. Naturally, inking and wiping had to be done by hand. Likewise, a good friend of mine does letterpress printing on an etching press.
Although admittedly, doing a large intaglio run (anything above 20) on a proofing press is a serious pain in the behind. It works more for limited edition artsy stuff then jobbing work.
For longer print-runs, an automatic press like Cronite or Waite & Saville are a much better match.
Engraved stationery printers use massive flat-bed presses to apply enormous pressure to press the paper into the inked image. The paper is usually a fairly heavy card or cover stock and almost has a plate finish after the printing due to the smooth surface of the plate and the pressure. It’s not a fast process either — nor quiet. One place I worked had a room full of those presses all whacking away at the same time — a noisy environment!
Bob
Enrique;
Everything you could ever want/need to know about engraving from a 3rd person perspective is in this video:
http://www.youtube.com/watch?v=N6N2r7zUv9g
No, I’m afraid you can’t do it with your C&P.
I stumbled upon this which is I think is laser etched rather than using any type of press.
http://www.paperlux.com/paper-etching/
Interesting stuff!
Wow.. thanks a lot, guys. It’s really interesting, and I always wondered how it was done. That video really cleared things up for me.
I wonder if anyone does this here in my city.
When printing an etching you will normally dampen the paper so that it can be pushed into the dip where the ink sits.
Inking the etching takes a while as you have to remove all excess surface ink by hand.
Behind the paper you will have one or two layers of thick material known as blanket.
You won’t get enough pressure with a flatbed, you need something with a roller, I have done it using a poster press with the roller height dropped.
If you want a one off print such as a face on a poster you can dry point etch using a piece off perspex, print the etching and then overprint.
engraving is also done on stone lithos, for maniere noire effects, with some softer packing a little embossing can be achieved.Rudolf Broulim is expert at these methods.
Right you are Jonathan- it’s a beautiful process, but not really akin to the process Enrique was talking about. Maniere noir, while beautiful, is the reverse of normal engraving.
Meaning that engraving on a litho stone is generally reductive when used in the Maniere Noir technique (or, “black manner”.)
This involves coating the surface of a stone with black ink, ‘rubbed in’ to achieve a very smooth, even surface. This surface also makes the stone hydrophobic, or water rejecting; it will take grease and only grease until the black layer is removed.
So- to make an image, then the artist or engraver uses tools to remove the ink and dig slightly into the stone. This yields crisp, mechanical lines or highly expressive, fuzzy marks depending upon the type of tool you use- but whatever you scratch away is now white. So you are working reductively and in the negative.
It’s basically like scratchboard for stones.
~~
However, there is another type of engraving done on stones through a GUM MASK called stone engraving.
This is known as ‘stone engraving’ because it mimics traditional metal plate intaglio engraving, and is a bit closer to what Enrique is referencing but it prints in the traditional lithographic method (sponging water onto the surface, rolling with oil ink) and requires a careful setup process to get right.
It generally involves making the stone hydrophilic (desensitizing the stone to grease, making it ‘like water’) by buffing a smooth gum arabic layer onto the surface. This creates a very shallow chemically processed layer.
Then the printer usually actually hoses off the stone and fans it dry. Since it’s now ‘desensitized’, but only to a very shallow depth, it will accept water and let go of grease (like asphaltum or ink).
(Some people leave the gum on and engrave through it, skipping the hose-off step in lieu of actual processing, but this leaves less crisp results.)
Now the artist is able to engrave or scratch very lightly into the stone, and every so often to see what they are doing, rub a little red iron oxide into the drawing (this substance is an inert pigment that doesn’t chemically alter the surface of the stone). This allows one to see the details they’re going after. It’s a bit more like engraving in the intaglio style, and less like ‘wood engraving’, as the maniere noir technique mentioned above is.
The last step after the drawing is actually finished is to rub asphaltum into the stone and then douse it with more gum arabic, and then water, to ‘wash’ the surface, with alternating very light pressure snap passes using a little leather roller that is covered in stiff litho ink (senefelders black).
The roller leaves the asphaltum in the engraved lines because they’re recessed, and the water is breaking it up and working with the gum arabic processing from the first step to remove it.
Fan dry, dust with rosin powder and then talc, apply a light etch of nitric/gum 1:350 parts, and you have a processed litho engraving.
After that, it’s important to build up the ink in those lines so that it takes less pressure to print- so several alternating inking/fan dry/cornstarch or talcum powder rubdown/light newsprint proof passes are used on press to accomplish this. A bit of dryer in the ink helps it to fill in those lines nicely, and at the end you’re left with a print that looks magnificent in detail as fine as you can actually scratch with a needle or work with a tiny sharp burin.
This is a better way to accomplish positive engraving work on a litho stone was still the best way (pre-photo-litho plate) and was used EXTENSIVELY on check printing, along with various kinds of securities printing and certificate printing like membership cards, some coupons, licenses, etc, rather than intaglio or normal engraving.
Thanks for reminding me with such a comprehensive description of both ways,I had a go some years ago in Belgium but not practised since, sounds like you’ve done a lot, fab.Rudolf works with ex czechoslovakian artists like Gazovic, Kulhanec , absolutely fab printed pictures as he specialises in these techniques.
Enrique your photo doesn’t look like engraving to me. It looks like it was printed and then embossed, If so, then you can do this on your press. You need two dies and a counter. One die is used for printing. The other die and counter pushes the paper and ink up and out of the paper.(think male/female) The female die is the reverse of your printing die. The counter is attached to the platen. When the press closes on impression the male counter pushes the paper into the female die.
Engraving uses a counter too, but is done in one pass. The printing die is inked, the extra ink is wiped off, so that ink is only in the recessed area of the die. Engraving board is used for the counter. The engraving board is cut away/relieved around the outside of the image. It pushes the paper into the die giving the ink a raised impression. Turn the paper over and look at the back to tell if it truly is engraved or printed then embossed.
Our local engraver never dampens his paper before printing. It would be too much of a pain for several hundred impressions. Send me your address and I will send you samples of both methods, so you can see the difference yourself.
suuuuuuuure looks like engraving to me:
http://www.underconsideration.com/fpo/project_images/philipattar_03.jpg
http://www.underconsideration.com/fpo/project_images/philipattar_02.jpg
http://www.underconsideration.com/fpo/project_images/philipattar_01.jpg
I mean, could you do it that way, but these cards are actually duplexed so we’ll never be able to look at the back and see if it was actually engraved :-/
I’m gonna guess it was though, or possibly someone is REALLY freaking good at thermography.
I don’t see the telltale sign of bruising around the image that is common with engraving. Because the back of the card is blind embossed that tends to point to print and emboss on the front of the card. I will try and post pictures later.
It is engraving.
http://www.underconsideration.com/fpo/archives/2012/05/philip-attar-busi...
This shop produced it.
http://terrapinstationers.com/
I know what the bruising you’re talking about is, Girl with kluge, and I say the card seems to have it all over- not just around the text.
I think they printed all-over engraving, with a plate mark slightly bigger than the cards, and then duplexed and trimmed to make the bruising work as an allover finish, instead of a finish contrasting problem.