PP plates - thin lines in positive vs negative space
Hi everyone,
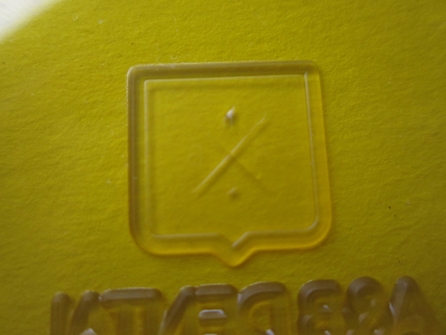
I am having difficulties processing the plate in the photos using Miraclon 94. In the original artwork the swords inside the shield are very narrow but not less than 0.25 of a point. I printed a number of proofs with a varying amount of ink.
As you can see the detail of the objects inside the shield has diminished dramatically. Even through there are other areas of the plate that contain lines close to the minimum only this area presents problems.
Sorry about the photos it was difficult to focus clearly on the areas of interest.
The better print was of a plate I outsourced.
I also attached an image from Illustrator zoomed over the detail. The yellow line is 0.25 of a point think.
I have processed plates with lines close to the minimum thickness, however, this time the small objects are the UNPRINTED SPACE. Do you treat small areas differently depending on whether they are positive of negative spaces?
What do you think went wrong? Help would be much appreciated.
Leo
m_IMG_6403.jpg
it says that the “disk quota of 4 MB has been reached” and cannot upload the pictures.
IMG_6403.JPG
proof
IMG_6406.JPG
IMG_6407.JPG
IMG_6408.JPG
025 point.JPG
Because a solid knock-out area will receive less pressure on the press, I can see how fine lines won’t print well. They aren’t getting the same amount of contact a small item of detail would outside of a knock-out area. I would definitely try to either increase the size a bit so that the line thickness is closer to .33 or .35 just to make sure that when pressure is applied to that area of the shield, the details are getting enough contact with the paper.
Any large, solid area is going to spread out the pressure more than an isolated, non-solid detail, so small objects contained in a solid area are having their impression lessened by the spread of the plate surrounding them.
A reverse image like that needs a shorter-than-normal exposure to stay open and to keep the recess from filling in. I would mask the center of that logo off for part of the exposure, perhaps a third or a quarter.
It doesn’t matter what press pressures are if you don’t hold image detail in the plate.
What process are you using for making your plates? Are you using photographic films or inkjet? Are you exposing your plates with emulsion down? Are your washout brushes in good condition and touching the plates surface with adequate pressure?
Daniel Morris
The Arm Letterpress
Brooklyn, NY
Hi lishii, I had similar problems with my plates until I realized that the type of exposure unit I have has a kind of shiny metal plate surface where I put the polymer plate down to expose it. The small letters and areas in the negative would expose nicely but any open or reversed area would get way overexposed. I solved the issue by using a black magic marker to blacken the surface of the metal so that no light can reflect back up and overexpose the polymer.
I think my unit was made for making metal plates, so for an opaque material that wouldn’t be an issue.
Hope that helps.
Bruce
thanks everyone.
Bruce, what you say makes sense. In my case, however, the surface upon which the plates are laid to expose is black in colour.
I use the common processes to expose plates. I use kereen, vacuum, photographic film with emulsion down, brushes and water level at correct height (I think the bristles of the brushes I got made are too hard but that is another topic of discussion).
Hello Nifty, yes I need to be more careful in recommending to costumers a rather thicker minimum line. I haven’t been sending out guidelines for artwork but I will in the future.
I think Parallel_Imp is on the money on this. someone else has also emailed me with similar recommendations. It seems to be about the compensatory exposure that need to be employed in the circumstances described. I will try that plate again and report back. Thanks again to everyone.
lishii:
You can get this kind of problem due to incomplete contact between the negative and the plate material. A small bit of air can get trapped under the film and will raise the negative above the surface enough to allow the light to undercut the non-image areas (whited when printed). Particularly in a humid environment, the film can stick to the plate and cause these air pockets.
As has been mentioned previously, over-exposure may also be the culprit, but I assume you may have already experimented with that parameter as that is the easiest to try.
Your example of a supplier-produced plate with good detail indicates that the process is at fault, and not the image line width.
John Henry
John is right, lack of contact is also a possibility. I experienced a lot of that when exposing in a glass contact frame. But with krene it doesn’t take much to roll or burnish any air pockets away. And I’d expect an air pocket to cause more distortion at the edge and especially at the inline of this particular design if contact was the cause.
Maybe I’m just too pre-digital in my methods, but for 25 years I have dodged-and-burned my plates, whether masked in pin registration under the glass or just masked over the krene. Never adjusted much in the software, though I occasionally spread/choke my film.