Adjusting the platen
Hi!
I recently bought a Craftsmen Superior (6.5x10), and I’m having some trouble with even printing. The bottom half of the form prints quite well (nice even impression, ink, etc.), but the top half barely registers on the paper at all. I have brand new rollers on the press and I’ve tried various combinations of packing. I’ve come to the conclusion the press needs to be adjusted.
However, I also was warned that Craftsmen presses are notoriously easy to break mid-adjustment, and that you need to turn the screws the opposite way you normally would (so in this case, turning to the left actually would tighten the screws, not turning to the right). Does this sound correct? I’m borderline terrified to have a go at this for fear of breaking the screws. On the other hand, I’d really like to print evenly.
I’ve never adjusted a press before, but I have a can of PB Blaster ready to go. All I need is some direction. Any advice or guidance would be very much appreciated!
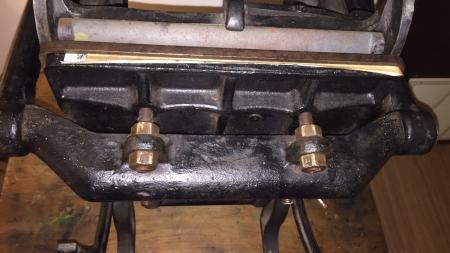
A top-down view of the top two platen screws. The screws are a bit rusty, and I'm not sure how to go about getting them off.
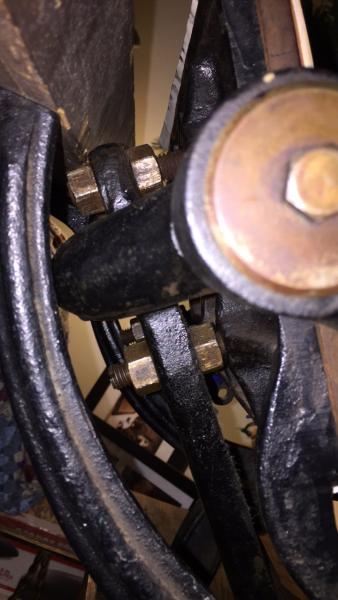
A side view of the platen screws, which seems to confirm the need for adjustment?
Do not touch the bolts unless you really really have to because you have a major change of stock thickness.
Somebody has used this press before you and would have set it up.
The solution is to make a progressive (packing), in other words a paper wedge.
Get a sheet of thin tissue and cut off a few strips that get wider and wider.Take a piece of your thinnest stock which will form the base of your progressive and paste onto it the widest piece of tissue starting at what would be the top edge for your packing. By paste I mean a few dabs to hold the tissue in place and not under any of the printing area.
Then paste onto that the next widest starting from the same edge and then the next so at the top end you have have the progressive with a thick end. The progressive may be four or five strips of tissue, you will need to experiment.
With the thick end at the top turn it over so the tissue side is underneath and then bury it in your packing.
The surface of your packing should now be roughly square to your type.
While I’d agree with platenprinter’s advice to (generally) leave the platen bolts alone, In this case it might require adjustment to get the press fully functional.
The first question I would ask is what happens when you reduce the amount of packing behind the topsheet on the platen? It may be possible that the platen is overpacked, and thus the impression is bearing off on the lower side of the form. If the image looks better after a few sheets of packing have been removed, that could be your solution.
But, there is also a good chance that the press has been misadjusted by the previous owner, and my first adjustment would be to back off the platen on the lower side by turning in the screws, thus increasing the distance between the lower side of the platen and the bed. The adjustment will be small, try a 1/8 turn to start with and see what that gets you.
I think it is important that craftsman become accustomed to the adjustments possible on their presses, and not be afraid of making simple adjustments like this one. If you take it easy and make small adjustments, you will not break anything.
Find a good source on press adjustment either a good printing manual or online from a trusted source, and study it well if you can’t find a knowledgeable printer to help you learn.
John Henry
Note that this press appears to have a pair of nuts on each bolt, the pair clamping the bracket on the back of the platen. To adjust the platen for less impression on the lower edge, you would loosen the outer nut (closest to you) of the left lower bolt slightly, then turn the inner (closest to the platen itself) nut clockwise a small amount (John’s suggestion of 1/8 turn could be modified to 1/6, one facet of the hex nut). DO NOT yet tighten the outer nut on that bolt, but repeat the process on the right lower bolt (loosen outer, turn the inner 1/6 turn). Then, and only then, tighten the two outer nuts 1/6 turn and test the impression. The threaded “bolt” is a stud fixed snug in the platen, and it should not rotate during this adjustment.
Bob
I would like to add an additional comment for general platen adjustment technique. It is most important to understand that not all platen presses incorporate the same style and type of adjusting screws, not to mention field alterations. I will not claim to have seen every possible iteration but I have worked on enough to know that I have likely not seen my last “what the heck?” set up. So if you are convinced you want to adjust your platen first prepare to understand how to obtain the end result you are hoping to attain. I believe the “best practice is on or around 0.968” at six places (all 4 corners and 2 mid span). Use a gauge, I use John Falstrom’s or one could use the 4 magnetic pieces available from Rick the Printer. I often read that 4 pieces of identical rather large type can be locked up in the chase and used as a gauge, though each piece of type would need to be shimmed up equally ~ 0.050” to account for tympan and a few sheets of packing. Anyway back to the actual adjusting… with the platen closed, against the press stops (on the C & P Pilot, Craftsmen Superior and Hohner this means the yoke is against the stops found on the side frames at the rear of the press. I have encountered more than a few presses where the platen comes to a halt and the stops have not yet been contacted. This usually means that the platen is hitting the rails. In this case the platen needs to be moved away from the rails in order to achieve the first requirement of the yoke being against the stops. All of the above advice is sound. But before turning any bolts determine what style of bolts you have. The older presses (C & P and Craftsmen most likely have the L/H threaded bolts at the end entering the platen whereas the bolt portion threaded through the rocker is a R/H thread. The N.S. Pilots retained the O.S. bolt style but the Craftsmen Superior changed to the straight stud using two jam nuts. This is why Bob mentioned that the stud ought not turn. Your photos lead me to believe you have an O.S. Craftsmen Superior which if unaltered is likely using the style with the L/H threads found at the end of the adjusting bolt. However the photos suggest otherwise as I don’t see the typical gap between the larger R/H threads and the smaller L/H threads. Bottom line is you need to know what style bolt you have before you attempt to adjust them. And be certain that they are all the same style. Keep in mind the lower two screws are longer than the upper because of the thickness of the rocker on O.S. presses of either manufacturer, yet this press clearly displays no difference in thickness.
Tom
T and T Press Restoration
www.tandtpressrestoration.com