Poco Proof Press No. 0
Hi friends,
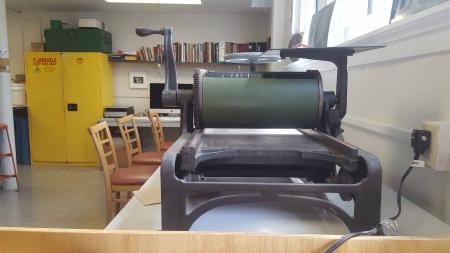
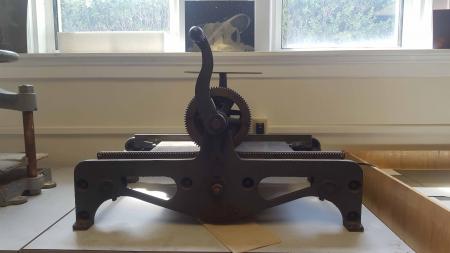
I’m helping the printmaking department at my local university to exhume some letterpress equipment from a basement. The professors pulled up a Poco No. 0 and we are trying to figure out pretty much everything about it. There is a really helpful website, https://sites.google.com/site/pocoproofpress/, which I have been referencing.
We would like to get the press running so we can give students in a bookmaking workshop some demos and let them experiment with typesetting and printing.
Does anyone have experience working on these presses? Restoring them? I’ve only ever printed on Vandercooks / Challenge presses and several platens, including my own little Pilot. So I’m up to the challenge of getting this thing ready to print, but unsure where to start.
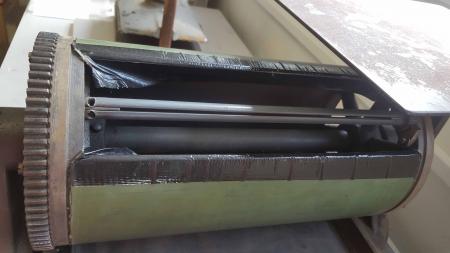
The first things we noticed about the press was the way the rubber is adhered to the cylinder w/ duct tape (?) and that the taper pins are missing. What should the cylinder look like? Is the rubber surrounding it original? Also, the site I linked above talks about a frisket - is this essential?
Any advice would be much appreciated. Thank you!!
poco1.jpg
poco2.jpg
poco3.jpg
Simple machine. Intended to make a proof of a form. The form was brayer inked and a piece of paper plopped on it and it was run over by the cylinder. Squareness was not a requirement. It was not intended to do nice multicolor poster work. It can with care and a frisket or pin registration system.
The rubber sheet on the cylinder was added by someone later to attempt to reduce the makeready for a form with differing heights of the type or other elements. It is most likely a blanket from an offset press. The standard for a proof press used just to make proofs of a type form is a tympan sheet around the cylinder. Perhaps a sheet or two of packing under the tympan sheet as required.
You must determine if the distance from the cylinder to the bed is type high or galley height. .918” or .968”
Taper pins available from a good hardware store.
Get some ink on your shirt.
I made a tympan and frisket for my Poco No. 0, hinging the tympan to a 10x15 C^P chase on the bed, and the frisket hinged to the tympan, as shown. So far I have onl;y used it once but it worked as planned. The tympan is covered with model airplane fabric that shrinks tight using a hair dryer, and the frisket nests inside it. My Poco’s bed is made for type high material. The cylinder is covered with a sheet of mylar and some packing..
Bob
Poco tympan and frisket.jpg
Rick Von Holdt has done some wonderful printing on his poco using a pin register system right on the cylinder of the press.
The press was originally designed to use conventional tympan paper and packing with possibly a very thin rubber sheeting. The offset press blanket pictured is certainly not original.
John Henry
Cedar Creek Press
First of all, where the heck are you? We could talk all day, but an on-site visit and personal demonstration/explanations would be immeasurably better.
I have been printing on a Poco for over 40 years, and can coax some really nice multi-colored prints out of it.
I received my press from a typopraphy shop in San Fransicsco in the mid 70’s. It did have an offset blanket on the cylinder, but it is not duct-taped on but simply held in place by the tympan paper . The tympan paper is tapered to have both ends slide into the slit in the bar you see in you photo. A nail or pin is then inserted into one of the two worn holes you see on the left and that bar is then turned with that to tighten the tympan paper. There are “hooks” for a lack of a better term (I am NOT that mechanically oriented) that can be pushed down into geared(?) teeth to catch and hold the bar under tension when everything is tightened.
I put a new (actually a used) blanket from an offset printing company, cut to size, and have NOT replaced it in 40+ years!!!!!!!! To adjust packing I simply tape film or paper on top of the tympan paper as need for each project.
Occassionally the tympan paper needs replacing, but that’s about it.
It would take hours to explain the nuances, the types of packing paper (hardness/softness/thickness), etc.
I also have several different methods to achieve registration, etc. The most elaborate involves pre-punched paper and registration pins taped to the cylinder.
This not only gives me near perfect registration, it also acts as a ‘gripper’ system that allows me to print back-and-forth in both directions. The trick is to make sure that each successive pass or color goes through the press in the same direction as the original pass. There is a minute amount of slippage in the gears that will throw things out of register if this is not done. I should note that I have the largest size of Poco press and my inking plate flips up and out of the way for my printing back-and-forth.
ALSO NOTE: There are varying thicknesses of offset press blankets!!!!! I’ll have to mic mine to post that info for anyone interested.
I will be in Mt. Pleasant, IA next week - Wednesday afternoon through Saturday morning if anyone is interested in coming and talking to me about this stuff. We don’t have a Poco there but I can demonstrate ALL the basics on a Vandercook No. 1 that we do have on-site.
Next week is the Annual Midwest and Great Northern Printer’s Fair at the Old Threshers Grounds in Mt. Pleasant, IA. We will be demonstrating Steam Roller Printing and using a 1905 Kelly-Springfield 12-ton steam roller on Friday and Saturday. There is also a big letterpress swap meet Saturday morning and 8’ sales tables are available for $25 to anyone having “stuff” to sell. We have people coming pretty much from the entire upper Midwest every year.
Rick von Holdt
The Foolproof Press