This one…
might even be too much of a challenge for me.
I feel sad just looking at it :(
Sad and tempted to bid :)
KITTEN.JPG
ffi |
fl |
5m |
4m |
’ |
k |
e |
1 |
2 |
3 |
4 |
5 |
6 |
7 |
8 |
$ |
@ |
# |
Æ |
Π|
æ |
œ |
|||||
j |
b |
c |
d |
i |
s |
f |
g |
ff |
9 |
A |
B |
C |
D |
E |
F |
G |
||||||||||
? |
fi |
0 |
||||||||||||||||||||||||
H |
I |
K |
L |
M |
N |
O |
||||||||||||||||||||
might even be too much of a challenge for me.
I feel sad just looking at it :(
Sad and tempted to bid :)
KITTEN.JPG
Oh dear, I think its beyond help…
Think of it as desk clutter for a printer with REAL presses! :-)
Bob
For one thing, I think that is an absurd amount of press packing.
I mean, I know deep impression is really in these days, but come on.
Has this person ever heard of ‘oil’?
http://www.ellensflorist.co.uk/Storage/Pics/263/4-1-1.jpg
hahahaha, you’re funny HavenPress. I agree, it’s an excessive amount of packing.
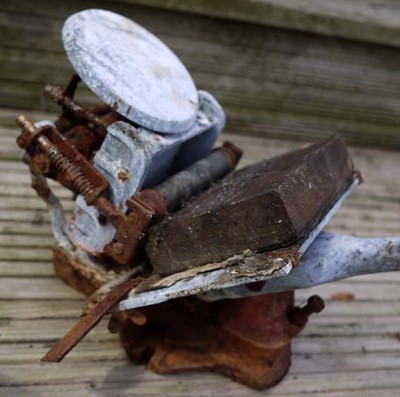
It is a little Adana H/S 1 with water damage, won’t be much of a problem to clean up. Put all the bits in lemon juice for a few mins and wire brush the steel parts.
The chase is missing but a replacement can be made with a bit of aluminium or lock up in the bearer chase.
Not worth getting rollers, they never go right to the bottom, you have to let the handle spring back, hand ink if going to print. Makes a good ornament for the work shop.
I’m going to go for it. Its all good fun.
Sorry, Kent. I forgot I was going to post an image to maybe encourage you and show you what can be done if you are willing and passionate.
http://www.flickr.com/photos/enriquevw/sets/72157628353976837/
I couldn’t attach the file but the link will show you all the photos of my restoration process of a much bigger press.
I have see that press called the HS1 on here before. In all the Adana stuff I can find it is called just HS or toy. This is a photo of it next to a HS1. It is one of the harder Adanas to find. I say save it . To small to realy use, just good desk clutter.
ls1 013.jpg
(All my kidding aside, I also think you should go for it.)
plenty of small Adana’s on ebay, Like Albion, too much corrosion especially on the disk I would think, but if it is another 99p press, you might get £1 for scrap…….?
!!
The corrosion will clean up with lemon juice. The disk can be polished with a fine car paint cleaner like T Cut.
This is a section of the manual with the parts diagram. Of the three extras the only one that I have seen is the gripper which is not on this one.
http://www.thepapertrail.org.uk/files/letterpress/Adana%20Rapid%20Print....
Thanks one and all, I’ve bid on it so we’ll see what happens.
oops
The problem you face that will make this difficult isthe steel parts have probably rusted within the aluminium ,the removal of one from the other is difficult at best , that said ,every re usable part that can be gained for re use is good news ! It is not unusual to see a pile of bits for sale .
I may even have a use for its cast body as have one with a broken back in the heap .
I won this for £11.25. Hurrah.
Peter - do you have the chase dimensions for this model anywhere?
3 5/16ths x2 1/4 inch is the internal bed area of the little ones here ,they dont have chases i set the job in the bed and re fit it every job ,although i use them for alternate jobs than printing .
Oh I Say Peter old chap, the chase/bed I have in front of me now has internal measurements of exactly 2 3/8 X 3 3/4 EXACTLY from an accurate analogue caliper/vernier backed up with an accurate 1” micrometer., (as below) … And the answers to FORTHCOMING questions will be>> height of the rails is exactly .820” (point 820) The rollers in original form had trucks of exactly .812” (point 812).and were/are of pressed steel, as opposed to lathe turned!!!<< . . And in line with many previous posts herein, as the rails are lower, the trucks are higher, consequently the compound, to cover the full out type area is of less diameter than the trucks. As are the ones in front of me now, cracked and crazed but still good for patterns, for me to turn new stocks from???
“Cracked and crazed”… Sounds like me!
Thanks again for the advice and for the bearing with the youthful enthusiasm.
Peter & Mick, thanks as ever for the helpful advice.
I saw these ‘small chases’ on eBay too, and wondered whether they would work, but I think this is all a bit far down the line, and anyhow, fitting the bed sounds like a more viable plan.
http://pages.ebay.com/link/?nav=item.view&id=141030276074
The link is here, anyway, just in case it is useful to anyone else :
I’d love to meet the seller though, he lives v near me.
Also Peter, your “heap” sounds like a treasure trove!
Mick, I used a plastic rule and as you are aware blind as a bat !
It is called the heap ,spread across at least three hoarders , buried in leaves, car parts , finshing equipment , rusty motorcycles , rusting in garages and piled in two gardens there is The Heap …. You have just heard a voice from the other end of the heap its ghostly and hollow sounding ,we call it moany type Mick ….
The Heap Is a storage sytem , if i can use it its on my side , if Mick can use it its on his side , somewhere in the middle is barry who like shiny brass things …..
If we can find something that we wont use and someone else can we will save it from scrap if only for a length of rod within it (mick).
Peter, yes fair do,s several (including me) have availed themselves of your Heap O Crap from the Midwest of the U.S.A. to beautiful Downtown Sussex. I try to post accurate info and always include a disclaimer if it is only conjecture, perhaps I should weigh up your occasional slips against other posts re H/berg Cylinder, H/berg Platen, Finishing, etc and much more. Perhaps I should keep in mind the self proclaimed little eyesight problem and the Left Hooker syndrome, left handed comps are still an enigma??? . Perhaps this also explains your Q W E R T Y keying efforts I.E. always the comma in the wrong place? But you will of course say that my syndrome is caused by by 30 years plus, reading Monotype upside down and back to front???… Along with My Heroine Elizabeth Cotton, with Her Guitar >Upside Down and Back to Front< . .Thats a very special Lady. Perhaps I am in no way worthy of any association. H G F D S A
Collected this tonight. So far the lemon juice is working wonders!
hs1.jpg
Another photo. After the first round of Lemon juice / vinegar / t cut, she’s looking in much better shape aesthetically. The age old tympan and packing etc had all gone mouldy, so I ditched that, and am just painstakingly cleaning up now.
Thanks everyone who guessed that a lot of the corrosion would come of, I was amazed how much did/has so far.
One other question, while I’m here, the handle moves a bit, but the chase bed etc does not move in response. Is the mechanism for the HS1 different from my 8x5 and 5x3?
If not, I’m guessing its due to the mechanism being corroded, and it’ll be back to the toothbrush / wire wool / gently teasing out the corrosion I guess.
Cheers everyone.
HS1a.jpg
The mechanism is the same as the No 2 and the 1930s No 3, pull the lever down and the platen moves up to the chase. If it is sticking it probably to do with the lever joints being corroded as it has been allowed to get wet. I had the problem with a No 2 but it turned out to be old solidified oil and required a bit of attention with a wooden mallet to free a couple of parts.
If you are cleaning with lemon juice it is easier to drop the disk, bearer chase, and lever arms in a tray of it. The metal dissolves so don’t leave for too long in the tray. The juice will turn grey and frothy. The lay bar and roller arms can also go into the lemon after brushing the loose rust off.
Vickie-Bold, With about 5 moving parts and depending on how in depth you want/need to go follows:- The platen swings up and into contact/impression via a mainshaft/pivot about 3/8” diameter!!! … If you throw everthing you can think of at it (the base as a whole) and then dont remove the shaft and separate the platen from the base, you will have rusty rubbish leeching out for ever and a day!!! . . It is not high tech/high spec to remove the shaft, BUT all the penetrating oil in the world will not remove, all, the rust build up on the exposed sections of the shaft, (normally retained by tiny circlips), the solution is to emery cloth down all exposed shaft parts down, and then tap the shaft out with a brass drift of smaller diameter than the shaft… Emery cloth strips at 1/4 to 1/2 inch wide torn from canvas backed sheets, … And then used as in linishing, I.E. the strip wrapped around the shaft at 50% and pull backwards and forwards… . .Next with very fine or, finest wet and dry wrapped around any thing with a slight convex contour by hand and in rotary fashion, GENTLY clean up the internal bores of the diecast sections!!!… . Plus if you havent already, a small vice, with soft jaws lead or copper slippers, (to protect your steel lumps) is an absolute boon for cleaning fiddly bits up, including aerosol spraying ( Ferrari Red is a ringer for Adana,s original colour) downhand in/on the vice as opposed to vertical? you get less runs and it flattens out beautifully!!!
Thanks both, I’m going to give taking it apart a go. Might give you a shout if any wild springs leap out at me! Looks straightforward enough though.
Wishing I’d taken a useful technology GSCE now.
A vice does indeed sound like a good idea. But then a work surface to attach it to would be needed. My poor living room is struggling. Both the cat and I were high on penetrant fumes last night. Oh the joys!