Rollers & Roller Height
Curious, I just purchased a new roller from NA and added it to my C&P 10x15 OS along with an older roller that came with the press.
Without having prior experience with a letterpress, I thought the old roller I had was in good condition. When the new one arrived, I realized how different they were. My old roller’s circumference is quite a bit smaller (due to wear?) and is far less tacky to the touch.
With that said, I had a few questions:
- Can my new and old roller play well together even though they have a different circumference? (I’m guessing not, because they ink the type completely differently.)
- Should the roller trucks lift off the rails at all when inking the type? I noticed my old roller lifts off just a small amount, but as my new roller hits, it lifts off a lot. I’m inclined to thing I need to build my rails up so they don’t lift off at all?
- My old roller is very easy to clean because it is not tacky like the new one. The new one if very difficult to clean. What are some cleaning technique for rollers? Rag? Shop towel? I’m using paper towels and the paper towel sort of rubs off on the roller as I clean it leaving paper strands all over the roller.
Any help would be much appreciated!
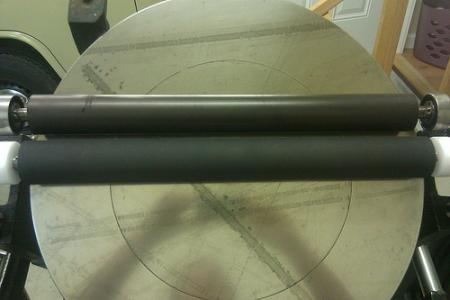
Old and new roller
I’d bet that the old roller and new roller could be used together as long as the trucks on each roller match the diameter of that roller. That being said, It would probably be easier to buy another new roller and just start fresh. It can be enough of a challenge getting your roller height corrected with matching rollers—I can only imagine what frustrations might arise from using a mismatched pair.
Your rollers should not lift off the rails at any point. This indicates that your rollers are hitting the form too hard. You’re correct to think that this means you need to build up your rails with tape. The difference in lift from old roller to new also indicates a difference in diameter—which you had suspected.
You’re going to get many different opinions on how to wash your rollers, but I prefer to use cotton rags (can be purchased in large boxes or through a rag service) with odorless mineral spirits. You should be able to get a good clean set of rollers with only one rag as long as you fold it into quarters and then unfold and refold as you progress through the cleanup process.
Hope this helps,
Brad.
Brad is correct. Just imagine trying to troubleshoot roller issues with two distinct sizes of rollers! You raise the rails only to have one not ink at all, and vice versa.
Largely this is going to depend on what you’re printing (plates, type, cuts, etc.) but you should start saving up for a new roller to save on headaches.
Brad is right, you should always get rollers in pairs, the older roller could be used for the third roller on larger forms. After lots of washups the rollers get shinny, there is a glaze remover you can wash them with that will help some, but the stuff smells strong, do it outside. The cotton rags are the best for washups. Good Luck Dick G.
Here is a cleanup instruction from an old high school text book. It says to use typewash, but you can use the cleaner of your choice.
cleanup.jpg
If your roller trucks are the same diameter as the rollers(the rollers should actually be very slightly larger, maybe 1/16 inch overall diameter larger, than trucks), old or new, there should be no lift-off of trucks from rails — if the rails are type high and the material being printed is also type high and sitting flat on the bed — not all valid unproven assumptions. Check them all and I think you’ll find one or more (roller-to-truck diameter, rail height, forme height) are off somewhere. Check everything before changing anything!
Bob
Evan -
I think your old roller is smaller due to shrinkage. They don’t ‘wear down’, but they sure do shrink as they dry out.
And, like Brad, I use regular cotton rags ( I buy the red ones from Home Depot) and Mineral Spirits.
1) YES. The old and new roller CAN play together - IF the old one is not too hard (durometer less than 45-55) and you adjust them individually to be just below type-high as they cross the form.
I actually have a set of new rollers on my 10x15 - just like yours. I got them from Fritz and they work well. But I bought a matched set - as my buddy DickG recommends..
2) No. The trucks should never lift off of the rails. The rollers should gently kiss the type and depress very slightly as they roll across the form. Slightly- very slightly.
3) If the old roller is really slick and not tacky at all, it is not a good sign - but does not mean that it’s useless either. As rollers get older, they do dry out. Oils in the rubber simply evaporate over time - and from exposure to solvents, so old rollers can cause problems -lots of problems. New rollers are better, but quite often older rollers can do the job as well. - and you can only know if you try.
I’m lucky - I have a set of old - *very* old rubber rollers on a little Pearl we have here. But mine were made over 40 years ago - when the rubber was still made with a sulphur content so that they would not dry out so quickly. 40 years at least - and they still transfer ink just fine.
Now, here’s the long, ranting part of the story….
Tape the trucks, not the rails.
Tape the trucks, not the rails.
Tape the trucks, not the rails.
I don’t know why everyone always tells novices to “tape the rails”. - musta read it on some new age “letterpressing” web site or something. Sure, taping the rails on a big press works sometimes, but don’t do it. I used to do it when I was a kid, but then I grew up and learned better.
Don’t bother taping the rails. Besides, it cannot be guaranteed to solve the problem.
Tape the trucks instead and get your rollers set properly. If they bounce as they cross the form, they are too low.
Tape the trucks. It’s the only reliable way to get your rollers adjusted properly - unless you have magic trucks…
Around 1920, a guy named Morgan invented an expandable truck - known, oddly enough as The Morgan Expandable Truck. It was one of the greatest press add-ons ever conceived. You can buy a set of them and solve the problem easily. - IF you can find some for sale somewhere.
Or, you can get a roll of vinyl electrical tape and solve it faster and for far less cost.
This is a common problem and always has been - and was more of a problem in the old days when rollers were cast of a glycerin-based composition that would swell and shrink depending upon the weather.
I repair and restore old presses and I deal with issues like this all of the time and become very frustrated at all of these ‘experts’ always telling novices to “tape the rails”
That won’t solve this problem.
And you don’t need to spend another $125-250 buying rollers you might not really need - at least not quite yet.
That one new roller you have may carry the load if the other one’s not too bad.- too hard, that is.
New rollers are always good have if you want to do quality printing, but unless your old roller is hard and rough, it could do quite well laying ink on your form - and can be made to play well with its new 20-30 durometer little brother.
You may be able to cut that glaze with some offset blanket rubber rejuvenator - or maybe even some super fine sand paper or one even just a Scotch-brite pad.
New rollers are commonly “ground” at the factory using a lathe and a fixed-position belt sander. Go ahead and try sandpaper or Scotch Brite if the roller is glazed. If it’s that bad, what do you have to lose?
I’ve got some 40-year-old semi-glazed hard old rubber rollers on a little Pearl we have here and they print well enough for printing with type. Never tried them on photo-polymer plates, but I guess I ought to see how they’d do.
In any case, roller height is probably *the* most critical factor in doing good letterpress printing, so make sure that your rollers are at the correct height.
But don’t tape the rails, tape the …. (yes, the trucks..)
And, if you plan to print with photo-polymer plates, roller height is even more critical an issue. Type is pretty forgiving. Deep etch engravings are, too. But Photopolymer plates are not. Even the deep-etch K-plates are really, really fussy about roller height
AdLib is right. Get your roller heights set properly before going off and wasting time and money.
And my old buddy DickG is right, too. When you do buy new rollers, it is best to buy them in pairs. But it’s a bit late for that today, and besides, why spend another $125 until you need to.
Your old roller looks a bit beat and shrunken and seems to have bit of a bulge on the left, but could still serve quite well for number and perf jobs or in the less critical 3rd roller position.
So, before you buy a new roller to replace it, see what you can do with the one you have.
Look in your toolbox or go out and spend $2 for a roll of black vinyl electrical tape and tape your trucks. Wrap 12-24” of tape around the trucks and continue to add tape on each truck individually until the rollers do not raise up when they hit the form.
And don’t measure the with a ruler or micrometer or anything like then. Measurements are a good place to start, but only a good place to start. TEST them by inking up the press and inking a live form - large type and small type together if you can.
Inked rollers should leave a 1/8-1/4” stripe of ink on the form when properly adjusted - closer to 1/8” for polymer plates, closer to 1/4” for normal type and cuts.
The thickness of the stripe you will want to see depends upon the diameter of the roller.
Now, if your press is an old style, it may actually have rails that are below type high. Yes, C&P actually made presses with lower rails for a while - and also made trucks of different dimension for different kinds of printing jobs.
And, it looks as though your old roller may actually have trucks that are already larger in diameter than the roller itself - another reason that I suspect you may have low rails.
That may be why your old roller bounces less when it hits the type. The new roller is the “proper” diameter, with trucks to match, but your press was made about 100 years ago and may not be quite like the more common New Series presses the rollers & trucks were made for.
Lock up some type, drop your chase in the press and lay a straight-edge across the rails. See if your rails are type-high or not. It won’t make any difference to solving the problem, but it would be interesting to know if yours is one of those low-rail presses that show up now and again.
Then get out that electrical tape, roll your rollers up onto the ink table and start wrapping. Don’t waste your time measuring anything and don’t rely on some one else’s idea of how large the trucks are compared to the rollers.
Roll them across the form - and keep adding tape - until the rollers don’t bounce - that’s your starting point. Then get in close for some serious testing and adjustment.
Adlib Bob’s advice is good - for most cases, but your case could well be one of those odd ones.
I think you may have low rails on your Old Style press. Rich Polinski had low rails on his Old Style 8x12 and he went nuts taking everyone’s advice until he finally figured it out for himself.
What’s really important is how the rollers contact the form.
If you had Morgan Expansion Trucks, you’d tighten a nut to squeeze the sides together and expand the rubber tire to increase the trucks’ diameter.
If you don’t have the Morgan trucks, you can accomplish the same goal - and be 100% successful - using a roll of inexpensive vinyl electrical tape..
So. Tape the trucks, not the rails.
Try to remove any glaze form that old roller, take two aspirin and post the results in the morning…
;)
- Al
Wow… thanks so much for the advice - especially you Alan :) One day I will meet you and take you out for a beer… or two.
It’s funny - I was watching the short “how-to” videos on the boxcar site yesterday and was watching the gentleman tape up the rails and thought to myself, “why doesn’t he just tape the trucks.”
I can’t wait to go out and start testing. I’ll definitely check back in and report my findings - especially if I have those low rails.
There is a reason why one tapes the tracks, when they are low, rather than making ALL roller adjustment by the truck diameter. If there is significant difference between truck and roller, the rollers will not roll over the form, they will slip and cause roller slur. Without any printing experience, you may not notice it with a metal form, but with photopolymer plates it becomes a serious problem obvious to even a novice, and resulting in frequent posts on this list. Photopolymer demands light and accurate setting.
Note that the last instruction sheet I saw for Cowan Trucks states they should be adjusted to diameter of the roller, not 1/16” less as is so often repeated. The main reason to have lower roller settings is to ink a form of inconsistant height, such as used type.
I just thought I’d give a little update on my roller height problem. Taping the trucks worked beautifully :) The rollers are striking the form nicely and not hopping off the rails. I inked up the press and did some tests and it seems to be working great. I have a noticeably more crisp impression.
I haven’t got to the old roller yet with sandpaper - but I’ll give that a go soon.
Real printers tape the roller wheels (trunnions). Letterpressers tape the rails.
if real printers tape the wheels, what do you call people who use the morgan expandable trucks? Dick G.
That’s the thing I like about the Heidelberg windmills. The rails are adjustable. It does simplify the problem. Ron
Stan, you can believe anything you want, you can say anything you want, but can you actually explain your reasoning instead of making cheap jokes? I thought something similar for the first fifteen years of my working career. Then in ‘87 I started using photopolymer plates on a C&P and discovered that I had to rethink what I was doing (ever tried that?), because none of my teachers or training or experience had dealt with this very real change in printing. And many of the techniques that worked for me I later found mentioned in older texts that were concerned with quality printing rather than teaching high school vocational students.
I have already explained one reason adjusting only the trucks can lead to problems (a second reason is that the more tape you lay on the truck, the harder it is to keep concentricity). Can any of you explain the specific problems caused by taping the tracks, when they are below type-height? It is also the easiet way to compensate for uneven wear to the tracks.
Several other high-end platens have adjustable tracks, not just the Heidelberg, in the US and in Europe.
I think I have one of these C&P presses with lower rails. This press was made in 1905. The only reason I could think of why they would make them low is to be able to accomodate type from other countries that is lower than .918? They measure at about .888.
This makes for a .030 difference between the rail height and type high. I have a machinist friend who will make trucks for my rollers so that they are type high. This will put the trucks .030 (radius) larger then the rollers. This way it seems I can have as close to type high as I can get. Does anybody see a problem with this? Everyone says have the trucks the same size or slightly smaller then the rollers. If I do that I will have to tape the trucks. Will I be not giving myself any room for adjustment if I have them made to get to type high?
Thanks,
Connie
I locked up some type and and used a straight edge to see where my rails where in relation to my form. They were clearly lower by roughly an eight of an inch - maybe a bit more.
How would I know if this is just normal rails wear, or if I have one of these C&Ps that have low rails. My OS is from 1902 if that helps.
Also, I’ve ordered a round type-high roller gauge from boxcar which should help get those rollers perfect!
My solution to low rails on my Sigwalt was to epoxy a piece of thin angle aluminum to each rail. The thinnest I could find was still a bit too thick so I had to file it down a little to get type high rails.
Oversize roller trucks will result in the surface of the rollers traveling faster than the surface of the trucks, causing slurring of the ink across the type face. It’s to avoid this condition that the trucks should be only very slightly smaller than the rollers, or as someone pointed out, exactly the same size, though this means that any slight variation in type height or roller surface will result in un- or under-inked type.
Bob
Hi Bob,
So, if my rollers are 1.615 and if I have trucks that are the same size but my rails are .030 under and I build up my trucks to get type high don’t I in effect make my trucks oversized?
Or is this a reason why some put build up on the rails instead of the trucks?
Cheers,
Connie
Your rails may be too low, or may not. For ink transfer to occur, there needs to be an interference of the surface of the roller with the plane of the type surface. This is set by the height of the rails and may need adjustment via tape, (the UHMW variety of NA Graphics yields a very stable long term solution). C&P Craftsman, Kluge, and Heidelberg platens have adjustable rails. Generally, the roller “stripe” (caused by the interference) left on a roller gauge should not exceed 1/8” for conventional type surfaces, and probably should be a bit less for photopolymer (depending on your plates/circumstances)
The truck MUST be the SAME size as the roller or the suface speed of the roller will be faster or slower than the roller movement across a form and slurring (roller surface skidding or “spinning out”) of the image will occur. I have a 1911 10 x 15 OS and use MERTS for the trucks and have a jerry rigged tape up job on the rails (to be replaced with something much more robust shortly. I put on a new roller and was having slurring issues until I realized I had not reset my trucks for that roller.
So, in short, your trucks must match the roller diameter. I would also recommend having the trucks machined from Derlin, as that will reduce or eliminate wear on your rails.
Mike & Bob,
Fascinating (said in the truest Spock sense).
My husband and I discussed this at length one evening and he kept trying to get at what this interferance tolerance is and why you wouln’t want to have trucks that take up that extra space. I didn’t even think about the roller gauge and it’s purpose. Geez. I kept thinking in terms of thousandths of inches and making the rollers, rails and trucks all add up to type high as a starting point.
Interesting. I do feel better about the .030 now.
I have 2 more questions.
Where does one buy Delrin stock?
Could have the need to build up rails been designed in as a way of having some adjustment depending on the type height? Kind of like makeready just being part of the whole procedure?
Thanks so much, this has been extremely helpful.
Connie
Connie,
I don’t think having low rails is necessarily a design flaw. Imagine the kind of trouble you would get into if the rails were machined too high… you would need to do some serious grinding to get them down to type height, and taping the rails is a relatively painless and quick solution, all in all.
I believe NA Graphics also carries the Derlin trucks, btw.
Another think to keep in mind is that the tolerance of printing seems to vary with the type of relief surface you’re printing from. Lead type seems to be more tolerant of low rollers than photopolymer, for instance. But good roller height is good practice in general.
As for the mystery of “interference tolerance” it’s pretty simple. The rollers can take just as much ink off of the press in a pass as they put on if they’re wiping the plate, just as Mike mentioned. Pull out the roller gauge at the beginning of any job!
Also… if anyone knows how to adjust the rails on an N-series Kluge, I would love to hear how! I always see it mentioned that the Kluge has adjustable rails, but as far as I can tell, mine only adjust at the ink disc with a screw and not along the bed of the press…
The ideal situation is that the rails are exactly type high, the rollers and trucks are so close to the same diameter, with the trucks slightly smaller, so that the rollers just kiss the type enough to transfer the ink. But a little off one way or the other can be adjusted. .030 is about 1/32 of an inch, the equivalent of the trucks being 1/16 smaller in diameter than the rollers. If your trucks are exactly the same diameter as the rollers you should get a good inking transfer. In that case, adjust the truck diameter to match the rollers and run with it!
Bob
Vrooom,
I’m not thinking low rails would be a flaw but a designed in thing (for lack of a better word) to allow the pressman the ability to make adjustments based on the form height.
Back in the day I wonder if there was enough import of type from Europe that was lower than .918 that made it reasonable to design in lower rails? There was some mention a while back that maybe low rails are intentional. Not just wear. I’m just curious as to the possible reasoning behind intentionally low rails.
Bob,
Trucks the same diameter it is! 1.615.
This will be much more cost effective (we’re talking trade) than getting three new rollers to match my old trucks when I have a set of good rollers from another press that just need new trucks.
Cheers,
Connie
Before US type height was standardized at .918”, different foundries had differing heights, such as .916”, and these types were in use for decades after standardization. Presses from early 1900s would have been built with that in mind. But any press of that age will also have had many decades of wear from metal truck against metal track, so whatever the original design was, the present state is certainly lower; that is not speculation or opinion. The 1916 C&P I used to own had tracks 4 points, or .056”, below .918”. Not every press I measured is that low, but all have been at least 2 points below. With metal type, especially with black ink, thaat is not so much a problem, and for years I also just adjusted the trucks, as my father did. Use photopolymer plates and transparent PMS inks, and problems are unavoidable with that theory of adjustment.
How much contact is needed between roller and form is a variable which depends on levelness of form and softness of roller. (Bear in mind also that nearly every printing instruction book was written when composition rollers, which changed diameter with the weather, and metal type were standard, and today harder rubber rollers are the norm, with plates replacing metal type for most.) A mixed-height metal form needs more contact in order to ink the low areas, while a perfectly level form can use less contact, assuming concentric rollers and trucks. The ink lies on the surface of the roller and a level form doesn’t really need to indent the roller to contact for ink transfer. You can actually see if ink is transferring from roller to form by advancing the press by hand and “reading” the image left on the surface of the roller as it passes over the form. Don’t just go by the stripe on a roller gauge, important though that is for consistancy. An observant printer may also read roller slippage (note well, any slippage between truck and track must be eliminated first) in the image left on the roller: place a 1” circle in the chase, and if the roller is smaller than the truck, the image will be shorter on the roller than the form; a roller larger than the truck will have an image longer than the form, if I remember this correctly. The closer truck and roller are in diameter, the less slippage there will be. In my opinion, once you get that right, all other adjustment should be done through adjusting track height to form height (and where form is low, it will need to be raised; always know your actual form height).
With so many variables, it sure is easier to just adjust the trucks, and certainly easiest to explain it that way.
Another update: I received my roller gauge in the mail yesterday and put some ink on the plate to start taking some measurements. Without any tape on the rails or trucks, one of my new rollers was pulling a ink strip on the gauge of around 15/32 of an inch! Apparently my rails are very low :) (I’m shooting for the 3/32 of an inch)
So, I started to build up my trucks with about 5 layers of vinyl tape which brought my strip down to 9/32.
Should I just keep building up the trucks? I feel like the trucks, after 10 layers of tape with be much larger than the rollers themselves. (Based on parallel_imps’s response above, I’m guessing this could create a problem.)
What do you think Alan? Should I just go for it, or should I start adding some tape to the rails as well and meet the truck half way?
If the truck diameter matched to roller diameter to start, I would focus on building up the rails until the roller stripes is where you want it. It would seem that you have a lot of build up to do. If you get lucky, you might find some plastic pallet banding to give you a large jump in raising, without putting on endless rolls of tape (which will come off). If you tape the trucks beyond the roller diameter, I suspect you’ll have slurring issues, especially on small or thin type.
Adjusting the rail height has to be done carefully. Throwing on many layers of masking tape (or worse, duct tape) won’t give a good result, with compression and puckering, and it may well just fall off. What is needed is stable dense even layers, well adhered. The nylon tape sold by NA Graphics works well (two different thicknesses), but all kinds of materials have been used by resourceful printers, from linoleum to steel straps. And you want something that your trucks will not slip on.
On my current platen I don’t need too much adjustment (it has adjustable tracks, but the mechanism is faulty), so I alternate layers of .005” flat white drafting tape and .0025” frosted tape. Using different tapes makes it easier to go back a layer or two for fine adjustment. I print from many different kinds of form (Lino, Ludlow, handset, blocks and photopolymer plate, mixed) and no one setting fits all the subtle variations in height.
There should be no subtle variations in height!
Type, blocks, lino prints, Ludlow, polymer etc should all be 0.918 inches in height, 23.32mm if you don’t work in imperial units. Remember these dimensions!! This is ‘TYPE HEIGHT’, THE MOST IMPORTANT DIMENSION IN LETTERPRESS PRINTING. (It varies around the world, being 0.928 inches in Russia and France) Strenuous efforts are/were made to get everything to Type Height - then the rollers roll the forme evenly.
As for running rollers of different diameter - don’t. I realise that many people who love and indulge in letterpress are hobby and part-time printers working to a budget, but if you buy one inking roller for your press then buy a set, even if you have to buy three. All the rollers will then give identical inking and they will all wear out at the same rate.
Rollers and roller trucks need to be exactly the same diameter to give perfect rolling. If the roller is bigger than the truck it will skid and if smaller will drag over the forme, affecting the application of the ink. In the picture at the top of this discussion look at the smaller of the two rollers.
If it’s trucks have a circumference of say 6 inches, then for each revolution they will roll 6 inches - but the undersized roller may only roll 5 3/4 inches and be gradually dragged the extra quarter of an inch, i.e. drag. A roller that is bigger would try and roll further than it’s truck. Both will affect inking quality (known as rolling). Therefore trucks and rollers need to be the same size.
Well, yes, .918” is the ideal, but there have always been different theories about makeready. At the upper end, prepress systems from Claybourn, Hacker, and Vandercook used much expensive equipment to insure a .918” form went to press, saving press makeready time. But that was mainly meant for long run work, large cylinder and rotary work, publications on coated stock, generally from plates and stereotypes, not the humble platen jobber. No relation to most work today in the twilight of letterpress, where everything is wearing out and irreplaceable.
But even then there was the more common attitude at street level, expressed in many books on makeready: .918 is the goal, but certain elements need to be adjusted to print correctly. Such as solids raised higher, fine elements lowered. Some things such as leaders and column rule were intentionally cast low so they wouldn’t punch, and vignette halftones had edges taper off, along with their overlay. And in book work, the ink and pressure right for a page of 12-pt type may make the 8-pt footnotes look dark. One could adjust that in the overlay with less pressure for the footnotes, but one could also lower the footnote slugs slightly for a similar effect.
Then come to the addition of photopolymer. Most of us who use it realize that it requires a lighter roller setting than a metal form. But how to switch or mix forms without having to reset the rollers? Simply, run the photopolymer .001” or .002” low.
But as I said, everything today is wearing out. I’m no Linotype or Ludlow machinist, though my output isn’t much worse than most I have seen. As a pressman I can compensate for variations very easily on the platen, though on the cylinders I do take extra care with form preparation. On the platen, rather than running the photopolymer low, I can add .002” tape on the track in line with it to adjust the roller contact. Once you understand the relationship between roller to truck and track to form, you have greater flexibility on the platen. I’ve even run .928” Japanese type mixed with .918” US type, using underlays and tape on tracks. I didn’t have to send it back to the composing room to get that .918” ideal form.
Now, in my one man shop, I can get away with this and get good results, since I understand the variables. If someone walked in to set up the press after I’d made up a form, they’d probably be lost.
But back to my original point: making all your roller adjustment through truck diameter is a huge mistake when tracks are low, as they likely are. Adjust trucks to roller diameter, adjust tracks to form. If all your forms are the same, so much the better.
Update: Took a few hours last night to try and get my rollers to a perfect 3/32 on both my new rollers - It didn’t go so well.
I ended up needing so many layers of tape between the trucks and rails it seem ridiculous. The tape started to curl off the top and bottom of the rails as I ran the press. I’m using black vinyl electrical tape - I’m guessing I should be using a better, more permanent material.
After I got the amount of tape I needed I took some measurements with the roller gauge. The measurements were all very different between the rollers being near the top of the bed, near the bottom, in the centers of the rollers, and near the edges. Some measurements were not even showing on the gauge, while others were a bit to thick etc. All over the map.
Is this just the nature of the beast? Will I have to invest in some thinner tape and actually build up specific areas of the rails to get this correct? My trucks and rollers are both new and identical in diameter.
I suggest using a depth micrometer to check the tracks and your adjustments to them; or compare them to a type high gauge, or directly to the roller gauge, and use feeler gauges to determine the difference in height. Guessing about such things can be a waste of time and effort when you have to redo the adjustment to get it right, and may have spoiled work in the meantime.
Layer upon layer of tape is a problem, and some of the unevenness could well be there. But tracks can be worn and rippled, and while thin patches can be used to level them, a more permanent correction would be to take a carborundum stone, build a jig that will hold it square and at a specific height, and take down the high areas to a height level at all points.
Thanks for the suggestions parallel_imp, I think I will eventually have to go for a more permanent solution.
Last night I went ahead a just took off all my tape off the rails and re-taped my trucks. I was able to get my rollers at a good, fairly consistent height with about seven layers of vinyl tape.
Even though the diameter of the trucks are are a good deal larger than the rollers, my tests prints seemed to turn out really well.
Looks like this will probably have to be my solution for awhile until I can better address the wear on my rails.
Another point about taping the trucks—make sure there is no extra overlap from where the tape starts to where it ends. Any overlap and you will have an extra layer, a hump on the truck, resulting in an irregular movement, or wobble. That would show up as diffent stripes on the gauge in different places. Also make sure you don’t stretch the tape as you apply it, to keep a consistant thickness.
Hello everyone,
I’m pulling very decent inking again, but I know my solution is only temporary since I built the rails with a lot, I mean a LOT of tape. I want to shim them up with brass or steel and glue it on with loctite or something like epoxy to make it more permanent, and close to a .918, so that I can just make a slight adjustment with the bolts, or a piece or two of tape and make it a more durable and clean solution.
For me this will probably translate into getting new rollers and trucks made to the right size.
I want to ask, what would be the right diameter assuming I have near perfect rails?
I’m using photopolymer most of the time so I know they should be truck and roller with same diameter. I will also look into getting trucks made in a more precise material like aluminum like Mick suggested.
My runs are not that long so I don’t think wear will take place very soon.
I just want to be able to ink very finely to make the best impression possible.
I appreciate your responses :)
I’ve scanned a 1935-36 data sheet for the C&P New Style presses from one of my catalogs. Although only somewhat familiar with the differences in the appearances between old and new styles, I do not know if there were differences in their originally issued rollers and trucks, which are listed on this sheet. A couple weeks ago I sent an email to Briar Press asking if they would like a .pdf copy for the manual section of the site but have not heard back. I would have needed a link to their direct email (I think). I’m concerned that if I resize the scanned file I will lose the detail. If someone would like to email me off-list I would be glad to send them a copy and they could see to it that it got posted where it would be of use to others. I’ve searched archives to see if it already exists but did not find.
Scanned file posted here:
http://www.briarpress.org/14559#comment-47588
(Credit: Butch B. )
Thanks Butch, I downloaded the document from AnonyMouse’s link.
So if I understand the specs table correctly and according to modern photopolymer practice, both truck and roller should be the same size, and that would be 1 ¾” diameter.
Yes?
Thanks! :)
There appears to be no mention of the fact that in the long gone years ,or if you like ,the hey day of these machines the bed bearers (rails ) of many of these machines particularly the pearls , had a leather strap that was held on pins that stuck out of the back upper and lower portion of the bed bearers . This strap had to be soaked in order to stretch it over the pins ,it would then when dried out shrink to hold it tight . this would protect the iron bed bearers and bring these extraordinarily low ones to near type high . some machines had no pins to hold the strap in place but utilised a wire length with a hook either end and this held the strap once it had shrunk , I have seen both methods used and the use of leather virtually eliminates slipping regardless of the material the rollers have by way of roller bearers (trucks). Having said that ,they performed the task adequately in the days of type however as is often said here ,photopolymer plates are in need of fine tuning the machine beyond that which it was originally intended to do ..
good point Pete, my Jardine has the leather straps.